Showing posts with label Free Patterns; Knitwear Designer. Show all posts

Sunday, 16 April 2023

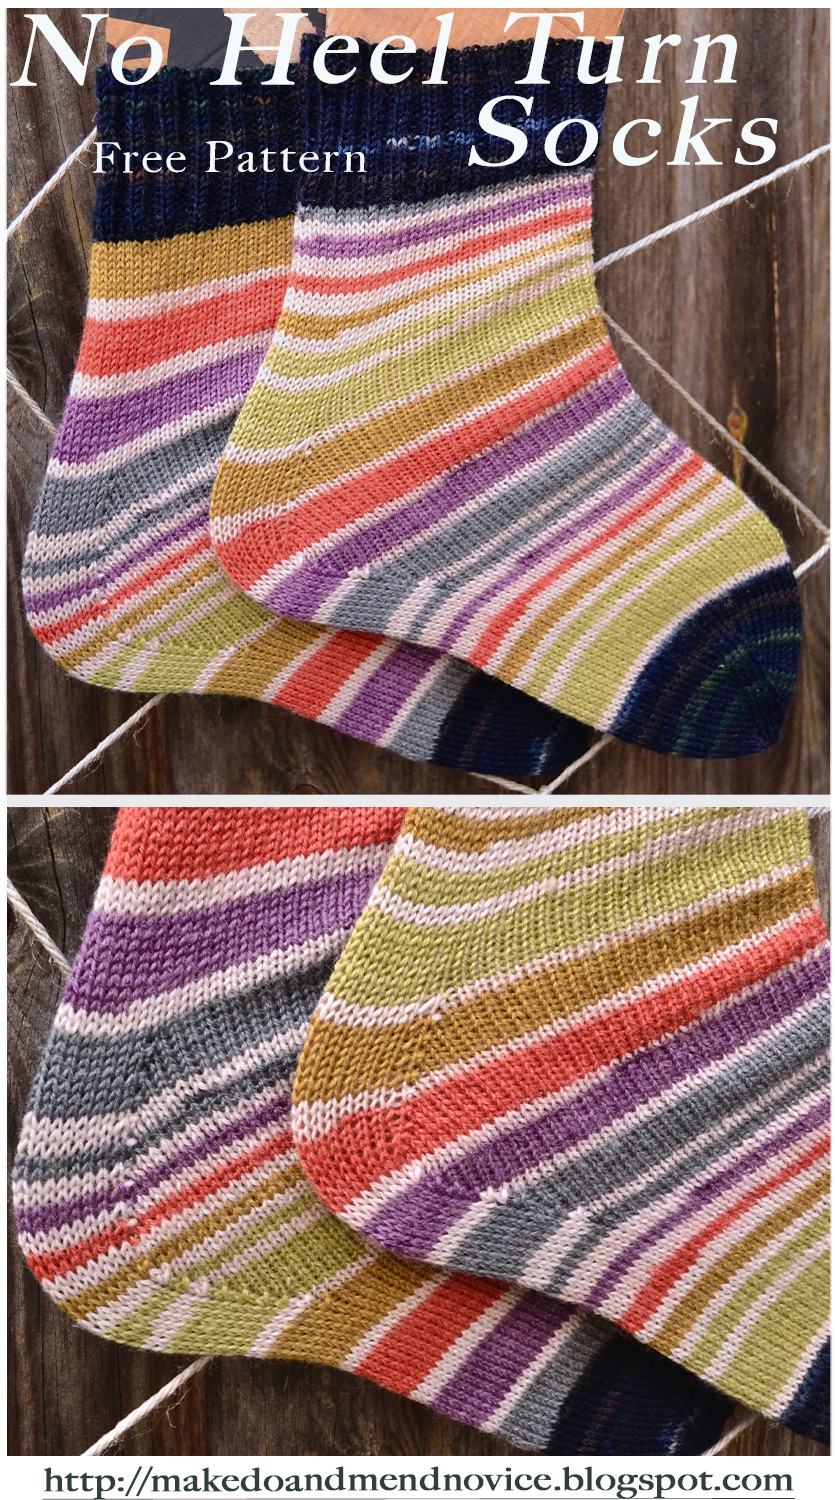
No Heel Turn Sock Knitting Pattern

Heel less socks knitting pattern basic sock knitting pattern free no heel turn socks


If you are looking for a sock knitting pattern that allows you to create seamless, uninterrupted stripes when using self-striping sock yarn, you have come to the right place. 

Meet the No-Heel-Turn-Sock.

Please excuse the makeshift cardboard sock blockers in the images. (I still haven't invested in a pair of blockers...) 

No Heel Turn sock knitting pattern - sock knitting pattern without turning heel

Yes, you heard that right, this sock knitting pattern does not require to work a heel-flap and there is no need to pick up stitches - probably one of the most off-putting aspects for beginner knitters wishing to venture into sock knitting. 

The heel in this pattern is created simply by working increases, followed by an equal number of decreases. 

This sounds incredibly simple and it is, believe me. 

So, if you are able to knit on double-pointed needles in the round, you are confident to work k2tog and ssk decreases, and you have toyed with the idea of getting into sock knitting, this pattern will be a beginner-friendly entry into the wonderful world of top-down vanilla socks. 

Sunday, 21 June 2020

Monster High: Knee Highs

Free Monster High Knee High Stocking Knitting Pattern


After a pair of Monster High doll leggings and tights, it was high time to knit a pair of knee high stockings for the Monsters Highs.

Monster High Doll Knee High Stocking Knitting Pattern


The knee high stockings are knitted seamlessly from the top-down and finished off at the toes with kitchener stitch.

Monster High Doll Knee High Stocking Knitting Pattern
Monster High Doll - Knee High Stocking Knitting Pattern

Saturday, 14 December 2019

Free Pattern: Knitted Leggings for Monster High Dolls

Free Monster High Leggings Pattern 

The Monsters were in need of some new clothes, and I decided it was time to make a few knitted leggings / pants.

This pattern is for  Monster High dolls, measuring approximately 26cm in height. Knitted seamlessly from the waist down, it gives you the chance to check whilst knitting to ensure a snug fit; and the length of the leggings can obviously be adjusted as you go. 


Monster High Doll Free Knit Leggings Pattern


Knitted on 2.5mm to 3mm needles, the pattern is suitable for all types of sock yarn. For the leggings below, I used Madelinetosh Tosh Merino Light (Victorian Gothic) and Araucania Botany Lace. 

Monster High Doll Free Knit Leggings Pattern

As you can see in the images, two of the Monsters are wearing a light green, fluffy jumper and OOAK wigs made from brushed acrylic yarn. The pattern for the jumper is available here, and instructions on how I make my doll yarn wigs can be found here and here. All of my other Monster High projects are available via this link.

Monster High Doll Free Knit Leggings Pattern


Without further ado, here is my knitting pattern for the knitted leggings: 


Monster High Doll Leggings

Pattern Notes


Materials and Tools

  • app 5 - 10g of: 4 ply Sock Yarn 
  • 2 - 3mm Double-Pointed Needles 
  • 4 Stitch Markers
  • Scissors
  • Safety Pin x2 or Scrap Yarn (in contrasting colour)
  • Darning Needle, Sewing Needle or Crochet Hook (for sewing in ends)


Friday, 15 December 2017

Knitting for Dollcena Takara Tomy Dolls


After knitting a pencil dress with sock yarn for this Takara Dollcena doll, I decided to make another in black (also with sock yarn). Project instructions will follow. Soon. I hope.

Here's the prototype.

Pencil Dress for Takara Tomy Dollcena Doll, hand-knit with Araucania Botany Lace 


And here's a preview of the little black pencil dress: 

Dollcena Takara Tomy doll in hand-knit pencil dress

Dollcena Takara Tomy doll in hand-knit pencil dress

Dollcena Takara Tomy Doll in Handknit Pencil Dress (Sock Yarn) - Beaded I-cord Halter 

Dollcena Takara Tomy Doll in Handknit Pencil Dress (Sock Yarn) - Beaded I-cord Halter


Saturday, 22 August 2015

Cast-on loosely and don't knit tight - knitting lace with fingering weight mohair yarn

Wisp: Pattern by Cheryl Niamath (published in Knitty, Summer 2007), Yarn: Patons UK Misty


The Wisp Shawl pattern by Cheryl Niamath has somewhat turned into a classic lace knitting pattern and due to its simplicity it tends to attract many beginner lace knitters, who may never have used cobweb or fingering weight yarn in any of their projects before.

Though not my first lace project, I, too, opted for the pattern as I wanted to gain experience knitting lace with fingering weight yarn, whilst completing a relatively simple pattern. Niamath's Wisp fulfils these requirements and due to its straightforward stitch sequence, it allows you to concentrate on your manual ability and, above all, to get a feel for working with extremely fine yarn. 


Saturday, 27 June 2015

The Picot Bind-Off: It's a love-hate relationship

I'm in the process of finishing the Picot Pi and (as the name suggests) I'm binding off picot-style. At over one thousand stitches, this is a lengthy and repetitive process. But, the end result will be worth the wait.

Picot literally means 'small loop' and describes the bobbles at the cast-off edge, which are produced by adding more stitches immediately before binding off. Incorporating the picot bind-off will result in a very flexible, wider garment at the outer edge of the piece. In other words, it adds drape.

Picot Bind-Off Detail for Ammonite 

Thursday, 11 September 2014

Free Pattern: The Nameless Choker

Nameless


The Nameless Choker is a simple and quick lace project, specifically designed to use up a small quantity of sock yarn (approximately 10 - 20 grams), i.e. roughly the amount of yarn you might have lying around following the completion of a larger project. The quantity of yarn I used for my choker hardly registered on my set of kitchen scales and the above estimate is rather conservative.

It is also an ideal pattern for beginner lace knitters, wishing to get to grips with two of the most common knitting decreases (k2tog and ssk), without having to commit too much time or too many resources; or for all those knitters who enjoy creating knitted accessories and jewellery, either for themselves or for others.


Materials

You will require the following materials:

  • approximately 10 - 20 grams of sock yarn (for my choker I used Madelinetosh Tosh Merino Light Sock Yarn in Victorian Gothic)
  • 3mm knitting needles (or the size specified by the yarn manufacturer)
  • scissors
  • darning needle 
  • 2 buttons 

Nameless Choker in Progress

Gauge

Gauge is not essential for this project but you should have a rough idea of how stretchy your chosen yarn is. This is a made-to-measure project, and as neck circumferences differ, you will have to regularly check whether your choker has reached the desired length. If you decide to knit this project with an unfamiliar yarn and you are not entirely sure how far it will stretch after blocking, it may be beneficial to knit a small gauge swatch and block this in order to get an idea of how the yarn will behave and, most importantly, to check its stretch.


Nameless Choker in Progress


Project Instructions

  • Set - up:

    • Cast on 12 stitches, using whichever cast-on method you are most comfortable with.
    • Knit 4 rows

Once you have completed the set - up, you are ready to start on the lace sequence of the pattern:

  • Lace Pattern:

Row 1: K3, YO, K1, K2tog, SSK, K1, YO, K3
Row 2: K2, P8, K2
Row 3: Repeat Row 1
Row 4: Repeat Row 2

Keep repeating the above sequence until both ends of the choker almost meet, when it is fitted for measuring. Bearing in mind that the choker should fit relatively tightly around the neck, I left a gap approximately as wide as the top of my index finger to allow for a snug fit following blocking. 

When your choker has reached the desired length, stop knitting the lace sequence on a purl row. Next, continue knitting three rows in garter stitch and proceed to bind off.

Nameless in Madelinetosh Tosh Merino Light (Victorian Gothic)
  • Blocking:

Blocking your choker is an absolute must in order to open up the lace. I opted for wet-blocking.

  • Finishing:
Following blocking, it is time to sew in ends and to add two buttons for fastening the choker. The buttons can be attached to either end of the choker. I decided to place mine on the cast - off edge, as this usually turns out slightly wider, directly underneath the openings of the yarn over increases. The  first holes created by the yarn over increases on the opposite end will serve as button holes.

Your choker is ready to be worn. 

Nameless in Madelinetosh Tosh Merino Light (Victorian Gothic) 

Enjoy!

! Update: One year on, I am revisiting the Nameless Choker. I am currently in the process of adapting the pattern to non-traditional knitting materials (cotton thread / leather etc). More on this venture is available here. !

! Update: I have designed another lace choker pattern (image below), the Brocade Choker. My pattern is available here. !

Brocade Choker Knitting Pattern


For pattern support, please feel free to contact me via Ravelry (ClariceAsquith), Twitter (@Slipstitched), leave a comment below or by e-mail: clarice.asquith@googlemail.com.

This pattern is for personal use only and may not be reproduced for commercial purposes without permission.

An update on knitting a variation of this pattern (pictured below) with non-traditional materials is available here


Nameless Cuff, More here.


Nameless Cuff, More here.

© 2014 Clarice Asquith. All rights reserved. http://makedoandmendnovice.blogspot.com

Wednesday, 9 November 2011

Another Project: The Knitted Cat Tunnel

When visiting a friend, I observed her cats diving in and out of a polyester / nylon cat tunnel. Our cats can also be found playing in enclosed spaces, especially underneath duvets and  blankets. When I saw how much her cats enjoyed playing in the tunnel, I contemplated purchasing one for ours, but on second thoughts I found  the material of the so-called cat caves, which are either made from nylon or polyester, somewhat off - putting. Given the choice, I knew that Pickle et al. would prefer hiding and resting in a cozy, knitted object. After all, they choose to fall asleep on my knitting projects. And so the idea for a knitted cat tunnel was born.

Cat Tunnel in Sirdar Big Softie

The following is not so much a knitting pattern, rather a description of my project in stages. It is suitable for the beginner knitter, as it only requires knowledge of a few knitting basics:
  • You will need to be able to cast on and off.
  • You should feel reasonably comfortable knitting on circular needles.
  • You need to be familar with the knit stitch.


Cat Tunnel in progress.


I used the following materials:

  • Bulky yarn of your choice. For my project I used approximately 10 skeins of Sirdar Big Softie. This included the yarn needed to sew in the plastic tubing at either end of the tunnel. As this project is a great exercise in stash busting, you could use yarn leftovers, provided they are of similar thickness.


    Knitted Cat Tunnel in Sirdar Big Softie

  • 10mm circular knitting needles (US size 15).

  • 10mm crochet hook (US size N/15) for finishing, sewing in yarn ends and incorporating the plastic tubing. (This can also be done with a large darning needle.)

  • Plastic tubing approximately as thick as a standard garden hose (see picture below), available at hardware stores. The length of the tubing is dependent on the circumference at the openings of the tunnel, and I would recommend buying the tubing, once you have completed knitting the tunnel and taken actual measurements of the openings.

  • Tape measure, scissors and a Stanley knife (for cutting the plastic tubing).

  • Two wooden plugs or sturdy parcel tape to join the plastic tubing

  • At least one playful feline, who will appreciate your crafting efforts.


    Pebble checking on progress


Instructions for a giant slouchy cat tunnel (40cm wide and 70cm long):

Begin by casting on 90 stitches using whichever method you prefer. (I used the cable cast on.) If you want a wider tunnel, cast on more stitches. If you want a smaller tunnel, reduce the amount of cast on stitches accordingly.

Place marker to mark the beginning of the round and join. 

Knit mindlessly until the tunnel has the desired length. My tunnel is approximately 70cm long and 40cm wide.

Proceed to bind off all stitches and weave in ends.

After you have finished knitting, you may wish to block the piece in order to stretch and straighten the material. I skipped this part.

Measure the circumference of the tunnel openings at either end to determine the required length of the plastic tubing. The plastic tubing I have chosen has the thickness of a domestic garden hose. 

Once you have cut the tubing to size with a Stanley knife, the ends of the tube have to be joined to form a circle. This can be achieved by glueing the ends together with sturdy parcel tape. Alternatively, you can join the ends with the help of a wooden plug, which will ensure a snug fit. (See picture below.) Before fitting the plug, briefly insert the tubes into hot water. This will cause the plastic to expand and the plug can be inserted easily. When the plastic has cooled down, the plug should fit tightly.


When the ends of the tube have been joined, proceed to sew the tube circles into the edges of the knitted tube, using the rolled up edges of the fabric as a guide.  


Having followed these steps, your cat tunnel is ready to be enjoyed destroyed (for your cats' safety obviously only under the supervision of a responsible human).


And here are a few impressions of how the tunnel was received by Pickle, Mietze and Pebble: 


Mietze enjoyed it as a seating facility until she was disturbed by Pebble.