Showing posts with label Knitting Techniques. Show all posts

Sunday, 16 April 2023

No Heel Turn Sock Knitting Pattern

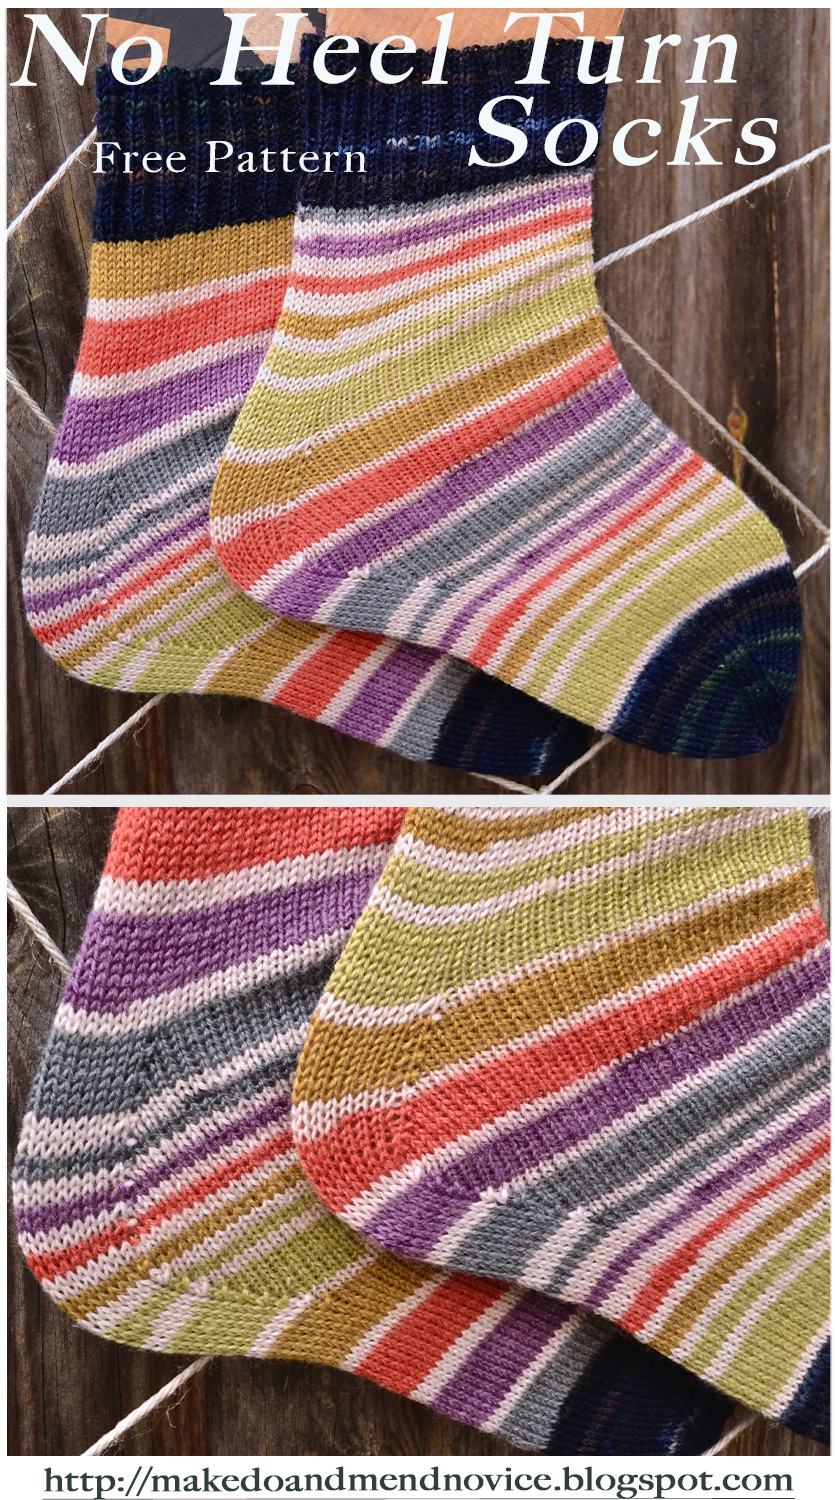
Heel less socks knitting pattern basic sock knitting pattern free no heel turn socks


If you are looking for a sock knitting pattern that allows you to create seamless, uninterrupted stripes when using self-striping sock yarn, you have come to the right place. 

Meet the No-Heel-Turn-Sock.

Please excuse the makeshift cardboard sock blockers in the images. (I still haven't invested in a pair of blockers...) 

No Heel Turn sock knitting pattern - sock knitting pattern without turning heel

Yes, you heard that right, this sock knitting pattern does not require to work a heel-flap and there is no need to pick up stitches - probably one of the most off-putting aspects for beginner knitters wishing to venture into sock knitting. 

The heel in this pattern is created simply by working increases, followed by an equal number of decreases. 

This sounds incredibly simple and it is, believe me. 

So, if you are able to knit on double-pointed needles in the round, you are confident to work k2tog and ssk decreases, and you have toyed with the idea of getting into sock knitting, this pattern will be a beginner-friendly entry into the wonderful world of top-down vanilla socks. 

Sunday, 21 November 2021

Sock Knitting for Beginners - 5 Tips for Perfect, Top-Down Vanilla Socks


Taking stock of my knitting projects this year, it appears that I have been knitting rather a lot of socks over the past 11 months - 5 pairs in total so far, to be precise. Following my very first sock knitting project back in 2015, I turned my attention to other types of knitting projects and focussed mainly on lace knitting, but this year I fancied a change and focussing on sock knitting and sock knitting techniques felt just right. 

5 Tips for Perfect, Top-Down hand knitted Vanilla Socks
Finished Socks on DIY Sock Blockers


Based on my recent excursion into the world of sock knitting, what follows are a few recommendations for novice sock knitters, including five tips to achieve perfectly fitting, vanilla top-down socks. 

Tuesday, 6 April 2021

How to block a knitted I-Cord or ...a new way to block an I-Cord


I am currently working on a new choker pattern, which will be up on the blog very soon. The new choker design (no name yet, and I am having a hard time finding one...) is a quick and simple lace project, which incorporates a cable stitch motif with some simple lace.

Sunday, 14 March 2021

A Sock Knitting Weekend - Stylecraft Head over Heels Sock Yarn Review


It's been a sock knitting kind of weekend...

Stylecraft - Head over Heels Sock Yarn Review (Shade: Olympus)
Stylecraft - Head over Heels Sock Yarn (Shade: Olympus) 

I haven't knit socks in ages, but a return to sock knitting has been on the cards for some time. Having picked up two skeins of Stylecraft Head over Heels sock yarn on a whim some time late last year, I finally got round to starting on my socks this weekend. 

I am pleased to say, the first sock is now finished (I always knit them individually) and presently blocking on a makeshift cardboard sock blocker. Looking at my homemade sock shaper, I think it's fair to admit that the instep section will have to go on a diet.

Stylecraft - Head over Heels Sock Yarn (Shade: Olympus)
Sock Blocking in progress (on homemade cardboard sock shaper)

Today, I am planning to cast-on for sock number 2.

I am not following a pattern or attempting to produce anything fancy with this project. Instead, I wanted to get back into sock knitting by starting off with a simple, ankle-length, top-down stockinette stitch sock with a ribbed cuff. 

This project is predominantly an exercise in (re-)familiarising myself with basic sock anatomy, revisiting sock construction techniques (turning the heel / picking up stitches / working toe decreases) and the calculation of measurements to achieve a good, personal fit. 

Stylecraft - Head over Heels Sock Yarn


All in all, a fun, simple and quick knit, which, most importantly, allows me to knit a portable project on small needles. I have just finished a condo knitting, openwork project with mohair yarn, the Winter's End Scarf, on size 2mm and size 8mm straight needles, using Yeoman's Elsa mohair fingering weight yarn, which comes on a cone, and was thus confined to my work desk to accommodate the cone and the growing mohair scarf for the duration of this project. The current sock project certainly feels like a relief in this respect. I can even knit this project standing up.

Now, after completing sock number one with my first skein of Stylecraft Head over Heels, I wanted to share my experience of knitting with this sock yarn, especially after reading some of the reviews of the yarn on the web and on Ravelry. 

Stylecraft - Head over Heels Sock Yarn Review


Stylecraft Head over Heels Sock Yarn Review

Sunday, 21 February 2021

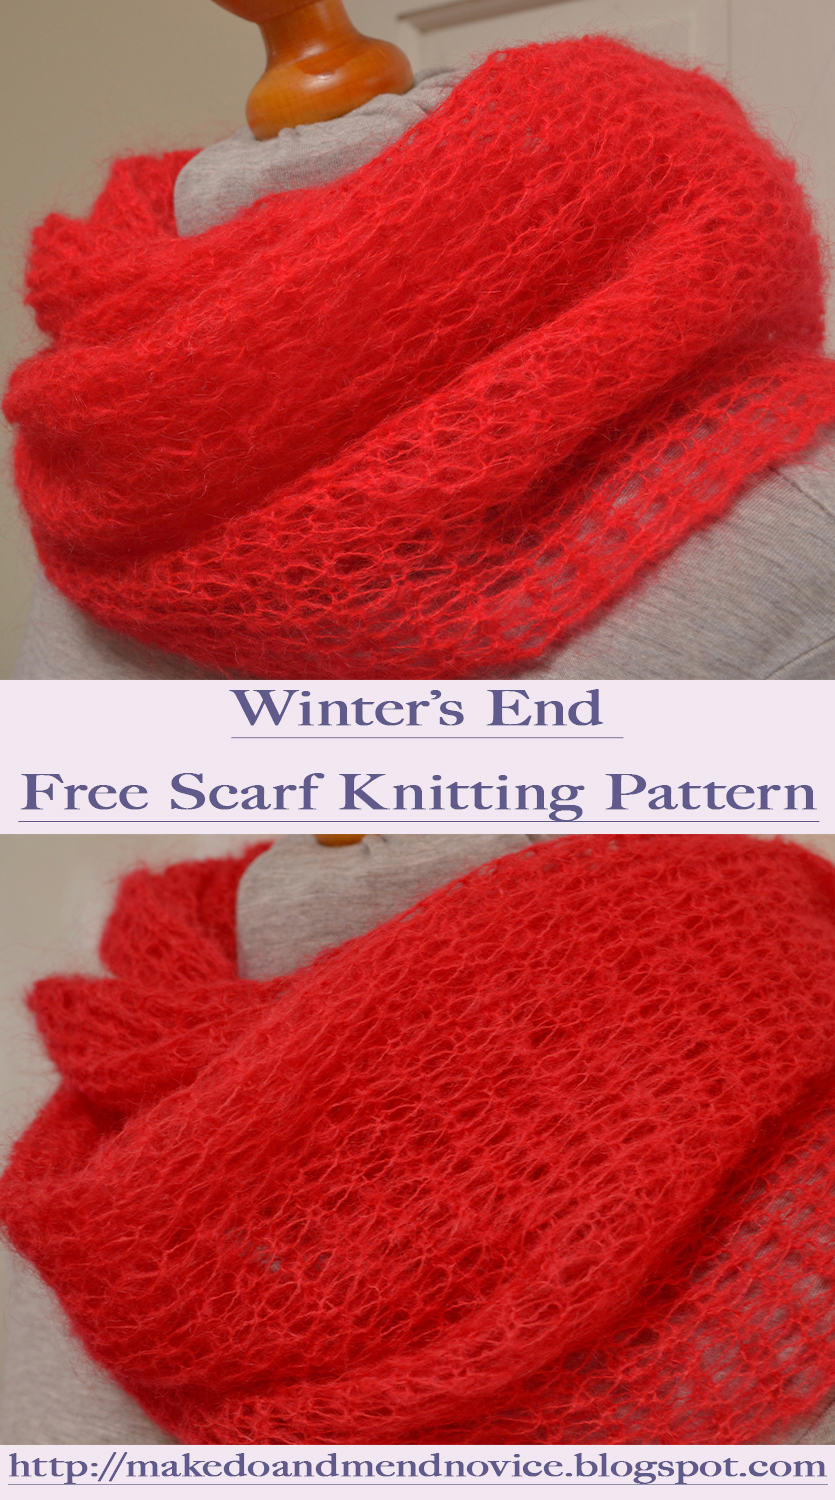
Free Mohair Scarf Knitting Pattern: The Winter's End Scarf

This weekend I completed the final rows of my Winter's End scarf and proceeded to block the scarf right after it came off the needles. The Winter's End scarf is knitted with fine 3 ply lightweight mohair yarn. As the pattern is straightforward and simple, this was my in-between, go-to project for the past four months. 

Free Mohair Scarf Knitting Pattern


Simple Mohair Knitting Pattern with a Technical Twist

The stitch pattern for the scarf is a simple 1x1 rib and to keep things interesting and achieve a unique look, this mohair scarf pattern incorporates a technical twist. In order to achieve the long chain of stitches and airy texture of the scarf, the project is knitted on needles of two different sizes, radically different sizes to be precise: 2mm and 8mm. 


Free Mohair Scarf Knitting Pattern
Free Mohair Scarf Knitting Pattern 

For this reason, and even though the project is perfectly suitable for beginner knitters, the challenge lies not so much in the stitch pattern, but in its execution; i.e. staying in charge of the fuzzy yarn, whilst working the pattern on odd needles and showing them who is boss.


Free Mohair Scarf Knitting Pattern
Free Mohair Scarf Knitting Pattern 


I enjoy working with superfine mohair and really appreciate the unique qualities of this type of yarn, but I am well aware that the fuzziness of the material can be a source of frustration. From my experience with mohair knits, the golden rule for working with this type of yarn is to cast on loosely and to ensure you do not knit tightly. (More information on this, is available here.) This advice holds true for all mohair knits, but is even more important when knitting with mohair on odd needles.  

For the Winter's End Scarf I used Yeoman's 3 ply Elsa ( 30% mohair 40% acrylic 30% nylon), which is a budget option when it comes to Mohair yarn. The pattern is equally suitable for similar yarns or more upmarket choices with a higher mohair component (such as Drops Kid Silk) or, if you are preferring the luxury option, those with an added silk component, i.e. Rowan Kid Silk Haze or Debbie Bliss Angel. 


Free Mohair Scarf Knitting Pattern
Free Mohair Scarf Knitting Pattern 


Gauge is not important for this project and my scarf is designed to be 35 cm wide and 135 cm long, thus producing a generous, versatile piece that can be worn in a variety of ways, either wrapped around the neck several times to keep chills away, as an accessory draped loosely around the shoulders to show off the knitting or as a protective layer for the head, shielding you from the elements, whilst simultaneously covering your entire head without destroying the hairstyle underneath. 

For a narrower scarf, simply cast on fewer stitches, ensuring you cast-on an odd number of stitches. The length of the scarf can be adapted by measuring the scarf as you knit.


Free Mohair Scarf Knitting Pattern
Free Mohair Scarf Knitting Pattern 


Sunday, 31 January 2021

The Simple Ruffled Edge - Without M1L / M1R Increases

The Simple Knitted Ruffled Edge (worked at the end of the knitting)  

When I was knitting my Virga Shawl, I wanted to incorporate a ruffled edge detail, but didn't feel like working m1l / m1r increases, considering the overall stitch count at this stage of the project (over 500 stitches). And so the search began for a simpler way of working the ruffled edging without m1l / m1r increases. 

Knitted Ruffled Edging
Knitted Ruffled Edging  - Virga Shawl Detail    


The Simple Ruffled Edge - With M1L / M1R Increases

The most common, simple ruffled edging is achieved by working m1l (make one left) and m1r (make one right) increases into the knitting. In the instructions below for a ruffled edge worked at the end of the knitting on a multiple of 6 plus 5 stitches, the m1l / m1r increases are placed just before and after the knit stitches on the right side rows. This results in an increase of purl stitches on the following row (wrong side row), whilst the amount of knit stitches on the wrong side rows remains constant throughout. In turn, as the stockinette part of the fabric grows, this creates the ruffle on the right side of the knitting.

The stitch pattern for a ruffled edging with M1L / M1R increases is as follows: 

Row 1 (RS): P5, *k1, p5, rep from * end.

Row 2 (WS): K5, *p1, k5, rep from * end.

Row 3 (RS): P5, *M1R, k1, M1L, p5, rep from * end.

Row 4 (WS): K5, *p3, k5, rep from * end.

Row 5 (RS): P5, *M1R, k3, M1L, p5, rep from * end.

Row 6 (WS): K5, *p5, k5, rep from * end.

The m1l and m1r increases between the sections of purl and knit stitches are continued as shown above until the ruffled edging has reached the desired length. 

Whilst the above technique produces a neat looking ruffled edge, it is time consuming as a result of the m1l / m1r increases. 


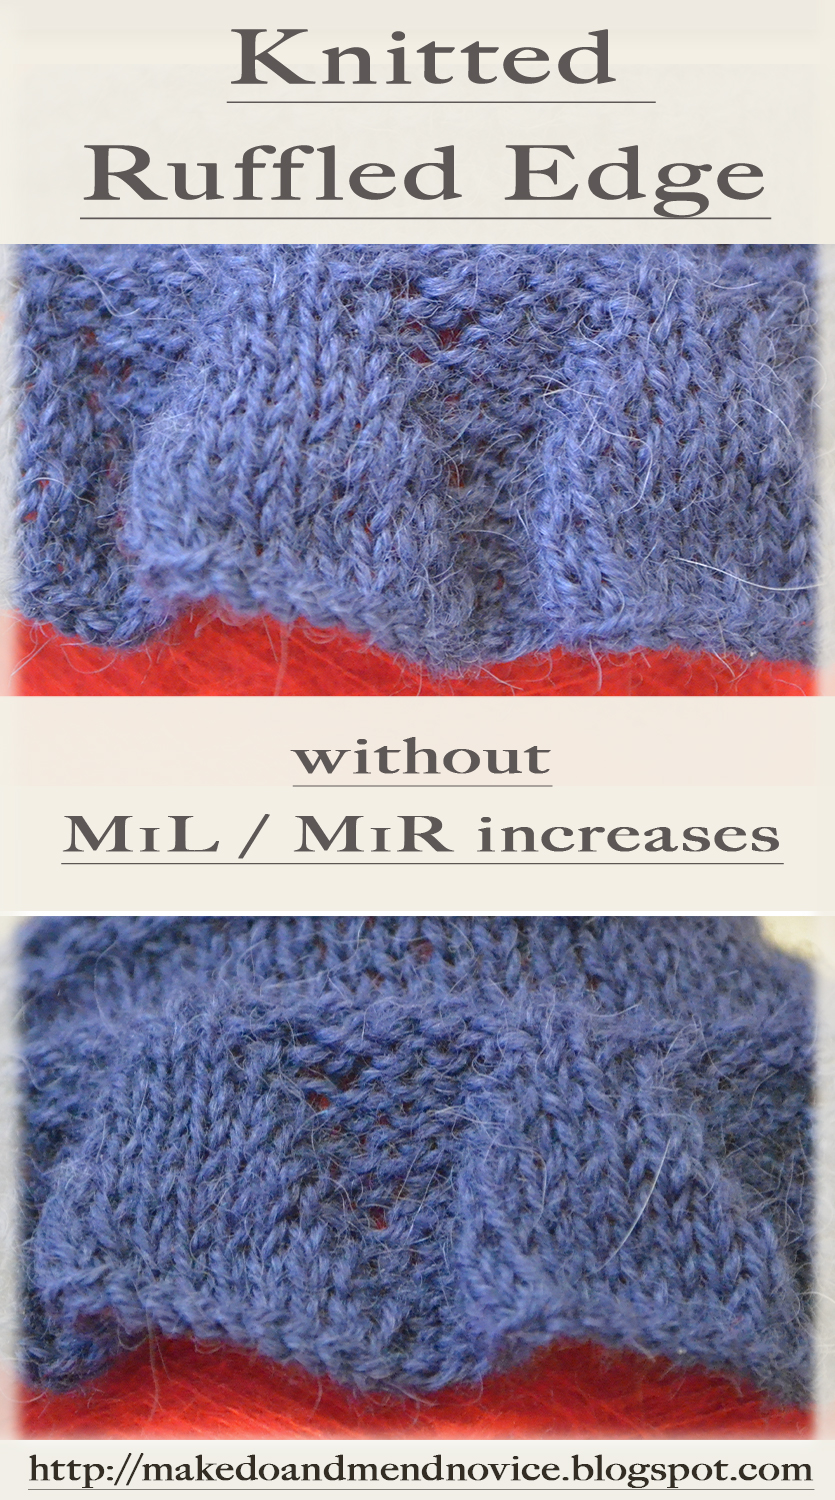
The Simple Ruffled Edge - Without M1L / M1R Increases
Ruffled Edging Knitting

The Simple Ruffled Edge - Without M1L / M1R Increases


In my efforts to avoid m1l / M1r, I decided to try knitting the ruffled edge with kfb (knit one into front and back) increases initially. Yet, when I knitted my edge sample with kfb increases, I didn't feel that the symmetry of the edging looked quite right, as the kfb increases created large holes in the fabric. All in all, I felt that the kfb increases didn't look neat. To fix this and improve the appearance of the ruffled edge without working m1l and m1r increases, I proceeded to work the increases slightly differently and tried something new. 

Instead of knitting in the front and back of the stitch that was to be increased, I decided to work p/ktbl and k/ptbl increases before and after the knit stitches on the right side row. (I am not sure whether the abbreviations k/ptbl and p/ktbl are correct, but as I was unable to find them referenced anywhere, I am for now just going along with these abbreviations to describe this type of increase.)

The p/ktbl and k/ptbl increases are achieved by purling (as normal) and then knitting through the back loop of the same stitch (p/ktbl) and by knitting (as normal) and then purling through the back loop of the next increase stitch (k/ptbl), thus maintaining the symmetry of knit and purl stitches. 

Increasing in this way tightens the holes, that would appear if a simple kfb increase was used, and is also much faster than working the m1l / m1r increases, which are traditionally called for. By working the increases into the purl stitch immediately preceding and following the knit stitches I maintained the increases on the right side rows just before and after the knit stitches. 

The P/ KTBL  K/PTBL Ruffled Edge

The stitch pattern for a ruffled edging with a multiple of 6 plus 5 stitches worked with P/ KTBL and K/PTBL increases looks like this: 

Row 1 (RS): P5, *k1, p5, rep from * end.

Row 2 (WS): K5, *p1, k5, rep from * end.

Row 3: P4, *(p/ktbl) into same stitch, k1, (k/ptbl) into same stitch, p3, rep from * to last stitch, p1.

Row 4: K5, *p3, k5, rep from * end.

Row 5: P4, *(p/ktbl) into same stitch, k3, (k/ptbl) into same stitch, p3, rep from * to last stitch, p1.

Row 6: K5, *p5, k5, rep from * end.

Row 7: P4, *(p/ktbl) into same stitch, k5, (k/ptbl) into same stitch, p3, rep from * to last stitch, p1.

Row 8: K5, *p7, k5, rep from * end.

Row 9: P4, *(p/ktbl) into same stitch, k7, (k/ptbl) into same stitch, p3, rep from * to last stitch, p1.

Row 10: K5, *p9, k5, rep from * end.

Row 11: P4, *(p/ktbl) into same stitch, k9, (k/ptbl) into same stitch, p3, rep from * to last stitch, p1.

Row 12: K5, *p11, k5, rep from * end.

Continue to increase as above until the edging has reached the desired length and proceed to bind off in pattern.


ruffled edge knitting no m1r / m1l increase
Simple Knitted Ruffled Edge 


For more knit stitch patternsplease follow this link to my knit stitch library.
Sunday, 13 September 2020

Introducing the Virga Shawl


New Knitting Pattern: The Virga Lace Shawl


Despite having completed work on a number of new patterns in recent weeks and months, I have not updated the blog with them. 

This is about to change and I decided to make a start today by posting a few images of my new shawl pattern, the Virga shawl.

Whilst the first test knit of the pattern is now complete, the shawl still requires blocking as well as a minimal amount of finishing; and I need to get to grips with my pattern notes before combining them into a usable pattern.

Tuesday, 5 May 2020

Knitting Book Review - Montse Stanley's Handknitter's Handbook

Montse Stanley - The Handknitter's Handbook
Montse Stanley - The Handknitter's Handbook, Publisher: David and Charles
Writing a review on Montse Stanley's Handknitter's Handbook has been on my ever expanding to-do-list for a while now and, thankfully, I am finally getting round to doing so. Since I got my hands on this book, it has become an indispensable companion in my knitting adventures; and despite the abundance of readily available digital resources, I am continuing to enjoy the luxury of having a hardcopy reference on my bookshelf, which I can pick-up, consult and browse without the need for an electronic device.

Stanley's guide claims to be a 'comprehensive guide to the principles and techniques of handknitting' and I wholeheartedly agree. This book does exactly what it says on the tin / cover. Whilst the Handknitter's Handbook is not an instructional book for aspiring or complete beginner knitters, those familiar with the basics and especially knitters, who enjoy designing their own projects, will find this to be an invaluable, encyclopaedic compendium, covering a wide array of topics from the very basics to advanced techniques with clear instructions and a wealth of technical illustrations and diagrams. 


Tuesday, 7 January 2020

Knitted Tights for Monster High Dolls


After the release of my leggings knitting pattern for Monster High dolls, I decided to adapt my pattern for a pair of closed-up, snug-fitting knitted Monster High tights. 

These are knitted on tiny needles and there is quite a bit of shaping happening before the piece is finished with a kitchener stitch bind-off. 

I am really pleased with the result so far and will be releasing my pattern notes on the blog very soon. In the mean time, here are some in-progress photos of the project, which were taken whilst I was completing the first leg of the tights: 


Monster High Doll - Knitted Tights in Progress
Monster High Doll - Tights Knitting in Progress

My Monster High tights knitting pattern is now available here.


Sunday, 16 September 2018

The Weekly Swatch: Bramble Knit Stitch

Bramble Knit in DK and Sock Yarn

Requiring a multiple of 4 plus 2 stitches, the Bramble Knit Stitch can be easily memorised and, once you have gotten to grips with knitting and purling repeatedly into the same stitch, there is nothing scary about this stitch sequence.

The Bramble Stitch is a little less 'bobbly' than the Gooseberry Stitch and ideally suited for garments with a dense texture. The pictures show swatch samples in both sock (Araucania Botany Lace) and DK yarn (Wendy Merino Double Knitting), highlighting the different effects you can achieve depending on the choice of yarn.

Friday, 24 November 2017

Crochet for Dollcena Dolls - Little Grey Hat

I literally have no idea how this little doll hat came together. It's a crochet hat and I can't crochet. I have some sort of mental block when it comes to crochet. 

I'm not entirely sure what I did and how it's constructed, I just used a crochet hook and it happened to turn out this way. By lucky coincidence, it happens to fit my Dollcena Doll. 

I'm afraid, I won't be able to write up project notes this time. But should I happen to attempt another crochet doll's hat, I promise to pay more attention to the process.

Dollcena Doll with Crochet Hat - Yarn: Stylecraft Kontiki


Dollcena Doll Crochet Hat (Doll by Takara Tomy, Yarn: Stylecraft Kontiki, Craft: Crochet)

Monday, 9 November 2015

The Weekly Swatch: The Smocking Stitch


The Smocking Stitch is a slightly more advanced stitch motif, creating a two-dimensional texture, which resembles the lattice stitch in appearance. This is achieved through a very limited amount of cabling on both the 4th and 8th rows of the stitch sequence. All other rows require simple knitting or purling. 

Smocking Stitch

Multiple of 6 stitches


Row 1 (wrong side): P2, *K2, P4; rep from * to last 4 sts., K2, P2.

Row 2 (right side)K2, *sl. 2 sts. purlwise, K4; rep. from * to last 4 sts., sl 2 sts. knitwise, K2.

Row 3: P2*sl. 2 sts. knitwise, P4; rep. from to last 4 sts., sl 2 sts. knitwise, P2.


Row 4:  *Sl 1st knitwise, place 2sts. onto CN (Cable Needle) and hold at back of work, K1, K2 sts. from CN, sl next st. onto CN and hold at front of work, K2, K1 st from CN; rep. from * to end. 


Row 5: K1, P4, *K2, P4; rep from * to last st., K1.


Row 6: Sl1 st knitwise, K4, *sl 2 sts knitwise, K4; rep from * to last st., sl 1st knitwise.


Row 7: Sl1 st knitwise, P4, *sl 2 sts knitwise, P4; rep from * to last st., sl 1st knitwise.

Row 8:  *Place 1st. onto CN and hold at front of work, K2, K1 st. from CN, sl next 2 sts. onto CN and hold at back of work, K1, K2 sts. from CN; rep. from * to end. 


Repeat Row 1 - Row 8 for pattern.


Smocking Stitch

More knit stitches are available here.

Sunday, 6 September 2015

Unravelling Old Projects: Musings on Reckless Beginner Knitting and Body Image

In the interest of frugality, I will be unravelling a project from the very early stages of my 'knitting career'. This was a time when knitting a gauge swatch was such a bore, adequate measuring (of myself and the swatch) appeared mysterious and incredibly complicated, blocking didn't exist and, due to a lack of familiarity with materials, I habitually chose the most unsuitable yarns for my projects. 

Hopelessly Oversized Asymmetrical Cardigan (completed circa 2010 / 2011)

I'm sure many other beginner knitters will be familiar with this cavalier attitude: You feel excited by the very fact that you mastered the basics of knitting and you just want to get on with it. Every project therefore turns into a test, attempting new techniques and more challenging pieces, rather than paying attention to the necessary groundwork, i.e. jumping through the hoops of all the preparatory steps before casting-on in earnest.  


I adopted this rather nonchalant attitude in two of my earliest projects: a jumper and an asymmetrical cardigan. And even though every seasoned knitter drew my attention to the importance of gauge, selecting suitable materials or the necessity of blocking, I chose to ignore all of this well-intentioned advice, knowing in the back of my mind that I was en route to Disappointment Central.


Friday, 4 September 2015

Exploring Basic Shapes: The Knitted Star

An end to a thoroughly unproductive day, in which I merely managed to complete the pattern notes for a basic knitted star in preparation for another upcoming project, which - going by the speed it's taken to complete these notes - will take a little while yet. 

Without further ado, here are the instructions for a basic star, which is worked in the round on double-pointed needles. The star's outer edges are shaped with short rows. The size of the star can be modified by increasing or reducing the total number of stitches before working the spikes on the outer perimeter.

Knitted Star
Materials Required
  • 4 double-pointed needles (dpns)
  • Approximately 10 - 30 grams of yarn (matching the needle size of the dpns) 
  • Scissors 
  • Darning Needle

Set - Up
  • Cast-on 7 stitches in whichever method you are most comfortable with (using a dpn)
  • As if knitting an I - Cord, bring the yarn to the first cast-on stitch
  • K1, KFB, K3, KFB, K1 [ 9 stitches in total]
  • Divide these 9 stitches evenly on three dpns and join in the round
Knitted Star after completion of first increase row 

Body of Star

Row 1: K9 
Row 2: KFB into all stitches [18 stitches]
Row 3: K 18
Row 4: *KFB, K2; repeat from * to end [24 stitches]
Row 5: K24
Row 6 *KFB, K3; repeat from * to end [30 stitches]
Row 7: K30
Row 8*KFB, K4; repeat from * to end [36 stitches]
Row 9: K36
Row 10*KFB, K5; repeat from * to end [42 stitches]
Row 11: K42

Please note: For a larger or smaller star, you can continue to increase the stitch count (adding 6 stitches on every even row) or decide to start the shaping of the spikes before you reach 42 stitches. Instead of utilising KFB increases, it is also possible to increase the stitch count with 'yarn overs'. This will result in a lace star.


Knitted Star - Detail

Before you start shaping the points, you should ensure that each dpn holds an even number of stitches. Half of the stitches on every needle will be shaped into one of the six outer points.


Shaping of the Outer Points


Shaping the Outer Points

Row 1: K7, turn (do not wrap the stitch when turning!)
Row 2: P7
Row 3: Sl1, K1, PSSO, K3, K2Tog, turn
Row 4: P5
Row 6: Sl1, K1, PSSO, K1, K2Tog, turn
Row 7: P3
Row 8: Sl1, K1, K1
Row 9: P2tog
Row 10: Bind-off remaining, break yarn

Proceed to shape the remaining five outer points in the same fashion.

A star is born.


Knitted Star


For pattern support, please feel free to contact me via Ravelry (ClariceAsquith), Twitter (@Slipstitched), Instagram (@clarice.asquith) leave a comment below or by e-mail: clarice.asquith@googlemail.com.


For a link collection to all original designs on the blog, please visit this link.

This pattern is for personal use only and may not be reproduced for commercial purposes without permission.

© 2015 Clarice Asquith. All rights reserved. http://makedoandmendnovice.blogspot.com


Tuesday, 1 September 2015

The Weekly Swatch: The Honeycomb Stitch


Honeycomb Knit Stitch


The Honeycomb Knit Stitch as featured above is an uncomplicated stitch motif (no purling, just knitting!), resulting in a dense, yet flexible, texture, which is ideal for a wide variety of wintery garments and accessories. These tend to be designed to retain heat, whilst remaining breathable; and the Honeycomb Stitch fulfils these design requirements perfectly. 


Honeycomb Knit Stitch Sample


Thursday, 27 August 2015

Knitting with Non-Traditional Materials: The Nameless Choker meets the Nameless Cuff

Roughly one year ago I released project notes for a simple knitted lace choker, the Nameless Choker. The pattern notes for the 'Nameless Choker' are available here. 

Specifically designed to use up the last remnants of sock yarn after the completion of a larger project, Nameless is an ideal project for a very small quantity of yarn (approximately 10 - 20 grams).


Nameless Choker, Knitting Pattern available here


One year on, I decided to explore the choice of material for this project in more detail. Whilst certain types of sock and cotton yarn (especially the sturdier varieties) work very well with the design, the pattern provides an ideal starting point for venturing into new territory, i.e. the cross-over point where knitting and jewellery-making techniques meet and blend into one another. 

For my revision of the pattern, I am planning to adapt the original design with the help of a number of non-traditional materials such as waxed cotton thong cord (1mm), leather cord (1mm) and, potentially, jewellery wires.

Having completed an initial experiment with waxed cotton cord (shown below), it is clear that certain design elements  of the original pattern (stitch count, lace repeats, needle size and quantities etc.) will obviously have to be revised and modified to take the properties of cotton thread into consideration, but I am quite happy with the initial outcome.

The first insight derived from yesterday's cotton cord knitting session is that 10 metres of waxed cotton thong are not sufficient to produce a fully fledged knitted choker on the basis of the original Nameless pattern, but they will be enough to make a knitted wrist cuff.   

Nameless Cuff (knitted with 1mm waxed cotton cord)


Nameless Cuff (knitted with 1mm waxed cotton cord)


Nameless Cuff (knitted with 1mm waxed cotton cord)

Nameless Cuff Prototype

Nameless Cuff - Prototype

Further updates and finalised project notes on the Nameless Cuff and the modified Nameless Choker will be up on the blog shortly. 

In the meantime, stay tuned... 


Sunday, 23 August 2015

Cartridge Rib Stitch in the Round + Cat = Cat Leg Warmer


Cartridge Rib Stitch in the Round + Cat = Cat Leg Warmer

The blog seems to have received a number of search queries for instructions to the cartridge rib stitch motif knitted in the round. This is potentially the result of an earlier entry, in which I posted the stitch sequence for the basic cartridge rib stitch. This is available here.


Catridge Rib Stitch Sample in the Round