Saturday 4 December 2021

The Weekly Swatch: Diagonal Zig Zag Knit Stitch

Reversible Diagonal Zig Zag Knit Stitch Pattern


I am in love with the texture of this diagonal zig-zag knit stitch. 

Knit and purl stitches are all you need to create these diagonal zig zags and the resulting stitch motif is fully reversible. 

A perfect match for chunky cotton yarns and knitted dishcloths. 


Diagonal Zig Zag Knit Stitch Pattern
Diagonal Zig Zag Knit Stitch 


The Weekly Swatch: Garland Lace Knit Stitch


With the Garland Lace Knit Stitch I am returning to simple, traditional lace in this instalment of the weekly swatch. 

The Garland Knit Stitch is a simple beginner lace knit stitch. The motif is created over sixteen rows, requires a multiple of 6 plus 1 stitches and all wrong side rows are purled throughout. 

The Weekly Swatch: Faggot Knit Stitch


Faggot Lace Knit Stitch Pattern


I have another 'no purl lace' knit stitch to add to the collection in this week's weekly swatch. 

It's the Faggot Lace Knit Stitch. 

This is an incredibly simple one-row repeat stitch motif, which creates an openwork lace mesh fabric.

More 'no purl' lace knit stitches are available here. 

Sunday 21 November 2021

Sock Knitting for Beginners - 5 Tips for Perfect, Top-Down Vanilla Socks


Taking stock of my knitting projects this year, it appears that I have been knitting rather a lot of socks over the past 11 months - 5 pairs in total so far, to be precise. Following my very first sock knitting project back in 2015, I turned my attention to other types of knitting projects and focussed mainly on lace knitting, but this year I fancied a change and focussing on sock knitting and sock knitting techniques felt just right. 

5 Tips for Perfect, Top-Down hand knitted Vanilla Socks
Finished Socks on DIY Sock Blockers


Based on my recent excursion into the world of sock knitting, what follows are a few recommendations for novice sock knitters, including five tips to achieve perfectly fitting, vanilla top-down socks. 

Monday 15 November 2021

The Weekly Swatch: Loop Mesh Lace Knit Stitch


This week, I have prepared the Loop Mesh Lace Knit Stitch. Another no purl lace knit stitch to add to the collection.

The stitch motif is created over 3 rows on a multiple of 5 plus 3 stitches and creates an openwork lace mesh without any requirement for purling stitches. 

More no purling lace knit stitches are available here.

Saturday 6 November 2021

The Weekly Swatch: Sheaf Knit Stitch


Sheaf Knit Stitch Pattern Tutorial


As I said, I am catching up with the weekly swatches today and now it's time for the second swatch post of the day. 

Next up is a stitch, I have really enjoyed preparing, the Sheaf Knit Stitch. 

K2 / P2 ribbing forms the foundation of this stitch motif; and the texture is achieved by wrapping the working yarn around two stitches on every fourth row. 

Sheaf Knit Stitch Pattern Tutorial

Sheaf Knit Stitch


The Weekly Swatch: Double Basket Weave Knit Stitch

Double Basket Weave Knit Stitch Pattern


I am catching up with the weekly swatches yet again and for this week I have prepared the Double Basket Weave Knit Stitch. 

This stitch is a variation of the Simple Basket Weave Knit Stitch and slightly more involved. 

The stitch motif is knitted on a multiple of 18 plus 3 stitches over 18 rows and creates a gorgeous, chunky texture. 


Double Basket Weave Knit Stitch Pattern
Double Basket Weave Knit Stitch


Wednesday 29 September 2021

The Weekly Swatch: Bamboo Rib Knit Stitch


Bamboo Rib Knit Stitch


I have prepared another rib knit stitch for this week's not-so-weekly, weekly swatch.  

It's the Bamboo Rib Knit Stitch - an incredibly simple knit stitch. 

The vertical columns are created by yarn overs, which are lifted over the knitted stitches. This stitch is worked over two rows on a multiple of two stitches and all wrong side rows are purled. 

For further posts on ribbed knit stitch tutorials and my knitting patterns utilising ribbed stitches, please visit this link.

Sunday 22 August 2021

The Weekly Swatch: Brioche Rib Knit Stitch Variation


For this week's weekly swatch, I am showcasing a variation on the ever popular Brioche Rib Stitch.

The classic Brioche Stitch is a simple rib stitch, that creates a beautiful texture, which is not only pleasing on the eye. The rich and flexible texture created by this stitch also appeals to our sense of touch. Every time I spot a garment knitted in brioche rib, I simply have to feel the texture of the stitch. 

Brioche Rib Stitch is not only an eye-catching stitch, but also easy to knit. 

Following a single set-up row on an even number of stitches, the stitch motif is created by the continuous repetition of a sequence of stitches on every following row. The first stitch of every row is slipped purlwise. Classic Brioche Rib therefore requires no purling or great effort to ensure the stitch count is correct. 

The variation of this classic stitch, as shown in the photos, shares most of the above attributes, but the resulting texture of the knitted columns is more rigid and the variation creates an interesting mesh texture when the fabric stretched sideways. 

Thursday 19 August 2021

Free Knitting Pattern: Irish Moss Diamond Dishcloth


free diamond motif dishcloth knitting pattern


Free Knitting Pattern: Irish Moss Diamond Dishcloth


I was looking for a small knitting project to use up less than half a skein of Stylecraft Kon-Tiki cotton yarn. On this occasion, I finally decided to pursue the dishcloth option. 

I have never knitted a dishcloth before, thinking that knitted dishcloths are somewhat of a waste of precious yarn, but as this particular skein, which has previously been utilised for many weekly knit swatches, looked already pretty tired and dishevelled from frequent use, the yarn finally needed to be turned into a permanent project. 

free diamond motif dishcloth knitting pattern


Framed by a garter stitch border to keep the fabric flat, the Irish Moss Diamond motifs are worked against a background of stockinette stitch. The diamond stitch motif is created through the variation of knit and purl stitches, making this pattern suitable for knitters of all skill levels.

Sunday 18 July 2021

The Weekly Swatch: Bubble Knit Stitch Tutorial

Bubble Knit Stitch Tutorial

 
After some time away from the blog, it's time for another not so weekly, weekly swatch. 

Today, I have prepared the bubble knit stitch. The texture of this simple stitch is achieved by slipping stitches with yarn held in the front of the knitting (wyif) and at the back (wyib). The stitch requires a multiple of 8 plus 4 stitches and is knitted over 16 rows. 

Tuesday 18 May 2021

Doll Round-Up: Madeline Hatter Ever After High First Chapter Doll with Varying Skin Tone and Doll Wig Making for MGA Moxie Girlz Dolls

Madeline Hatter, First Chapter Doll - The Tanned Version 


There have been a few new additions to the doll house this past week. In the lot of pre-loved dolls that moved in was a Madeline Hatter Ever After High First Chapter doll. I already have this Madeline doll in the collection (the joys of buying used lots) and wasn't paying too much attention to her initially. 


Madeline Hatter Ever After High First Chapter Doll in Custom Picot Dress 


However, upon closer inspection and when compared to the other Madeline doll in my collection, the new Madeline appears to have a somewhat darker complexion. In fact, she looks like she has been to the tanning salon when comparing her skin tone to my other Ever After High Madeline Hatter First Chapter doll.


Ever After High Dolls different skin tone same doll made in 2012 Indonesia
Madeline Hatter Ever After High First Chapter Doll (tanned skin tone) 


Ever After High Dolls different skin tone same doll made in 2012 Indonesia
Madeline Hatter Ever After High First Chapter Doll (tanned skin tone) 


Madeline Hatter Ever After High First Chapter Doll (tanned skin tone) 


There are also subtle differences to the way her eyes are painted. For want of a better description, it appears that her green eyes are more vivid as a result of the darker skin tone and a larger highlight underneath her pupil, whilst the other Madeline seems to have an altogether matte, flesh-coloured complexion and a less playful expression.   


Madeline Hatter Ever After High First Chapter Doll: Differing Complexions / Skin Tone and Varying Make-Up
Madeline Hatter Ever After High First Chapter Doll: Differing Complexions and Varying Make-Up 

Sunday 25 April 2021

Free Lace Choker Knitting Pattern: The Jera Rune Lace and Cable Choker

Free Lace Choker Knitting Pattern - Jera Rune Choker


After an initial test knit and following some minor adjustments to the design, here is, as promised, my new knitting pattern for the Jera Lace and Cable Choker.  

The Jera Choker - A Rune-Inspired Choker Design

As mentioned in a previous post, which is featuring an earlier version of this design, the pattern  for this choker was inspired by the Jera rune, the twelfth rune from the Elder Futhark. 

Jera in its literal translation means ' (good) year' or 'harvest'. 

The Jera rune is a symbol for connection and perpetual movement, representing the seasons and the natural cycle of recurring change at a steady pace and regular intervals. 


Jera Rune Inspired Knitting Pattern Free Lace Choker Knitting Pattern - Free Lace Choker Knitting Pattern

With the vernal equinox now behind us, the release of this design celebrates this seasonal flow -  the passing of long, dark nights and short, gloomy days and it welcomes the arrival of spring as we are approaching summer solstice. 


Jera Rune Inspired Knitting Pattern Free Lace Choker Knitting Pattern - Free Lace Choker Knitting Pattern
Jera Rune Inspired Lace Choker Knitting Pattern 


Just like my earlier lace choker knitting patterns (the Nameless, the Brocade Choker, the Cascade Choker, and the Virga Choker) the Jera Choker is a quick and beginner-friendly knitting project, incorporating elements of both lace and cable knitting techniques in a quick-to-knit project. The choker can be completed in a day or two, including the time it requires to block the finished piece. It's also ideal for using up tiny amounts of yarn. (For my choker I used approximately 6g to 7g of Scheepjes Maxi Sugar Rush mercerised cotton yarn.)


Jera Rune Inspired Lace Choker Knitting Pattern


The choker's simple elongated cable motif is created over 6 rows, consisting of knit and purl stitches, a variety of standard in-and decreases and by creating elongated stitches, which are subsequently worked as cable stitches. 

The choker is worked on 2mm - 2.5mm double-pointed needles (dpns). I knitted my choker on 2.5mm dpns. It is, of course, absolutely possible to substitute with different yarns, including sock yarn and to adjust the needle size accordingly.

Though it is possible to knit the choker on wood or bamboo needles, I recommend the use of pointy, metallic dpns, especially if you are opting for the use of mercerised cotton yarn with this pattern. This will make the knitting experience much more enjoyable. 


Jera Rune Inspired Lace Choker Knitting Pattern
Jera Rune Lace and Cable Choker Knitting Pattern 


The length of the choker can be adjusted easily for different neck circumferences and I recommend you check the fit whilst knitting. Altogether, you should ensure that the body of the choker covers around 80% - 85% of the neck before the piece is blocked. 

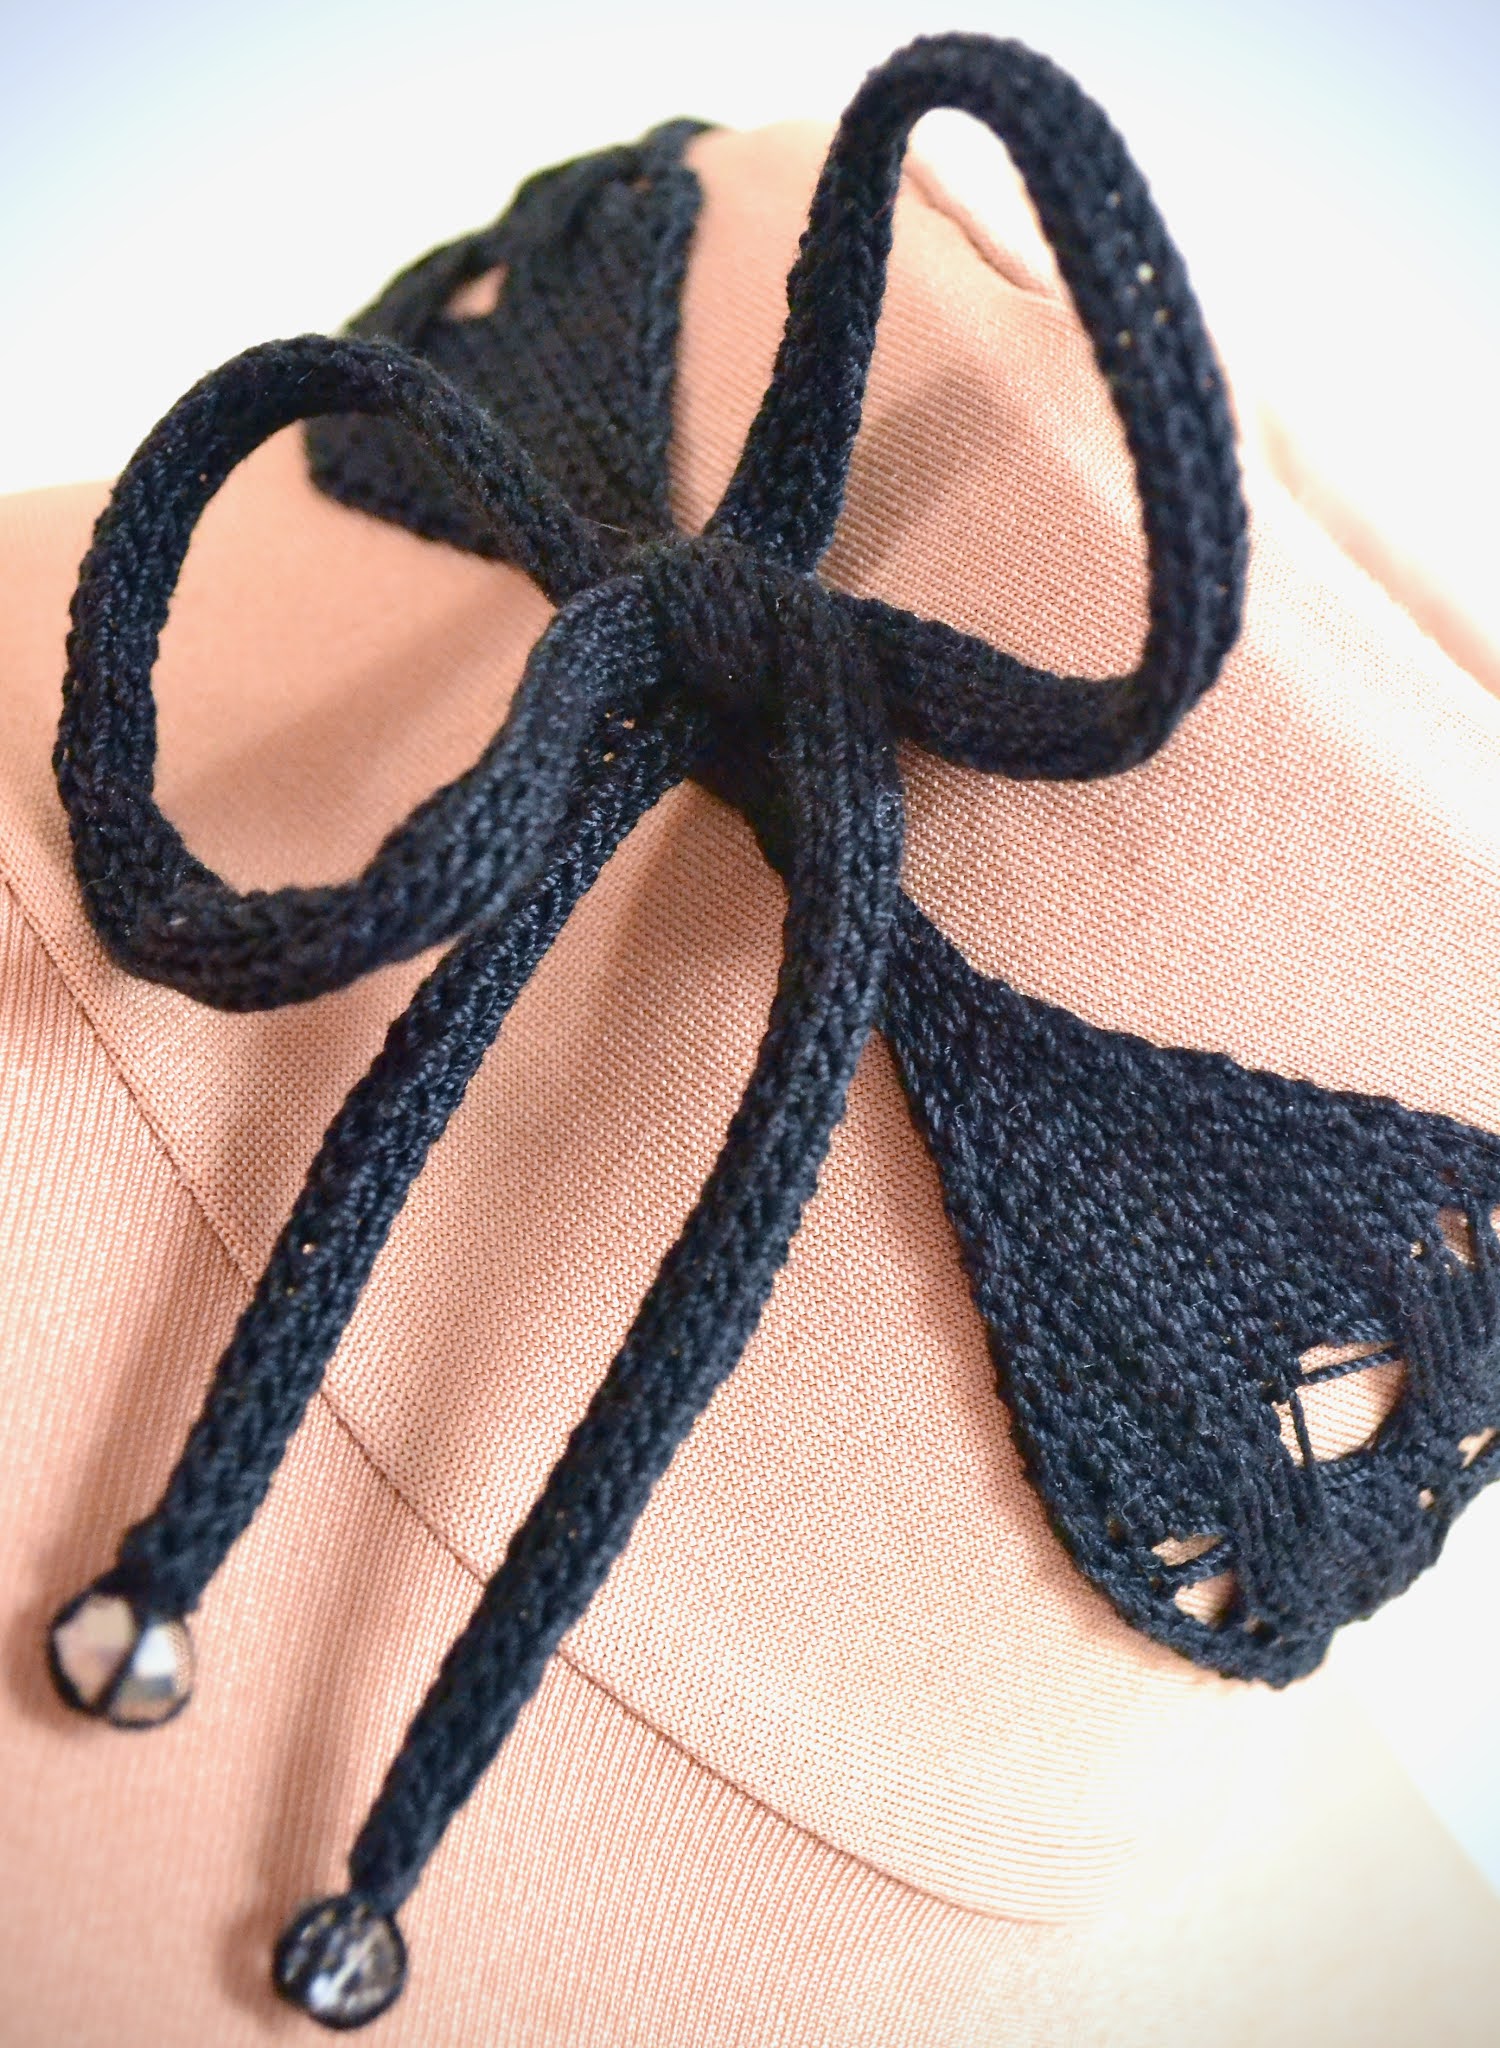
The piece is secured with the help of two i-cords, which each measure approximately 20cm to 25cm in length. These will be tied to a bow to secure the choker. Beads can be attached to the ends of the i-cords for a more sophisticated finish.

Jera Rune Lace and Cable Choker Knitting Pattern - I-Cord Detail 


The completed piece should be wet-blocked (to open the lace detail) and left to dry over night. Blocking is absolutely essential for the choker to look its best and I have compiled some hints and tips on special choker blocking techniques. These can be found here. 

Depending on your chosen needle size and whether you decide to substitute the mercerised cotton with another type of yarn, the number of lace repeats might differ. As you can check the fit whilst knitting, this should not be a major issue, making this project ideally suited for using up various types of yarn leftovers.


Jera Rune Lace and Cable Choker Knitting Pattern
Jera Rune Lace and Cable Choker Knitting Pattern 


Jera Lace and Cable Choker

Free Knitting Pattern


Materials and Tools

  • app. 7g of Scheepjes Maxi Sugar Rush mercerised cotton yarn 
  • 2 mm or 2.5 mm double-pointed needles
  • cable needle
  • 1.5 mm crochet hook / fine darning needle (for sewing-in yarn ends and attaching beads)
  • 2 beads for securing the ends of the i-cords (optional)
  • Blocking utensils

Rune-Inspired Knitwear Design Jera Rune Lace and Cable Choker Knitting Pattern
Jera Rune Lace and Cable Choker Knitting Pattern 


Knitting Instructions


Cast-On and First I-Cord 
  • Cast-on 6 stitches
  • Knit an i-cord that measures approximately 25cm. 

Increase to Body of Choker:

Row 1 (wrong side)Sl 1 (knitwise), p4, k1. (6 stitches)

Row 2 (right side): Sl1 (knitwise), kfb, k to last two stitches, kfb, k1.(8 stitches) 

Row 3
Sl1 (knitwise), p to last stitch, k1.

Row 4: Sl1 (knitwise), kfb, k to last two stitches, kfb, k1. (10 stitches) 

Row 5: Sl1 (knitwise), p to last stitch, k1.

Row 6: Sl1 (knitwise), kfb, k to last two stitches, kfb, k1. (12 stitches) 

Row 7: Sl1 (knitwise), p to last stitch, k1.

Row 8: Sl1 (knitwise), kfb, k to last two stitches, kfb, k1. (14 stitches) 

Row 9: Sl1 (knitwise), p to last stitch, k1.

Row 10: Sl1 (knitwise), kfb, k to last two stitches, kfb, k1. (16 stitches) 

Row 11: Sl1 (knitwise), p to last stitch, k1.

Row 12: Sl1 (knitwise), kfb, k to last two stitches, kfb, k1. (18 stitches) 

Row 13: Sl1 (knitwise), p to last stitch, k1.


Body of Choker - Lace Pattern 

Row 1 (right side): Sl1 (knitwise), k2tog, yo, k to last 3 stitches, yo, ssk, k1.

Row 2 : Sl1 (knitwise), p to last stitch, k1.   

Row 3Sl1 (knitwise), k2tog, yo, k 1, *wrap yarn round the needle twice, k1, rep. from * to last 3 stitches, yo, ssk, k1.

Row 4: Sl1 (knitwise), p2, *slide next 6 stitches from left-hand needle to right-hand needle, dropping the extra loops created on previous row, return 3 stitches to left-hand needle, place the 3 remaining elongated stitches on the right-hand needle from the right hand needle onto a cable needle and hold at back of work, p3 elongated stitches from left-hand needle, p3 elongated stitches from cable needle, repeat from * to last three stitches, p2, k1.   

Row 5: Sl1 (knitwise), k2tog, yo, k to last 3 stitches, yo, ssk, k1.

Row 6: Sl1 (knitwise), p to last stitch, k1.

Row 7: Sl1 (knitwise), k2tog, yo, k to last 3 stitches, yo, ssk, k1.

Row 8: Sl1 (knitwise), p to last stitch, k1.

Repeat Rows 3 to 8 for pattern.

For a choker body measuring 27cm repeat the above lace sequence x times. Adjust the number of repeats according to your own requirements and check the fit whilst knitting. 

When the body of the choker has reached the desired length and after completion of the final lace cable pattern repeat, work 2 more rows in above pattern: 


Row 1 (right side): Sl1 (knitwise), k2tog, yo, k to last 3 stitches, yo, ssk, k1.

Row 2 : Sl1 (knitwise), p to last stitch, k1.  


Next, proceed to decrease the total stitch count before working the second i-cord.


Decrease to Second I-Cord

Row 1 : Sl1 (knitwise), k2tog, k to last 3 sts, ssk, k1. (16 stitches) 

Row 2: Sl1 (knitwise), p to last stitch, k1.   

Row 3 : Sl1 (knitwise), k2tog, k to last 3 sts, ssk, k1. (14 stitches) 

Row 4:  Sl1 (knitwise), p to last stitch, k1.   

Row 5:  Sl1 (knitwise), k2tog, k to last 3 sts, ssk, k1. (12 stitches) 

Row 6: Sl1 (knitwise), p to last stitch, k1.  

Row 7:  Sl1 (knitwise), k2tog, k to last 3 sts, ssk, k1. (10 stitches) 

Row 8: Sl1 (knitwise), p to last stitch, k1.  

Row 9:  Sl1 (knitwise), k2tog, k to last 3 sts, ssk, k1. (8 stitches) 

Row 10: Sl1 (knitwise), p to last stitch, k1.  

Row 11:  Sl1 (knitwise), k2tog, k to last 3 sts, ssk, k1. (6 stitches) 

Row 12: Sl1 (knitwise), p to last stitch, k1.  


When the total stitch count has reached 6 stitches, knit the second I-cord, equal in length to the initial I-cord, and bind off.

Attach beads to the ends of both i-cords. (optional)


Finishing:
  • Weave-in all yarn ends and block the piece to ensure the lace is fully opened up.  

Rune-Inspired Knitwear Design Jera Rune Lace and Cable Choker Knitting Pattern


Should you require pattern support, please feel free to contact me via RavelryTwitterFacebookInstagram, by e-mail or leave a comment below.


This pattern is for personal use only and may not be reproduced for commercial purposes without permission. Neither may you sell any items made from the directions in this pattern.

Should you wish to knit another of my chokers, the pattern for my Nameless Choker is available here, the pattern for the Brocade Lace Choker is available here, the pattern for the Cascade Lace Choker is available here and the pattern for the Virga Choker is available here and here (for the beaded version).

Nameless Choker:


Virga Coker and Virga Beaded Choker


Cascade Choker


© 2021 Clarice Asquith. All rights reserved. http://makedoandmendnovice.blogspot.com


Saturday 24 April 2021

Pebble's Trip to the Vet: Dental Extractions, Abdominal X-Rays and an Unusual Amount of Sublumbar Muscles


It's been a busy week in cat care terms. 

Pebble had to see the vet for dental extractions (five teeth). Though she is a healthy, almost ten-year-old cat, her teeth appear to be a weak point. Following her first trip to the dentist back in 2019, this was the second dental she has had in as many years. She appears to be recovering well from the procedure and will hopefully feel the benefit of the extractions going forward.

During the course of Pebble's dental intervention, we decided to take advantage of the anaesthetic and had a small lump removed from her thigh, which thankfully turned out to be a lipoma and not a dreaded mast cell tumor. (Following Pickle's death from colorectal adenocarcinoma I was preparing myself for the worst.) 

We also had abdominal x-rays taken to see whether these would provide a clue as to why  Pebble appears to be constipated at times and has a tendency to scoot across the carpet after visiting the toilet for a number 2. 

After ruling out the obvious culprits, including parasites and anal gland issues, x-rays were the next logical step.

Abdominal X-Rays and Pebble's Sublumbar Muscles

I am now pleased to present the two most expensive images taken this year so far: 

Image no 1 of Pebble's abdominal x-rays:

Abdominal X-Ray Feline sublumbar muscle obscuring the view
Abdominal X-Ray Pebble (Feline) 

Sunday 18 April 2021

Introducing the Jera Choker: A Rune - Inspired Free Lace Choker Knitting Pattern

Free Lace Choker Knitting Pattern Jera Lace Choker Knitting Pattern - Rune-Inspired Lace Choker Knitting Pattern


It's been a productive weekend in crafting terms. The first test knit of my new choker knitting pattern is finished, blocked and I have finally decided on a name for this design. Looking at the lace pattern motif, which is achieved by a series of elongated cable knit stitches, I was somehow reminded of the Jera rune, the twelfth rune from the Elder Futhark, which in its literal translation means ' (good) year' or 'harvest'. 

Runic letter jeran.svg

Made up of two separate charachters, which appear to spin around one another from the centre, this rune symbolises connection and perpetual movement, representing the recurring seasons and the natural cycle of  perpetual change at a steady pace and regular intervals. 

Tuesday 6 April 2021

How to block a knitted I-Cord or ...a new way to block an I-Cord


I am currently working on a new choker pattern, which will be up on the blog very soon. The new choker design (no name yet, and I am having a hard time finding one...) is a quick and simple lace project, which incorporates a cable stitch motif with some simple lace.

Monday 5 April 2021

The Weekly Swatch: Braid Cable Knit Stitch Pattern / Tutorial


Braid Cable Knit Stitch Pattern


Following up on my plan to explore more cable stitch motifs in my weekly swatch motifs, I have prepared another simple cable stitch for this week's swatch post, the Braid Cable Knit Stitch. 

The cables are worked on the right side rows and following the completion of the set-up rows (1 and 2), the stitch is worked over three rows.