Showing posts with label I-cord. Show all posts

Tuesday, 6 April 2021

How to block a knitted I-Cord or ...a new way to block an I-Cord


I am currently working on a new choker pattern, which will be up on the blog very soon. The new choker design (no name yet, and I am having a hard time finding one...) is a quick and simple lace project, which incorporates a cable stitch motif with some simple lace.

Sunday, 4 October 2020

Virga Choker (beaded version) - Free Lace Choker Knitting Pattern

 - These are the pattern instructions for the beaded version of the Virga Choker, the pattern for the Virga Choker without beads is available here. - 

Free Lace Choker Knitting Pattern
Virga Lace Choker Free Knitting Pattern (beaded version) 

As an in-between project I finished another choker. I was inspired to design this choker when looking at in-progress project photos of my Virga shawl, an upcoming pattern for a semi-circular lace shawl, which will be published on the blog shortly. When I took the photos of the shawl, the dressmaker's dummy still had my Cascade choker wrapped around the neck and I got the idea to make a choker in the same lace motif as the Virga shawl. 

The result of this endeavour is my Virga Choker.

Saturday, 27 June 2020

Free Knitting Pattern: Cascade Lace Choker

I’m finally catching up with the pattern posting of my latest knitted lace choker, the Cascade Choker. Just like my earlier lace choker knitting patterns (the Nameless and the Brocade Choker), this is a quick and uncomplicated lace project, ideal for using up tiny amounts of yarn. The choker can be completed in a day or two, including the time it requires to block the finished piece. (And if you decide to knit this choker, blocking is not optional, but absolutely essential to open up the lace.) The simple lace motif is knitted over 6 rows, consisting of knit and purl stitches and a variety of standard in-and decreases. 


Cascade Lace Knit Choker Free Pattern
Cascade Lace Choker


For this project I used just 5g of Scheepjes Maxi Sugar Rush mercerised cotton yarn and 2mm double-pointed needles (dpns). Though it is possible to knit the choker on wood or bamboo needles, I recommend the use of pointy, metallic dpns, especially if you are opting for the use of mercerised cotton yarn with this pattern. This will make the knitting experience much more enjoyable. 

The length of the choker can be adjusted easily for different neck circumferences and I recommend you check the fit whilst knitting. Altogether, you should ensure that the body of the choker covers around 80% of the neck before the piece is blocked. The choker is secured with the help of two dainty i-cords, which each measure approximately 20cm in length. These will be tied to a bow. Beads can be attached to the ends of the i-cords for a more sophisticated finish. 

Cascade Lace Knit Choker Free Pattern
Cascade Lace Knit Choker

The completed piece should be wet-blocked (to open the lace detail) and left to dry over night. 

If you decide to substitute the mercerised cotton with another type of yarn, the number of lace repeats will obviously differ. As you can check the fit whilst knitting, this should not be a major issue, making this project ideally suited to using up all types of yarn leftovers.

!!Update!!

The pattern for the one-piece i-cord version of the Cascade Choker (picture below) is now available here.


Saturday, 25 April 2020

Free Knitting Pattern: Brocade Lace Choker

As promised, here is my latest free pattern for a knitted lace choker - a project ideally suited for beginner lace knitters looking for a sense of accomplishment in a quick and easy lace project, which can be completed in a day or two. 


Free Lace Choker Knitting Pattern
Brocade Choker - Free Knitting Pattern
The lace motif, which is knitted over eight rows, is simple, consisting mainly of a combination of standard in- and decreases across fifteen stitches. All wrong side rows are a combination of knit and purl stitches. 

Brocade Lace Choker Knitting Pattern - Lace Detail

For this project I used just 5g of Scheepjes Maxi Sugar Rush mercerised cotton yarn and 2mm double-pointed needles (dpns). Though it is possible to knit this project on wood or bamboo needles, I recommend the use of pointy, metallic dpns, especially if you are opting for the use of mercerised cotton yarn with this pattern. This will make the knitting experience much more enjoyable. 

The size of the choker can be adjusted easily for different neck circumferences and I recommend you check the fit whilst knitting. Altogether, you should ensure that the body of the choker covers around 80% of the neck before the piece is blocked. The choker is secured with the help of two dainty i-cords, which each measure approximately 20 cm in length. These will be tied to a bow. Beads can be attached to the ends of the i-cords for a more sophisticated finish. 


Free Lace Choker Knitting Pattern
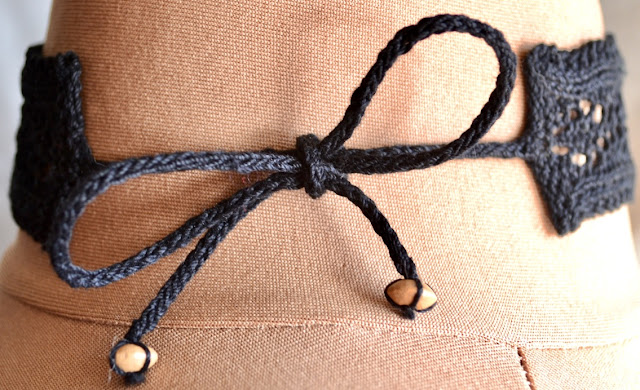
Brocade Lace Choker - I-Cord Detail

The completed piece should be wet-blocked (to open the lace detail) and left to dry over night.

If you decide to substitute the mercerised cotton with another type of yarn, the number of lace repeats will obviously differ. As you can check the fit whilst knitting, this should not be a major issue, making this project ideally suited to using up all types of yarn leftovers, especially sock yarn.


Free Choker Knitting Pattern
Brocade Choker 

Brocade Lace Choker

Free Knitting Pattern


Measurements


Before starting this project, measure your neck circumference. The lace body of your choker should cover around 80% of your neck and it will be secured with two i-cords, which should be long enough to tie a bow comfortably 


The knitting instructions for the Brocade choker below will produce a piece which measures 26.5 cm (body of the choker after blocking) and the i-cords each measure 20 cm in length. For a choker measuring 26.5 cm, you will work 16 repeats of the lace sequence for the body of the choker. One repeat measures approximately 2 cm. Adjust the number of lace repeats for a shorter or longer choker.


Free Choker Knitting Pattern
Brocade Choker Knitting Pattern

Materials and Tools


  • 5g of Scheepjes Maxi Sugar Rush mercerised cotton yarn 
  • 2 mm double-pointed needles
  • 1.5 mm crochet hook / fine darning needle (for sewing-in yarn ends and attaching bead)
  • contrast yarn (for provisional cast-on)
  • 2 beads for securing the ends of the i-cords (optional)
  • Blocking utensils


Free Choker Knitting Pattern
Brocade Choker Knitting Pattern 


Instructions

  • Cast-on 15 stitches, using the provisional cast-on for the three centre stitches (7,8,9) as shown in the photo below. The three live stitches are located, where the i-cord will be worked later.
Provisional Cast-On Choker
Provisional cast-on for i-cord
  • Knit 4 rows (garter stitch)
Start of lace pattern:
  • Row 1 (right side): k2, p2, k2tog, [k1, yo] twice, k1, sl1, k1 psso, p2, k2
  • Row 2 (wrong side): k4, p7, k4
  • Row 3: k2, p2, k2tog, yo, k3, yo, sl1, k1, psso, p2, k2
  • Row 4: k4, p7, k4
  • Row 5: k2, p2, k1, yo, sl1, k1, psso, k1, k2tog, yo, k1, p2, k2
  • Row 6: k4, p7, k4
  • Row 7: k2, p2, k2, yo, sl1, k2tog, psso, yo, k2, p2, k2
  • Row 8: k4, p7, k4
  • For a choker body measuring 26.5 cm repeat the above lace sequence 16 times. Adjust the number of repeats according to your own requirements.
  • Knit 3 rows in garter stitch, ensuring that the cast-off is started on the wrong side.
  • Bind off all stitches up to the three centre stitches, knit the centre three stitches (7, 8, 9) and cast-off the remaining stitches. 

I-cords: 
  • Start knitting a 20 cm i-cord with the three remaining live stitches, bind-off i-cord  and attach bead (optional). 
  • Pick-up the three centre stitches from the provisional cast-on edge, attach yarn and proceed to knit the  second i-cord. Ensure the i-cords are long enough to comfortably tie a bow.

Icord  Detail  - Knitted Lace Choker - Free Knitting Pattern
Brocade Choker - I-Cord Detail


Finishing:
  • Weave-in all yarn ends and block piece to ensure the lace is opened up.  


Should you require pattern support, please feel free to contact me via Ravelry, Twitter, Facebook, by e-mail or leave a comment below.

This pattern is for personal use only and may not be reproduced for commercial purposes without permission. Neither may you sell any items made from the directions in this pattern.

Should you wish to knit another choker (and, let's face it, one can never have enough chokers), the pattern for my Nameless Choker (pictured below) is available here and the pattern for the Cascade Choker (last image in this post) is available here.

Nameless Choker
Lace Choker Knitting
Cascade Lace Choker


© 2020 Clarice Asquith. All rights reserved. http://makedoandmendnovice.blogspot.com


Wednesday, 22 April 2020

Knitted Chokers - Two New Designs

Update: The knitting pattern for the Brocade Choker is now available here.


After completing a huge circular throw I was in need of a smaller knitting project and ended up designing two new lace chokers, the Brocade and the Cascade Choker, which are currently being finished.  

Whilst waiting for the Brocade Choker to complete its time on the blocking board, here are some in-progress images of the designs. 

Sunday, 30 June 2019

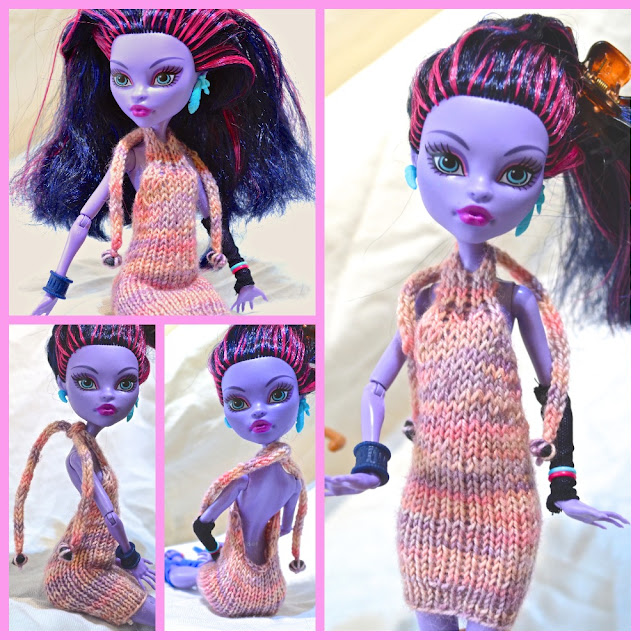
Free Monster High I-Cord Dress Knitting Pattern

After a long period of absence, I'm finally back attending to my many craft projects and I thought it would be a good idea to make a start with the release of my long overdue Monster High doll dress pattern. 


Free Monster High Doll Dress Pattern (Yarn: Araucania Botany Lace, 4 ply sock yarn)

The mini pencil dress, which will fit a Monster High doll measuring approximately 25cm, required less than 5 grams of yarn. For the pink Monster High dress I used Araucania Botany Lace, which is a 4 ply fingering weight sock yarn. For the other dress, I utilised leftover scraps of 4 ply Knitglobal sock yarn (shade: plum). Any sock yarn with similar attributes will be suitable for this pattern. 


Free Monster High Doll Dress Pattern (Yarn: Knitglobal 4 ply Sock Yarn)
Free Monster High Doll Dress Pattern (Yarn: Knitglobal 4 ply Sock Yarn) 

Monday, 12 November 2018

Monster High Knitted I-Cord Dress Pattern - Sneak Peek of the new Pattern

-Update: The Monster High I-Cord Dress Pattern is now up on the blog and available here.-


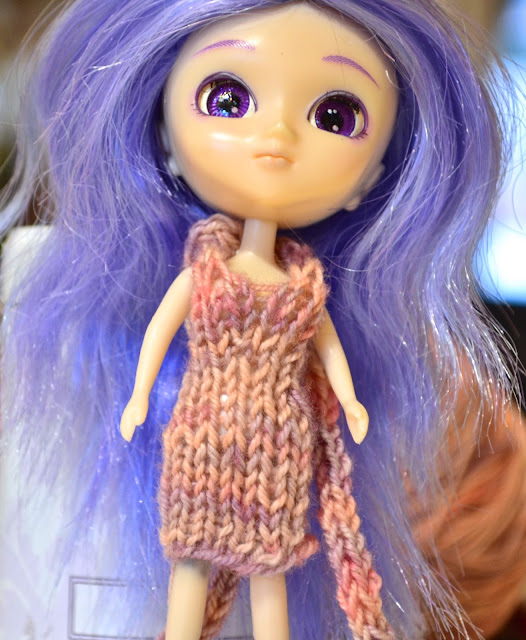
Following on from knitting a small pencil dress for a Takara Dollcena / Petite Blythe and Little Pullip doll (photos below) a few months ago, I have adapted my pattern to fit a Monster High doll.   


Knitting Pattern for Takara Petite Blythe / Dollcena Doll
Knitted Mini Pencil Dress for Takara Petite Blythe / Dollcena Doll

The pattern for the knitted I-Cord dress for Petite Blythes (above) is available here.

My knitting pattern for the Monster High dress (below) will be on the blog soon. In the mean time, I couldn't resist releasing a sneak peek of the new Monster High dress.

Monster High Doll Knitting Patern
I-Cord Dress Knitting Pattern for Monster High Doll

Monday, 2 April 2018

Knitted Pencil Mini - Dress for Petite Blythe or Little Pullip - Free Knitting Pattern


As promised months ago, here is my pattern for a miniature knitted pencil dress, designed for both Petite Blythe dolls, Dollcena Dolls and Little Pullips. 


Little Pullip Doll in custom Hand-Knit Pencil Dress 

The pink mini pencil dress, worn by the Little Pullip doll above required less than 2 grams of yarn. I used Araucania Botany lace, which is a 4 ply fingering weight sock yarn, but any sock yarn with similar attributes will be suitable for this pattern. The construction of the dress allows you to easily adjust the design when fitting the dress on your doll whilst knitting. 

Knitted seamlessly in the round from the bottom up, the pencil dress is secured at the back of the doll's neck with the help of two i-cords. The simple design can be customised by adjusting both the length of the dress itself and the length of the i-cords. In two prototypes of the design (worn by a Takara Tomy Dollcena below) I turned the mini into a maxi dress, but overall I prefer the shorter version.

Takara Tomy Dollcena Doll in Knitted Pencil Maxi Dress 

Friday, 4 September 2015

Exploring Basic Shapes: The Knitted Star

An end to a thoroughly unproductive day, in which I merely managed to complete the pattern notes for a basic knitted star in preparation for another upcoming project, which - going by the speed it's taken to complete these notes - will take a little while yet. 

Without further ado, here are the instructions for a basic star, which is worked in the round on double-pointed needles. The star's outer edges are shaped with short rows. The size of the star can be modified by increasing or reducing the total number of stitches before working the spikes on the outer perimeter.

Knitted Star
Materials Required
  • 4 double-pointed needles (dpns)
  • Approximately 10 - 30 grams of yarn (matching the needle size of the dpns) 
  • Scissors 
  • Darning Needle

Set - Up
  • Cast-on 7 stitches in whichever method you are most comfortable with (using a dpn)
  • As if knitting an I - Cord, bring the yarn to the first cast-on stitch
  • K1, KFB, K3, KFB, K1 [ 9 stitches in total]
  • Divide these 9 stitches evenly on three dpns and join in the round
Knitted Star after completion of first increase row 

Body of Star

Row 1: K9 
Row 2: KFB into all stitches [18 stitches]
Row 3: K 18
Row 4: *KFB, K2; repeat from * to end [24 stitches]
Row 5: K24
Row 6 *KFB, K3; repeat from * to end [30 stitches]
Row 7: K30
Row 8*KFB, K4; repeat from * to end [36 stitches]
Row 9: K36
Row 10*KFB, K5; repeat from * to end [42 stitches]
Row 11: K42

Please note: For a larger or smaller star, you can continue to increase the stitch count (adding 6 stitches on every even row) or decide to start the shaping of the spikes before you reach 42 stitches. Instead of utilising KFB increases, it is also possible to increase the stitch count with 'yarn overs'. This will result in a lace star.


Knitted Star - Detail

Before you start shaping the points, you should ensure that each dpn holds an even number of stitches. Half of the stitches on every needle will be shaped into one of the six outer points.


Shaping of the Outer Points


Shaping the Outer Points

Row 1: K7, turn (do not wrap the stitch when turning!)
Row 2: P7
Row 3: Sl1, K1, PSSO, K3, K2Tog, turn
Row 4: P5
Row 6: Sl1, K1, PSSO, K1, K2Tog, turn
Row 7: P3
Row 8: Sl1, K1, K1
Row 9: P2tog
Row 10: Bind-off remaining, break yarn

Proceed to shape the remaining five outer points in the same fashion.

A star is born.


Knitted Star


For pattern support, please feel free to contact me via Ravelry (ClariceAsquith), Twitter (@Slipstitched), Instagram (@clarice.asquith) leave a comment below or by e-mail: clarice.asquith@googlemail.com.


For a link collection to all original designs on the blog, please visit this link.

This pattern is for personal use only and may not be reproduced for commercial purposes without permission.

© 2015 Clarice Asquith. All rights reserved. http://makedoandmendnovice.blogspot.com