Showing posts with label Madelinetosh. Show all posts

Tuesday, 7 January 2020

Free Knitting Pattern - Monster High Doll Tights


Monster High Doll Tights Knitting Pattern


Having recently released a Monster High doll leggings pattern, I wanted to develop this project further and adapt the leggings pattern into Monster High doll tights. The result of my experiment is this pattern.

The tights are knitted seamlessly from the top-down and finished off at the toes with kitchener stitch.

For the tights in the images I used Madelinetosh Tosh Merino Light sock yarn in Victorian Gothic, but the pattern should work with any 4 ply sock yarn. 

To achieve snug-fitting tights, I recommend checking the fit on the doll frequently to see whether it's necessary to insert additional knit rows between the calf-decreases.  


Free Monster High Tights Pattern
Monster High Tights Knitting Pattern


Monster High Doll Tights

Pattern Notes


Materials and Tools

  • app 10 - 15g of 4 ply Sock Yarn 
  • 2 - 3mm Double-Pointed Needles 
  • 4 Stitch Markers
  • Scissors
  • Safety Pin (x 2) or Scrap Yarn (in contrasting colour)
  • Darning Needle (for kitchener stitch), Crochet Hook (for sewing in ends and tidying up)

Monster High Doll Tights  Pattern
Monster High Tights Knitting Pattern


Cast on 24 stitches.

Row 1: k1, p1 to end of row.

Row 2 - 4: Divide stitches evenly on 3 double-pointed needles and join in the round, placing a stitch marker at the beginning of the round. Continue in k1, p1 ribbing for another 3 rounds.

Waist Increases: 

Row 5: SM (slip marker), k1, PM (place marker), kfb, k8, kfb, pm, k1, pm, kfb, k10 to last stitch, kfb (28 stitches)

Row 6 - 8: Repeat above increase row three times until stitch count totals 40 stitches.

Continue knitting 5 - 8 rounds in stockinette stitch until the piece has reached the desired length and fits comfortably around the dolls hips. 

Dividing for the legs

Removing markers, at the beginning of the next round place the first 20 stitches onto waste yarn. 

Join the remainder of the stitches in the round, placing a marker at the beginning of the round.

Row 11: sm (slip marker), kfb, knit to last stitch, kfb (22 stitches)

Row 12: k all stitches

Thigh Decreases

Row 13: sl1, k1, psso, k to last 2 stitches, k2tog (20 stitches)

Row 14: k all stitches

Row 15: sl1, k1, psso, k to last 2 stitches, k2tog (18 stitches)

Row 16: k all stitches

Row 17: sl1, k1, psso, k to last 2 stitches, k2tog (16 stitches)

Row 18: k all stitches

Row 19: sl1, k1, psso, k to last 2 stitches, k2tog (14 stitches)

Row 20 - Row 57: continue knitting in stockinette stitch for 38 rows (knitting throughout) until the piece has reached the dolls calf.


Monster High Tights Pattern
Monster High Tights Knitting Pattern


Calf Decreases 


During this section, it's advisable to keep checking the fit on the doll. If you notice that you require more rows for added length, insert these between the decrease rows after checking the fit.

Row 58: k to last 4 sts before end of round, sl1, k1, psso, k2tog (12 stitches)

Row 59 - Row 63: k 4 rows in stockinette stitch 

Row 64: k to last 4 sts before end of round, sl1, k1, psso, k2tog (10 stitches)

Row 65 - Row 68: knit 4 rows in stockinette stitch 

Row 69: k to last 4 sts before end of round, sl1, k1, psso, k2tog (8 stitches)

Row 70 - Row 73: knit 4 rows in stockinette stitch 

Row 74: k to last 4 sts before end of round, sl1, k1, psso, k2tog (6 stitches)

Row 75 to bind off: continue knitting in stockinette stitch until the knitted fabric almost entirely engulfs the doll's foot as shown in the picture below.

When the doll's foot is comfortably covered by the knitted fabric, switch to two double-pointed knitting needles and align them parallel to one another, preparing to bind the last remaining stitches off in kitchener stitch.   


Ready for kitchener stitch bind off 

More in-progress photos of the tights are available here. You may find them helpful to show the bind-off.

When the bind off is complete, insert the needle at the corner of the toes and pull the yarn through to the inside to achieve a bump-free finish. 

The Second Leg 

Proceed to knit the second leg, dividing stitches held on scrap yarn evenly on three double-pointed needles. Using the m1 increase method, pick up 1 stitch at the beginning and at the end of the round to ensure a closed up seam. 

Mark the beginning of the round and start knitting the second leg, following the instructions above. Ensure that the thigh decreases are positioned at the inside of the leg and the calf decreases are positioned at the back of the doll's leg.

When the tights are complete, block the finished object by leaving it fitted on the doll. This will ensure that the fabric is nicely stretched into shape.  

Free Monster High Tights  Pattern
Monster High Tights Knitting Pattern


Free Monster High Doll Tights Pattern
Monster High Tights Knitting Pattern

Should you require pattern support, please feel free to contact me via Ravelry, Twitter, by e-mail or leave a comment below.

This pattern is for personal use only and may not be reproduced for commercial purposes without permission. Neither may you sell any items made from the directions in this pattern.


© 2020 Clarice Asquith. All rights reserved. http://makedoandmendnovice.blogspot.com

Knitted Tights for Monster High Dolls


After the release of my leggings knitting pattern for Monster High dolls, I decided to adapt my pattern for a pair of closed-up, snug-fitting knitted Monster High tights. 

These are knitted on tiny needles and there is quite a bit of shaping happening before the piece is finished with a kitchener stitch bind-off. 

I am really pleased with the result so far and will be releasing my pattern notes on the blog very soon. In the mean time, here are some in-progress photos of the project, which were taken whilst I was completing the first leg of the tights: 


Monster High Doll - Knitted Tights in Progress
Monster High Doll - Tights Knitting in Progress

My Monster High tights knitting pattern is now available here.


Friday, 27 December 2019

Big Jim Action Figures - Free Pants Knitting Pattern

Boxer Shorts for Big Jim Action Figures


Having crafted a lot for my collection of Monster High fashion dolls lately (more here), I decided it was time to branch out and design some pants / boxer shorts for Winnetou, a Big Jim Action figure and by far the oldest doll in my collection.

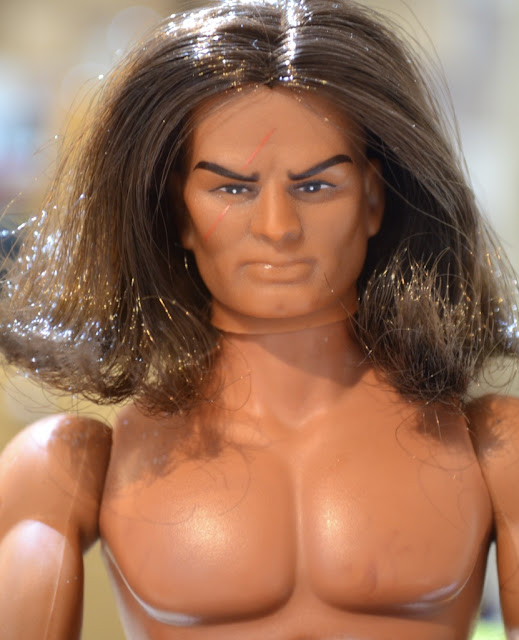
Big Jim Action Figure (Winnetou / Geronimo) by Mattel ca 1970s / 1980s


With boys being the obvious target market, Big Jim action figures were produced by Mattel during the 1970s up to the mid-1980s, when production of the line eventually seized. As you can see from the picture above, the dolls don't have a proper head, yet come with a variety of other features, including a bulging biceps and the legendary push button in their backs, enabling the characters to execute what is supposed to resemble 'a karate chop move'. For a demonstration, watch the video below.


Though I don't have any concrete proof, I assume that my figure is named Winnetou, the Native American chief, originally marketed as part of the German 'Karl May' movie edition of the toys. These were distributed in other countries as part of the regular Big Jim / Kid Acero line with a  generic wild west theme and Winnetou being renamed Geronimo. 

Unlike most of the other Big Jim figures, Winnetou was one of the few characters, who sported a head full of hair, which, given the age of the toy, is still in perfect condition.

At any rate, having recently designed a basic leggings pattern for the Monster Highs, I adapted the pattern for Big Jim action figures and knitted Winnetou (and friends) a few pairs of boxer shorts. Winnetou seems pleased and my boxer short pattern can be found below.


Big Jim Action Figure (Mattel)
Big Jim Action figure (by Mattel) in hand knitted boxer shorts (by me)
Big Jim Action figure Winnetou (by Mattel) wearing handknitted boxer shorts
Big Jim Action figure (by Mattel) in hand knitted boxer shorts (by me) 


Free Big Jim Action Figure Boxer Shorts Knitting Pattern


Knitted seamlessly from the waist down, this pattern gives you the chance to check whilst knitting to ensure a snug fit; and the length of the boxer shorts  can obviously be adjusted as you go. 


Big Jim Action figure Winnetou (by Mattel) wearing handknitted boxer shorts

Big Jim Action figure Winnetou (by Mattel) wearing handknitted boxer shorts

Knitted on 2.5mm to 3mm needles, the pattern is suitable for all types of sock yarn. For  the  boxer shorts in the images, I used Madelinetosh Tosh Merino Light (Victorian Gothic - for the dark purple pants) and Araucania Botany Lace for the pink and multi-coloured versions.


Materials and Tools

  • app 5 - 10g of: 4 ply Sock Yarn 
  • 2 - 3mm Double-Pointed Needles 
  • 4 Stitch Markers
  • Scissors
  • Safety Pin x2 or Scrap Yarn (in contrasting colour)
  • Darning Needle, Sewing Needle or Crochet Hook (for sewing in ends)

Big Jim Action figure Winnetou (by Mattel)
Big Jim Action figure Winnetou (by Mattel) wearing handknitted boxer shorts

Instructions

Cast on 30 stitches.

Row 1: k1, p1 to end of row.

Row 2 - 5: Divide stitches evenly on 3 double-pointed needles and join in the round, placing a stitch marker at the beginning of the round. Continue in k1, p1 ribbing for another 4 rounds.

Waist Increases: 

Row 6: SM (slip marker), k1, PM (place marker), kfb, k11, kfb, pm, k1, pm, kfb, k to last stitch, kfb (34 stitches)

Row 7 - 11: Repeat above increase row five times in stockinette stitch, knitting in the front and back of each stitch directly before and after each marker until the stitch count totals 54 stitches.


Dividing for the legs

Removing markers, at the beginning of the next round place the first 27 stitches onto waste yarn. 

Join the remainder of the stitches in the round, placing a marker at the beginning of the new round.

Row 12: sm, kfb, knit to last stitch, kfb (29 stitches)

Continue knitting in stockinette stitch for 11 rounds and bind-off or continue knitting until piece has reached the desired length.

Proceed to knit the second leg, dividing stitches held on scrap yarn evenly on three double-pointed needles. Using the m1 increase method, pick up 1 stitch at the beginning and at the end of the round to ensure a closed up seam. Mark the beginning of the round and start knitting the second leg, following the instructions above. 

Weave in all ends, block and enjoy!

For my other doll knitting patterns, please visit this link.


Big Jim Action figure Winnetou (by Mattel) wearing handknitted boxer shorts


Big Jim Action figure Winnetou (by Mattel) wearing handknitted boxer shorts

Big Jim Action figure Winnetou (by Mattel) and his haul of hand-knitted boxer shorts

Should you require pattern support, please feel free to contact me via Ravelry, Twitter, by e-mail or leave a comment below.
This pattern is for personal use only and may not be reproduced for commercial purposes without permission. Neither may you sell any items made from the directions in this pattern.


© 2019 Clarice Asquith. All rights reserved. http://makedoandmendnovice.blogspot.com

Saturday, 14 December 2019

Free Pattern: Knitted Leggings for Monster High Dolls

Free Monster High Leggings Pattern 

The Monsters were in need of some new clothes, and I decided it was time to make a few knitted leggings / pants.

This pattern is for  Monster High dolls, measuring approximately 26cm in height. Knitted seamlessly from the waist down, it gives you the chance to check whilst knitting to ensure a snug fit; and the length of the leggings can obviously be adjusted as you go. 


Monster High Doll Free Knit Leggings Pattern


Knitted on 2.5mm to 3mm needles, the pattern is suitable for all types of sock yarn. For the leggings below, I used Madelinetosh Tosh Merino Light (Victorian Gothic) and Araucania Botany Lace. 

Monster High Doll Free Knit Leggings Pattern

As you can see in the images, two of the Monsters are wearing a light green, fluffy jumper and OOAK wigs made from brushed acrylic yarn. The pattern for the jumper is available here, and instructions on how I make my doll yarn wigs can be found here and here. All of my other Monster High projects are available via this link.

Monster High Doll Free Knit Leggings Pattern


Without further ado, here is my knitting pattern for the knitted leggings: 


Monster High Doll Leggings

Pattern Notes


Materials and Tools

  • app 5 - 10g of: 4 ply Sock Yarn 
  • 2 - 3mm Double-Pointed Needles 
  • 4 Stitch Markers
  • Scissors
  • Safety Pin x2 or Scrap Yarn (in contrasting colour)
  • Darning Needle, Sewing Needle or Crochet Hook (for sewing in ends)


Saturday, 10 August 2019

The Weekly Swatch: Another Zig Zag Lace Knit Stitch

Lace Knit Stitch


As mentioned in my last weekly swatch post, in which I was showcasing a 'zig zag lace stitch pattern', there are many variations of the so-called 'zig zag stitch' motif in lace knitting. That's why I have decided to knit up another zig zag swatch for this week's not-so-weekly, weekly swatch. 


Zig Zag Lace Knit Stitch Variation, Yarn: 4 ply Madelinetosh Tosh Merino Light


Here, we have another zig zag stitch motif. It requires a multiple of 9 stitches and is knitted over 16 rows. Stitches on all even rows are purled throughout, all in- and decreases are a combination of yos, k2togs and pssos.


Thursday, 27 August 2015

Knitting with Non-Traditional Materials: The Nameless Choker meets the Nameless Cuff

Roughly one year ago I released project notes for a simple knitted lace choker, the Nameless Choker. The pattern notes for the 'Nameless Choker' are available here. 

Specifically designed to use up the last remnants of sock yarn after the completion of a larger project, Nameless is an ideal project for a very small quantity of yarn (approximately 10 - 20 grams).


Nameless Choker, Knitting Pattern available here


One year on, I decided to explore the choice of material for this project in more detail. Whilst certain types of sock and cotton yarn (especially the sturdier varieties) work very well with the design, the pattern provides an ideal starting point for venturing into new territory, i.e. the cross-over point where knitting and jewellery-making techniques meet and blend into one another. 

For my revision of the pattern, I am planning to adapt the original design with the help of a number of non-traditional materials such as waxed cotton thong cord (1mm), leather cord (1mm) and, potentially, jewellery wires.

Having completed an initial experiment with waxed cotton cord (shown below), it is clear that certain design elements  of the original pattern (stitch count, lace repeats, needle size and quantities etc.) will obviously have to be revised and modified to take the properties of cotton thread into consideration, but I am quite happy with the initial outcome.

The first insight derived from yesterday's cotton cord knitting session is that 10 metres of waxed cotton thong are not sufficient to produce a fully fledged knitted choker on the basis of the original Nameless pattern, but they will be enough to make a knitted wrist cuff.   

Nameless Cuff (knitted with 1mm waxed cotton cord)


Nameless Cuff (knitted with 1mm waxed cotton cord)


Nameless Cuff (knitted with 1mm waxed cotton cord)

Nameless Cuff Prototype

Nameless Cuff - Prototype

Further updates and finalised project notes on the Nameless Cuff and the modified Nameless Choker will be up on the blog shortly. 

In the meantime, stay tuned... 


Thursday, 11 September 2014

Free Pattern: The Nameless Choker

Nameless


The Nameless Choker is a simple and quick lace project, specifically designed to use up a small quantity of sock yarn (approximately 10 - 20 grams), i.e. roughly the amount of yarn you might have lying around following the completion of a larger project. The quantity of yarn I used for my choker hardly registered on my set of kitchen scales and the above estimate is rather conservative.

It is also an ideal pattern for beginner lace knitters, wishing to get to grips with two of the most common knitting decreases (k2tog and ssk), without having to commit too much time or too many resources; or for all those knitters who enjoy creating knitted accessories and jewellery, either for themselves or for others.


Materials

You will require the following materials:

  • approximately 10 - 20 grams of sock yarn (for my choker I used Madelinetosh Tosh Merino Light Sock Yarn in Victorian Gothic)
  • 3mm knitting needles (or the size specified by the yarn manufacturer)
  • scissors
  • darning needle 
  • 2 buttons 

Nameless Choker in Progress

Gauge

Gauge is not essential for this project but you should have a rough idea of how stretchy your chosen yarn is. This is a made-to-measure project, and as neck circumferences differ, you will have to regularly check whether your choker has reached the desired length. If you decide to knit this project with an unfamiliar yarn and you are not entirely sure how far it will stretch after blocking, it may be beneficial to knit a small gauge swatch and block this in order to get an idea of how the yarn will behave and, most importantly, to check its stretch.


Nameless Choker in Progress


Project Instructions

  • Set - up:

    • Cast on 12 stitches, using whichever cast-on method you are most comfortable with.
    • Knit 4 rows

Once you have completed the set - up, you are ready to start on the lace sequence of the pattern:

  • Lace Pattern:

Row 1: K3, YO, K1, K2tog, SSK, K1, YO, K3
Row 2: K2, P8, K2
Row 3: Repeat Row 1
Row 4: Repeat Row 2

Keep repeating the above sequence until both ends of the choker almost meet, when it is fitted for measuring. Bearing in mind that the choker should fit relatively tightly around the neck, I left a gap approximately as wide as the top of my index finger to allow for a snug fit following blocking. 

When your choker has reached the desired length, stop knitting the lace sequence on a purl row. Next, continue knitting three rows in garter stitch and proceed to bind off.

Nameless in Madelinetosh Tosh Merino Light (Victorian Gothic)
  • Blocking:

Blocking your choker is an absolute must in order to open up the lace. I opted for wet-blocking.

  • Finishing:
Following blocking, it is time to sew in ends and to add two buttons for fastening the choker. The buttons can be attached to either end of the choker. I decided to place mine on the cast - off edge, as this usually turns out slightly wider, directly underneath the openings of the yarn over increases. The  first holes created by the yarn over increases on the opposite end will serve as button holes.

Your choker is ready to be worn. 

Nameless in Madelinetosh Tosh Merino Light (Victorian Gothic) 

Enjoy!

! Update: One year on, I am revisiting the Nameless Choker. I am currently in the process of adapting the pattern to non-traditional knitting materials (cotton thread / leather etc). More on this venture is available here. !

! Update: I have designed another lace choker pattern (image below), the Brocade Choker. My pattern is available here. !

Brocade Choker Knitting Pattern


For pattern support, please feel free to contact me via Ravelry (ClariceAsquith), Twitter (@Slipstitched), leave a comment below or by e-mail: clarice.asquith@googlemail.com.

This pattern is for personal use only and may not be reproduced for commercial purposes without permission.

An update on knitting a variation of this pattern (pictured below) with non-traditional materials is available here


Nameless Cuff, More here.


Nameless Cuff, More here.

© 2014 Clarice Asquith. All rights reserved. http://makedoandmendnovice.blogspot.com