Showing posts with label Design Digest. Show all posts

Sunday 31 January 2021

The Simple Ruffled Edge - Without M1L / M1R Increases

The Simple Knitted Ruffled Edge (worked at the end of the knitting)  

When I was knitting my Virga Shawl, I wanted to incorporate a ruffled edge detail, but didn't feel like working m1l / m1r increases, considering the overall stitch count at this stage of the project (over 500 stitches). And so the search began for a simpler way of working the ruffled edging without m1l / m1r increases. 

Knitted Ruffled Edging
Knitted Ruffled Edging  - Virga Shawl Detail    


The Simple Ruffled Edge - With M1L / M1R Increases

The most common, simple ruffled edging is achieved by working m1l (make one left) and m1r (make one right) increases into the knitting. In the instructions below for a ruffled edge worked at the end of the knitting on a multiple of 6 plus 5 stitches, the m1l / m1r increases are placed just before and after the knit stitches on the right side rows. This results in an increase of purl stitches on the following row (wrong side row), whilst the amount of knit stitches on the wrong side rows remains constant throughout. In turn, as the stockinette part of the fabric grows, this creates the ruffle on the right side of the knitting.

The stitch pattern for a ruffled edging with M1L / M1R increases is as follows: 

Row 1 (RS): P5, *k1, p5, rep from * end.

Row 2 (WS): K5, *p1, k5, rep from * end.

Row 3 (RS): P5, *M1R, k1, M1L, p5, rep from * end.

Row 4 (WS): K5, *p3, k5, rep from * end.

Row 5 (RS): P5, *M1R, k3, M1L, p5, rep from * end.

Row 6 (WS): K5, *p5, k5, rep from * end.

The m1l and m1r increases between the sections of purl and knit stitches are continued as shown above until the ruffled edging has reached the desired length. 

Whilst the above technique produces a neat looking ruffled edge, it is time consuming as a result of the m1l / m1r increases. 


The Simple Ruffled Edge - Without M1L / M1R Increases
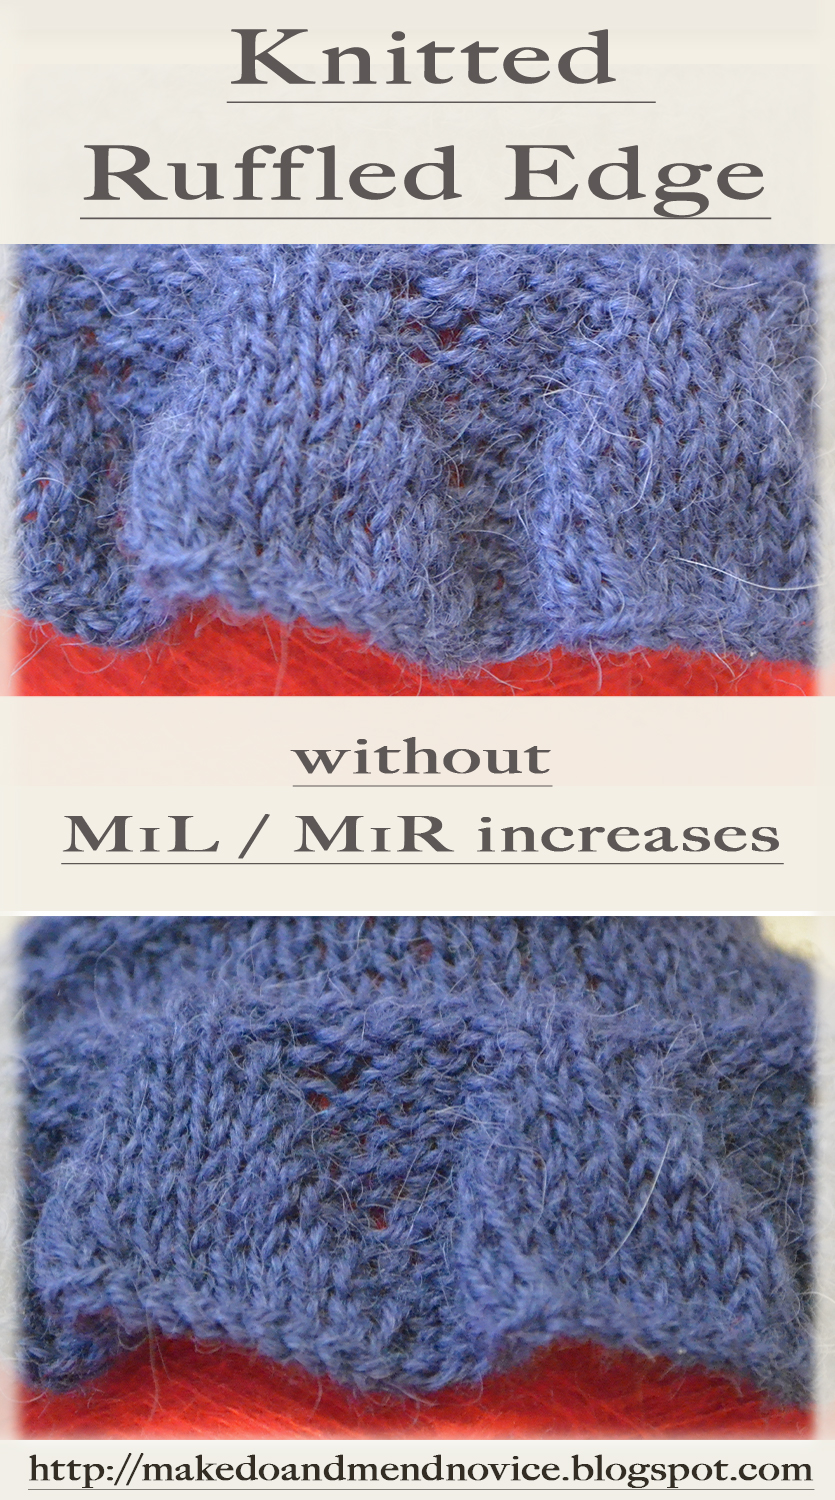
Ruffled Edging Knitting

The Simple Ruffled Edge - Without M1L / M1R Increases


In my efforts to avoid m1l / M1r, I decided to try knitting the ruffled edge with kfb (knit one into front and back) increases initially. Yet, when I knitted my edge sample with kfb increases, I didn't feel that the symmetry of the edging looked quite right, as the kfb increases created large holes in the fabric. All in all, I felt that the kfb increases didn't look neat. To fix this and improve the appearance of the ruffled edge without working m1l and m1r increases, I proceeded to work the increases slightly differently and tried something new. 

Instead of knitting in the front and back of the stitch that was to be increased, I decided to work p/ktbl and k/ptbl increases before and after the knit stitches on the right side row. (I am not sure whether the abbreviations k/ptbl and p/ktbl are correct, but as I was unable to find them referenced anywhere, I am for now just going along with these abbreviations to describe this type of increase.)

The p/ktbl and k/ptbl increases are achieved by purling (as normal) and then knitting through the back loop of the same stitch (p/ktbl) and by knitting (as normal) and then purling through the back loop of the next increase stitch (k/ptbl), thus maintaining the symmetry of knit and purl stitches. 

Increasing in this way tightens the holes, that would appear if a simple kfb increase was used, and is also much faster than working the m1l / m1r increases, which are traditionally called for. By working the increases into the purl stitch immediately preceding and following the knit stitches I maintained the increases on the right side rows just before and after the knit stitches. 

The P/ KTBL  K/PTBL Ruffled Edge

The stitch pattern for a ruffled edging with a multiple of 6 plus 5 stitches worked with P/ KTBL and K/PTBL increases looks like this: 

Row 1 (RS): P5, *k1, p5, rep from * end.

Row 2 (WS): K5, *p1, k5, rep from * end.

Row 3: P4, *(p/ktbl) into same stitch, k1, (k/ptbl) into same stitch, p3, rep from * to last stitch, p1.

Row 4: K5, *p3, k5, rep from * end.

Row 5: P4, *(p/ktbl) into same stitch, k3, (k/ptbl) into same stitch, p3, rep from * to last stitch, p1.

Row 6: K5, *p5, k5, rep from * end.

Row 7: P4, *(p/ktbl) into same stitch, k5, (k/ptbl) into same stitch, p3, rep from * to last stitch, p1.

Row 8: K5, *p7, k5, rep from * end.

Row 9: P4, *(p/ktbl) into same stitch, k7, (k/ptbl) into same stitch, p3, rep from * to last stitch, p1.

Row 10: K5, *p9, k5, rep from * end.

Row 11: P4, *(p/ktbl) into same stitch, k9, (k/ptbl) into same stitch, p3, rep from * to last stitch, p1.

Row 12: K5, *p11, k5, rep from * end.

Continue to increase as above until the edging has reached the desired length and proceed to bind off in pattern.


ruffled edge knitting no m1r / m1l increase
Simple Knitted Ruffled Edge 


For more knit stitch patternsplease follow this link to my knit stitch library.

Sunday 13 September 2020

Introducing the Virga Shawl


New Knitting Pattern: The Virga Lace Shawl


Despite having completed work on a number of new patterns in recent weeks and months, I have not updated the blog with them. 

This is about to change and I decided to make a start today by posting a few images of my new shawl pattern, the Virga shawl.

Whilst the first test knit of the pattern is now complete, the shawl still requires blocking as well as a minimal amount of finishing; and I need to get to grips with my pattern notes before combining them into a usable pattern.

Sunday 25 March 2018

Simple DIY Monster High Outfit - made from scraps

The Great Scarrier Reef edition of Clawdeen (Monster High)

The Great Scarrier Reef edition of Clawdeen moved in three months ago and I completely ignored her pleas for an outfit change. I'm pleased to report that I finally rectified this dire state of affairs and - after a brief outing into the world of hand sewing - here we have her in a prototype of a new stripy outfit, which was made from the sleeve of a an old top and the salvaged components of a retired bra. 


Clawdeen Wolf (Monster High) in custom stripy outfit

As a result of the fins on her hips and arms, and her mermaid-style stand, the scarrier reef version of Clawdeen poses certain challenges when it comes to creating clothes for her. 

The  design of this two-part (three-part, if you care to include her small scarf) outfit tries to work around these obstacles (arm fins, hip-fins and and tail-stand) rather than altering the doll.

Custom DIY Outfit for Monster High Great Scarrier Reef Clawdeen 

As I didn't have a suitable piece of velcro to hand, I resorted to cannibalising an old bra to salvage the metal fasteners and the elastic bands. The fabric scrap used for her sirrong-style skirt and drapey top is rather stretchy and wraps tightly around the elastics when sewing up the fasteners. The elastic top seams help adding drape to skirt and top, and ensure a good fit around hips (below the fin fasteners) and torso. 

Clawdeen should be much happier now, whilst I'm off improving the design. 

Clawdeen Wolf Monster High in Custom Outfit

Sunday 11 March 2018

Vintage 80s Knitting Patterns - Part 2

If you can't get enough of 1980s knitting patterns, here is another post full of them. Some might be 1970s, some 1990s. Unfortunately, the majority of these don't have a publication date.

At any rate, be prepared for broad shoulders and daring colours.

More of my vintage knitting pattern collection is available here.

Vintage 80s Knitting Pattern
Vintage 1980s Knitting Pattern, Ladies' Slash Neck Slipover - Argyll Wools Ltd, Leaflet No 647


Vintage1980s Ladies' Jersey with Aran Stitch Bands Knitting Pattern

Saturday 10 March 2018

Vintage 80s Knitting Patterns

As I was going through my vintage knitting pattern collection, I came across these gems from the 80s. They simply had to go on the blog. 

It's time for knitted jackets (preferably with foam shoulder pads), over-sized jumpers and colour blocks. Let's go back to the 1980s.

Enjoy!


Vintage 80s Argyll Knitting Pattern - Ladies' Cotton Drop Stitch Sweater 

Vintage 80s Alafoss Ladies' Jumper Knitting Patterns 

Friday 24 November 2017

Crochet for Dollcena Dolls - Little Grey Hat

I literally have no idea how this little doll hat came together. It's a crochet hat and I can't crochet. I have some sort of mental block when it comes to crochet. 

I'm not entirely sure what I did and how it's constructed, I just used a crochet hook and it happened to turn out this way. By lucky coincidence, it happens to fit my Dollcena Doll. 

I'm afraid, I won't be able to write up project notes this time. But should I happen to attempt another crochet doll's hat, I promise to pay more attention to the process.

Dollcena Doll with Crochet Hat - Yarn: Stylecraft Kontiki


Dollcena Doll Crochet Hat (Doll by Takara Tomy, Yarn: Stylecraft Kontiki, Craft: Crochet)

Sunday 30 August 2015

Winter Stole Update: Test Knit Completed ✔

Back in January I released my pattern notes for the Winter Stole, a lace stole knitted with a chunky alpaca / wool blend on 6mm needles. More background on the rationale behind the design and my choice of yarn is available here; and the pattern is available here.


The Winter Stole pattern was developed to encourage knitters (and myself) to diversify the choice of materials when knitting lace. Depending, of course, on the complexity of the lace stitch sequence and the overall design, I was aiming to showcase that it is possible to produce knitted lace with chunkier yarns. 

Winter Stole (yarn: Wendy Zena, pattern available here.


Winter Stole (yarn: Wendy Zena, pattern available here.

Thanks to Tara (tara53aus on Ravelry) I am now pleased to announce that the pattern has undergone its first 'independent' test knit and Tara's completed stole is pictured below:


Tara's Completed Winter Stole 

Regular readers of this blog will know that I am always thankful for the feedback I receive from the knitters of my designs, especially from those, who put their trust in a pattern that has so far only been completed by the pattern's very own designer. This was the case with the Winter Stole pattern. 


This time round and following the feedback I received from Tara, I am particularly pleased to announce that my original Winter Stole pattern is free of mistakes, slips and no modifications are necessary.


Tara's Stole Blocking

I was also delighted to see that Tara not only used a natural, undyed alpaca yarn to complete her stole, she also chose a very special handspun yarn from an independent producer in Western Australia. 


Sadly, I was not able to retrieve more information on the producer over the web, but the ball band details can be seen in the picture below. So, if you are located in Western Australia, I suggest you get your hands on a delightful skein (or two) of Greg's and Wendy's handspun.


A remark on the pattern from my side: I have decided to update the pattern notes of the Winter Stole slightly with optional variations, to take those knitters into consideration, who are opting to use handspun yarn (Alpaca or otherwise) and may thus only have a finite amount of yarn to complete the project. The stole was designed to be rather wide and fewer cast-on stitches (resulting in fewer lace motif repeats in the body of the piece) will ensure that the piece will turn out long enough to be classed a 'stole'. These notes on modifications of the original pattern will be published shortly. In the meantime, the original Winter Stole pattern is available here.

Finally and once again, a very big 'THANK YOU!' to Tara for her feedback, for being the first to test the pattern and for choosing a delicious, independently produced, handspun yarn to complete her project. 

For any interested knitters, wishing to complete a Winter Stole and requiring pattern support, please feel free to contact me via Ravelry (ClariceAsquith), Twitter (@Slipstitched), leave a comment below or by e-mail: clarice.asquith@googlemail.com.


For a link collection to all original designs on the blog, please visit this link.

Thursday 27 August 2015

Knitting with Non-Traditional Materials: The Nameless Choker meets the Nameless Cuff

Roughly one year ago I released project notes for a simple knitted lace choker, the Nameless Choker. The pattern notes for the 'Nameless Choker' are available here. 

Specifically designed to use up the last remnants of sock yarn after the completion of a larger project, Nameless is an ideal project for a very small quantity of yarn (approximately 10 - 20 grams).


Nameless Choker, Knitting Pattern available here


One year on, I decided to explore the choice of material for this project in more detail. Whilst certain types of sock and cotton yarn (especially the sturdier varieties) work very well with the design, the pattern provides an ideal starting point for venturing into new territory, i.e. the cross-over point where knitting and jewellery-making techniques meet and blend into one another. 

For my revision of the pattern, I am planning to adapt the original design with the help of a number of non-traditional materials such as waxed cotton thong cord (1mm), leather cord (1mm) and, potentially, jewellery wires.

Having completed an initial experiment with waxed cotton cord (shown below), it is clear that certain design elements  of the original pattern (stitch count, lace repeats, needle size and quantities etc.) will obviously have to be revised and modified to take the properties of cotton thread into consideration, but I am quite happy with the initial outcome.

The first insight derived from yesterday's cotton cord knitting session is that 10 metres of waxed cotton thong are not sufficient to produce a fully fledged knitted choker on the basis of the original Nameless pattern, but they will be enough to make a knitted wrist cuff.   

Nameless Cuff (knitted with 1mm waxed cotton cord)


Nameless Cuff (knitted with 1mm waxed cotton cord)


Nameless Cuff (knitted with 1mm waxed cotton cord)

Nameless Cuff Prototype

Nameless Cuff - Prototype

Further updates and finalised project notes on the Nameless Cuff and the modified Nameless Choker will be up on the blog shortly. 

In the meantime, stay tuned... 


Sunday 26 July 2015

Going Full Circle: The Picot Pi Shawl is OFF THE NEEDLES


According to Elizabeth Zimmermann, we should be knitting circular shawls during the summer months, and that's exactly what I have done. Below is a first glimpse of my Pi Shawl variation, based on Zimmermann's timeless Pi Shawl pattern.


I haven't counted the picot bobbles of my Pi and keeping track of the exact stitch count in the final stages of my pattern is not essential, but I estimate that the Picot Pi's final bind-off row consisted of over three thousand stitches, when including the additional cast-on stitches. More on the Picot bind-off technique is available here

The completion of the knit was further delayed by having to find a more or less suitable yarn substitute for Regia (4 ply silk), as I was running out shortly after starting the last row. And although my knitting cupboard is home to many treasures, it may at times take a while to retrieve these. It appears somewhat crammed in there at the moment.


Pickle invading the cupboard and getting comfy...as usual

Sunday 14 June 2015

Design Digest: Revisiting the Ammonite Prototype

Following a few enquiries from the knittersphere regarding the prototype Ammonite in grey, which eventually evolved into the Ammonite pattern, I finally found the time to write up my recollections, which might help with the queries I recently received. 

Apologies for such a late response to all those who got in touch!

Ammonite Mark 2 Pattern instructions available here

Ammonite Mark 3, Project Notes are available here

Unfortunately, I didn't take any notes when knitting my freestyle Ammonite prototype. Below you will find some pointers, which might be useful, should you wish to achieve a different appearance from the final Ammonite pattern: 


Freestyle Ammonite


Tuesday 26 May 2015

The First Sock is the Hardest: Turning Those Heels...

Gently inserted into everyday conversation, the mere mention of sock knitting tends to provoke remarks about its apparent difficulty and a comment on the intricacy of heel turning will undoubtedly be thrown in here and there as well. Even non-knitters or those only loosely connected to the fibre sphere will appear to sound like experts on the topic of sock knitting and inevitably convey a sense of a awe when they utter that ominous phrase: 'turning a heel'. 


And all of a sudden it seems that everyone has heard about how immensely difficult it is to turn a heel. "Turning the heel', i.e. the part of the knitting when you shape the heel of the sock and work your piece on several needles whilst decreasing, seems to simultaneously instil feelings of awe, fear and amazement whenever it is mentioned, especially if non-knitters join the conversation. 
It sounds somewhat magical, surgical and therefore terribly advanced. 


Sock Knitting Heel Detail

Saturday 23 May 2015

A Tribute to Elizabeth Zimmermann's Pi

In an earlier post on Elizabeth Zimmermann's Knitter's Almanac, I outlined why I believe that Zimmermann's no-frills paperback should be considered a very special publication indeed, despite its somewhat bland appearance and apparent lack of project photography. 

First up, a few words on the low-cost nature of the paperback edition: The Almanac features instructions to over 15 patterns (including 4 sweaters) on approximately 150 pages, making this a densely packed publication. With the exception of the book cover, the project photography is in black and white throughout, thus lacking the visual appeal and photographic detail of contemporary knitwear publications. 

In short, the project photography (though decent and undertaken with great care) is by modern standards outdated. As a result, those of us, who derive inspiration from ogling an appealing finished object before casting on, will undoubtedly be disappointed.  To really get in the mood for knitting a Zimmermann pattern from the Almanac, it might be best to start off by trawling the web for pictures of finished Zimmermann projects and adaptations of her original designs. At this point, her true genius will be revealed. The Pi Shawl pattern provides a perfect case in point.  

Zimmermann's Pi Shawl design and instructions have inspired countless knitters to produce a multitude of design variations based upon Zimmermann's original design. The Pi Shawls featured below are merely a small selection of the many outstanding projects on show across the  web. 

Special thanks go to MadKnits, Terhi, Aisling Doonan and Glenna C aka crazyknittinglady  for allowing me to showcase their most amazing, finished Pis here on the blog. Thank you so much! 

For even more Pi inspiration, please visit my Pi Shawl board on Pinterest.


Terhi's Pi, Yarn: Wetterhoff Sivilla and Fiberphile Merino 

Sunday 8 March 2015

Another Brain Cleanser - Baktus in Cartridge Rib


Almost one year ago, I was busy knitting my first baktus (a triangular scarf in garter stitch throughout). The pattern for the original baktus can be found here. I highly recommend it as a brain cleanser project. For those occasions when you wish to knit, but lack the desire for a serious challenge. For those occasions, it's an ideal base project. 

Due to its simplicity, the pattern inspires to play around. If you feel like trying new techniques (knitting with multiple colours, cabling, basic lace and so on), then the baktus should be on your list of 'go-to-patterns'.


Garter Stitch Baktus

Sunday 11 January 2015

Knitting Lace with Chunky Alpaca Yarn


Admittedly, to a sock yarn lover the above might not sound particularly intriguing. As a sock yarn connoisseur myself, I have to admit that the idea of knitting simple lace with a chunky alpaca / wool blend did not seem appealing. Nevertheless, in the interest of reducing the size of my yarn stash, I decided to embark on this adventure some time in late 2014. 


Winter Stole in Progress (Yarn: Wendy Zena)

Sunday 21 September 2014

A Gallery of Ammonites

In a recent post on a new design, I briefly reflected on why I enjoy creating my own knitting patterns. It turns out that I secretly take pleasure in the hardship of the creative process: choosing yarns, counting stitches, knitting swatches, discarding those swatches and so on, until I arrive at combinations that can be turned into a viable design. 

Ammonite in Moonlight Sonata (James C Brett Yarns) 

Saturday 5 July 2014

Sunday 24 March 2013

Still No German Translation for Ammonite ...or Ammonite in Moonlight Sonata (James C Brett)

I should be renaming this blog into the 'Absent Knitter's Landing Page'. In actual fact, I might just do that in a minute. Considering this rather long period of silence (due to having nothing to report on the knitting front as of late), I may take a while to find the 'knitting voice'...the nice, fluffy me. It's not here at the moment. I lost it on a train between Faversham and Victoria. 

Commuting and knitting. It can be done, but it requires dedication to preparation, meaning you have to be organised at 6:00am in the morning.

So what have I been doing? Reading, mainly. Because that's what one does on a train. Preferably with headphones, so you don't have to witness the human misery around you. Somewhere between Faversham and Victoria I came across some interesting knitting - related trivia...it involves men, knitting and the island of Jersey (Channel Islands):

Men (as I keep telling non - knitters: knitting was the domain of our male brethren before mere females were allowed to engage in it) are apparently prohibited to knit during the fishing season on the Island of Jersey. By law. To this day.


Thursday 17 May 2012

Design Digest: Ammonite - Part 2

... in which, amongst other things, she talks about sock yarn, choosing a knitting project to suit your mood and the skill level required to knit an Ammonite.


When approaching a design, simplicity is sometimes best. I suppose this is the essence of my previous post on designing Ammonite. Once I had accepted this simple, yet fundamental rule, the design process assumed its own momentum. However, as already mentioned in Part I of my design digest, the first knitted sample turned out to resemble an Elizabethan collar rather than a generously sized, ruffled shawl.

Ammonite: First Test - Knit


This was clearly down to my choice of yarn and a kfb - increase bonanza. Repeated attempts of ironing these faults out with the help of prolonged and intense blocking, yielded only very limited results and did not really seem to make much of an impact overall. It soon dawned on me that I needed to have a rethink on my choice of yarn and moderate my use of increases.

In the first instance I had a look at my stash, which was lacking sock yarn at the time. I briefly contemplated knitting a second Ammonite in Patons UK Misty, but decided against it in the end. I felt that cobweb - type mohair yarn would not give sufficient expression to the ribbed texture of the stitch motif. The answer, obviously, was to use sock yarn and so I went yarn shopping. Joy! (No, this time I really had to...;-) Of course, I had seen some very enticing sock yarns (100g @ £15.00) and even though these looked tempting, I decided to settle on a less costly alternative for two reasons:

Firstly, my pattern required a fair quantity of yarn, approximately 300g to be precise. And secondly, I did not want to overspend on materials, not knowing whether my pattern would actually be right for the materials chosen.

Mietze ... inspecting again

Friday 4 May 2012

Design Digest: Ammonite - Part I


Ammonite and the Grey Cone...

If you are reading this post, I suppose you have seen Ammonite on Ravelry or on Flickr and you might want to know a little more about the design process and my inspiration for the pattern. Perhaps you have merely stumbled upon this blog because you are interested in knitwear design or maybe good, old Google directed you to this page because you are interested in fossils.


If you are looking for fossil - related information (and I don't mean the knitted kind), I have to disappoint you, as I am going to talk about a knitting pattern and, unless you are interested in knitting, what follows will not be a great deal of help to you.

So, Ammonite...It's probably best to start at the beginning. Roughly a year ago I was browsing in a local charity shop and found a cone of grey DK - weight yarn. There was no further information regarding the identity of the yarn, only a label inside the cone stating it was an acrylic / wool mix (30% wool, 70% acrylic). Having done a bit of research, I now believe that the yarn was manufactured by Yeoman Yarns in Yorkshire, an interesting yarn manufacturer, especially for the thrifty knitters amongst us. Yeoman's yarns come wrapped around cones, presumably targeting machine knitters. (And the big advantage of yarn on cones is of course the fact that you won't run out of yarn during your project.)

Mietze inspecting 

As this poor, grey cone was looking a little lonely, I decided to buy it at a bargain price together with two others, one in heather and another in a light creamy brown. The lovely people at the shop must have been glad to see them go and included a pair of knitting needles at the till. 

Here I was with my yarn bargains. I took them home, where they were subjected to the usual "scratch and sniff " inspection by a member of the feline quality control squad. 

Grey Cone and Friends