Showing posts with label Free Patterns;. Show all posts

Sunday, 26 May 2024

Free Knitting Pattern: Retro 1970s Tea Towel / Dishcloth


1970s Retro Knit Teatowel Dishcloth Free Knitting Patterern and vintage Arcopal Scania cups and coffee jug


Brighten up your dishwashing chores and inject some groove into your kitchen with this 1970s-inspired three-colour retro tea towel. 

This is an ideal project for getting started with colourwork knitting and those wishing to get more practice in managing several balls of yarn in a quick and simple project. The colour motif of the pattern is achieved by slipping stitches and the texture is created by simply knitting and purling.

Knitted in a colour scheme that is synonymous with the '70s (green, brown and orange), doing the dishes will never be dull again. Promise. 


1970s Retro Tea Towel Free Knitting Pattern and true vintage Arcopal mug


The measurements of the finished piece depend on the number of pattern repeats worked, giving you the freedom to create a tea towel or a smaller dishcloth-size finished piece. 

If you stick to the colour  pattern in the instructions, you will produce a tea towel measuring app. 31cm (length) by 28cm (width) unblocked. (I didn't actually bother to block my finished tea towel, because, guess what..., it's a tea towel and will be put to work as such.) 


1970s Retro Tea Towel (and some vintage Arcopal Scania cups and coffee jug)
1970s Retro Tea Towel (and true vintage Arcopal Scania cups and coffee jug)


For the tea towel in the images I used Drops Paris dishcloth cotton yarn in Parrot Green (Shade Code 72), Brown (Shade Code 44) and Orange (Shade Code 13). The recommended needle size for this yarn is 5mm (US size 8), but I decided to knit on 4mm needles (US size 6) to create a denser fabric. 

The pattern is, of course, suitable for all aran weight dishcloth cotton yarns and, for all those not keen on the '70s vibes, other colour combinations are available. 


1970s Retro Tea Towel and vintage Arcopal Scania cups and coffee jug


Sneak Peek of the New Pattern: 1970s Retro Knit Tea Towel / Dishcloth


!!! Update: The pattern is now live and available on the blog via this link. !!!

My pattern for a 1970s inspired retro dishcloth / tea towel is about to go live. Whilst I am putting the finishing touches to the upcoming pattern post, here is a little sneak peek of the initial test knit. 

As a lover of bold '70s colour combinations and having recently gotten more interested in colourwork knitting, this project combines colourwork practice with the visual stimulus of vintage 70s vibes.

Sunday, 10 April 2022

Free Knitting Pattern: Cascade Lace Choker (One-Piece I-Cord Version)

Fee Choker  Knitting Pattern Knit Pattern

- These are the pattern instructions for the one-piece i-cord version of the Cascade Choker. The pattern for the Cascade Choker with attached / grafted i-cords is available here. -  

I recently finished another Cascade Choker and rather than attaching i-cords to the choker after knitting the body of the choker, I decided to knit the i-cords directly at the beginning and at the end of the project to achieve a more organic look. 

This lace choker can be completed in a day or two, including the time it requires to block the finished piece (blocking is absolutely essential to open up the lace). 

The choker requires approximately 5g of Scheepjes Maxi Sugar Rush mercerised cotton yarn and is worked on 2mm - 2.5mm double-pointed needles (dpns). Though it is possible to knit the choker on wood or bamboo needles, I recommend the use of pointy, metallic dpns, especially if you are opting for the use of mercerised cotton yarn with this pattern. This will make the knitting experience much more enjoyable. 

Fee Choker Knit Pattern Knitting Pattern

The length of the choker can be adjusted easily for different neck circumferences and I recommend you check the fit whilst knitting. Altogether, you should ensure that the body of the choker covers around 80% - 85% of the neck. 

The choker is secured with the help of two i-cords, which each measure approximately 20cm in length. These will be tied to a bow. Beads can be attached to the ends of the i-cords for a more sophisticated finish.

The completed piece should be wet-blocked (to open the lace detail) and left to dry over night. 

If you decide to substitute the mercerised cotton with another type of yarn, the number of lace repeats will differ. As you can check the fit whilst knitting, this should not be a major issue, making this project ideally suited to using up all types of yarn leftovers.

Free Choker Knit Pattern


Thursday, 19 August 2021

Free Knitting Pattern: Irish Moss Diamond Dishcloth


free diamond motif dishcloth knitting pattern


Free Knitting Pattern: Irish Moss Diamond Dishcloth


I was looking for a small knitting project to use up less than half a skein of Stylecraft Kon-Tiki cotton yarn. On this occasion, I finally decided to pursue the dishcloth option. 

I have never knitted a dishcloth before, thinking that knitted dishcloths are somewhat of a waste of precious yarn, but as this particular skein, which has previously been utilised for many weekly knit swatches, looked already pretty tired and dishevelled from frequent use, the yarn finally needed to be turned into a permanent project. 

free diamond motif dishcloth knitting pattern


Framed by a garter stitch border to keep the fabric flat, the Irish Moss Diamond motifs are worked against a background of stockinette stitch. The diamond stitch motif is created through the variation of knit and purl stitches, making this pattern suitable for knitters of all skill levels.

Sunday, 25 April 2021

Free Lace Choker Knitting Pattern: The Jera Rune Lace and Cable Choker

Free Lace Choker Knitting Pattern - Jera Rune Choker


After an initial test knit and following some minor adjustments to the design, here is, as promised, my new knitting pattern for the Jera Lace and Cable Choker.  

The Jera Choker - A Rune-Inspired Choker Design

As mentioned in a previous post, which is featuring an earlier version of this design, the pattern  for this choker was inspired by the Jera rune, the twelfth rune from the Elder Futhark. 

Jera in its literal translation means ' (good) year' or 'harvest'. 

The Jera rune is a symbol for connection and perpetual movement, representing the seasons and the natural cycle of recurring change at a steady pace and regular intervals. 


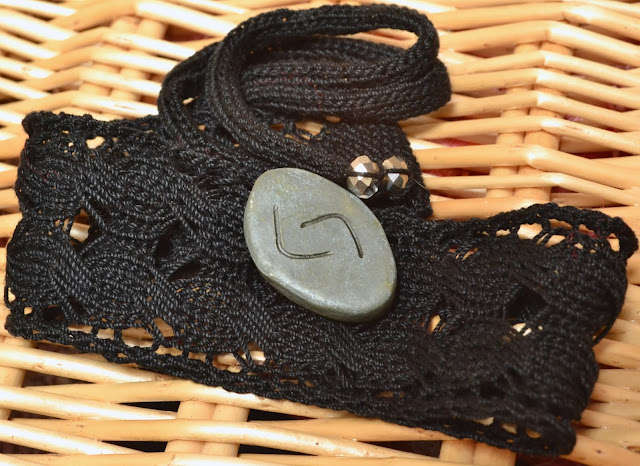
Jera Rune Inspired Knitting Pattern Free Lace Choker Knitting Pattern - Free Lace Choker Knitting Pattern

With the vernal equinox now behind us, the release of this design celebrates this seasonal flow -  the passing of long, dark nights and short, gloomy days and it welcomes the arrival of spring as we are approaching summer solstice. 


Jera Rune Inspired Knitting Pattern Free Lace Choker Knitting Pattern - Free Lace Choker Knitting Pattern
Jera Rune Inspired Lace Choker Knitting Pattern 


Just like my earlier lace choker knitting patterns (the Nameless, the Brocade Choker, the Cascade Choker, and the Virga Choker) the Jera Choker is a quick and beginner-friendly knitting project, incorporating elements of both lace and cable knitting techniques in a quick-to-knit project. The choker can be completed in a day or two, including the time it requires to block the finished piece. It's also ideal for using up tiny amounts of yarn. (For my choker I used approximately 6g to 7g of Scheepjes Maxi Sugar Rush mercerised cotton yarn.)


Jera Rune Inspired Lace Choker Knitting Pattern


The choker's simple elongated cable motif is created over 6 rows, consisting of knit and purl stitches, a variety of standard in-and decreases and by creating elongated stitches, which are subsequently worked as cable stitches. 

The choker is worked on 2mm - 2.5mm double-pointed needles (dpns). I knitted my choker on 2.5mm dpns. It is, of course, absolutely possible to substitute with different yarns, including sock yarn and to adjust the needle size accordingly.

Though it is possible to knit the choker on wood or bamboo needles, I recommend the use of pointy, metallic dpns, especially if you are opting for the use of mercerised cotton yarn with this pattern. This will make the knitting experience much more enjoyable. 


Jera Rune Inspired Lace Choker Knitting Pattern
Jera Rune Lace and Cable Choker Knitting Pattern 


The length of the choker can be adjusted easily for different neck circumferences and I recommend you check the fit whilst knitting. Altogether, you should ensure that the body of the choker covers around 80% - 85% of the neck before the piece is blocked. 

The piece is secured with the help of two i-cords, which each measure approximately 20cm to 25cm in length. These will be tied to a bow to secure the choker. Beads can be attached to the ends of the i-cords for a more sophisticated finish.

Jera Rune Lace and Cable Choker Knitting Pattern - I-Cord Detail 


The completed piece should be wet-blocked (to open the lace detail) and left to dry over night. Blocking is absolutely essential for the choker to look its best and I have compiled some hints and tips on special choker blocking techniques. These can be found here. 

Depending on your chosen needle size and whether you decide to substitute the mercerised cotton with another type of yarn, the number of lace repeats might differ. As you can check the fit whilst knitting, this should not be a major issue, making this project ideally suited for using up various types of yarn leftovers.


Jera Rune Lace and Cable Choker Knitting Pattern
Jera Rune Lace and Cable Choker Knitting Pattern 


Jera Lace and Cable Choker

Free Knitting Pattern


Materials and Tools

  • app. 7g of Scheepjes Maxi Sugar Rush mercerised cotton yarn 
  • 2 mm or 2.5 mm double-pointed needles
  • cable needle
  • 1.5 mm crochet hook / fine darning needle (for sewing-in yarn ends and attaching beads)
  • 2 beads for securing the ends of the i-cords (optional)
  • Blocking utensils

Rune-Inspired Knitwear Design Jera Rune Lace and Cable Choker Knitting Pattern
Jera Rune Lace and Cable Choker Knitting Pattern 


Knitting Instructions


Cast-On and First I-Cord 
  • Cast-on 6 stitches
  • Knit an i-cord that measures approximately 25cm. 

Increase to Body of Choker:

Row 1 (wrong side)Sl 1 (knitwise), p4, k1. (6 stitches)

Row 2 (right side): Sl1 (knitwise), kfb, k to last two stitches, kfb, k1.(8 stitches) 

Row 3
Sl1 (knitwise), p to last stitch, k1.

Row 4: Sl1 (knitwise), kfb, k to last two stitches, kfb, k1. (10 stitches) 

Row 5: Sl1 (knitwise), p to last stitch, k1.

Row 6: Sl1 (knitwise), kfb, k to last two stitches, kfb, k1. (12 stitches) 

Row 7: Sl1 (knitwise), p to last stitch, k1.

Row 8: Sl1 (knitwise), kfb, k to last two stitches, kfb, k1. (14 stitches) 

Row 9: Sl1 (knitwise), p to last stitch, k1.

Row 10: Sl1 (knitwise), kfb, k to last two stitches, kfb, k1. (16 stitches) 

Row 11: Sl1 (knitwise), p to last stitch, k1.

Row 12: Sl1 (knitwise), kfb, k to last two stitches, kfb, k1. (18 stitches) 

Row 13: Sl1 (knitwise), p to last stitch, k1.


Body of Choker - Lace Pattern 

Row 1 (right side): Sl1 (knitwise), k2tog, yo, k to last 3 stitches, yo, ssk, k1.

Row 2 : Sl1 (knitwise), p to last stitch, k1.   

Row 3Sl1 (knitwise), k2tog, yo, k 1, *wrap yarn round the needle twice, k1, rep. from * to last 3 stitches, yo, ssk, k1.

Row 4: Sl1 (knitwise), p2, *slide next 6 stitches from left-hand needle to right-hand needle, dropping the extra loops created on previous row, return 3 stitches to left-hand needle, place the 3 remaining elongated stitches on the right-hand needle from the right hand needle onto a cable needle and hold at back of work, p3 elongated stitches from left-hand needle, p3 elongated stitches from cable needle, repeat from * to last three stitches, p2, k1.   

Row 5: Sl1 (knitwise), k2tog, yo, k to last 3 stitches, yo, ssk, k1.

Row 6: Sl1 (knitwise), p to last stitch, k1.

Row 7: Sl1 (knitwise), k2tog, yo, k to last 3 stitches, yo, ssk, k1.

Row 8: Sl1 (knitwise), p to last stitch, k1.

Repeat Rows 3 to 8 for pattern.

For a choker body measuring 27cm repeat the above lace sequence x times. Adjust the number of repeats according to your own requirements and check the fit whilst knitting. 

When the body of the choker has reached the desired length and after completion of the final lace cable pattern repeat, work 2 more rows in above pattern: 


Row 1 (right side): Sl1 (knitwise), k2tog, yo, k to last 3 stitches, yo, ssk, k1.

Row 2 : Sl1 (knitwise), p to last stitch, k1.  


Next, proceed to decrease the total stitch count before working the second i-cord.


Decrease to Second I-Cord

Row 1 : Sl1 (knitwise), k2tog, k to last 3 sts, ssk, k1. (16 stitches) 

Row 2: Sl1 (knitwise), p to last stitch, k1.   

Row 3 : Sl1 (knitwise), k2tog, k to last 3 sts, ssk, k1. (14 stitches) 

Row 4:  Sl1 (knitwise), p to last stitch, k1.   

Row 5:  Sl1 (knitwise), k2tog, k to last 3 sts, ssk, k1. (12 stitches) 

Row 6: Sl1 (knitwise), p to last stitch, k1.  

Row 7:  Sl1 (knitwise), k2tog, k to last 3 sts, ssk, k1. (10 stitches) 

Row 8: Sl1 (knitwise), p to last stitch, k1.  

Row 9:  Sl1 (knitwise), k2tog, k to last 3 sts, ssk, k1. (8 stitches) 

Row 10: Sl1 (knitwise), p to last stitch, k1.  

Row 11:  Sl1 (knitwise), k2tog, k to last 3 sts, ssk, k1. (6 stitches) 

Row 12: Sl1 (knitwise), p to last stitch, k1.  


When the total stitch count has reached 6 stitches, knit the second I-cord, equal in length to the initial I-cord, and bind off.

Attach beads to the ends of both i-cords. (optional)


Finishing:
  • Weave-in all yarn ends and block the piece to ensure the lace is fully opened up.  

Rune-Inspired Knitwear Design Jera Rune Lace and Cable Choker Knitting Pattern


Should you require pattern support, please feel free to contact me via RavelryTwitterFacebookInstagram, by e-mail or leave a comment below.


This pattern is for personal use only and may not be reproduced for commercial purposes without permission. Neither may you sell any items made from the directions in this pattern.

Should you wish to knit another of my chokers, the pattern for my Nameless Choker is available here, the pattern for the Brocade Lace Choker is available here, the pattern for the Cascade Lace Choker is available here and the pattern for the Virga Choker is available here and here (for the beaded version).

Nameless Choker:


Virga Coker and Virga Beaded Choker


Cascade Choker


© 2021 Clarice Asquith. All rights reserved. http://makedoandmendnovice.blogspot.com


Sunday, 4 October 2020

Virga Choker (beaded version) - Free Lace Choker Knitting Pattern

 - These are the pattern instructions for the beaded version of the Virga Choker, the pattern for the Virga Choker without beads is available here. - 

Free Lace Choker Knitting Pattern
Virga Lace Choker Free Knitting Pattern (beaded version) 

As an in-between project I finished another choker. I was inspired to design this choker when looking at in-progress project photos of my Virga shawl, an upcoming pattern for a semi-circular lace shawl, which will be published on the blog shortly. When I took the photos of the shawl, the dressmaker's dummy still had my Cascade choker wrapped around the neck and I got the idea to make a choker in the same lace motif as the Virga shawl. 

The result of this endeavour is my Virga Choker.

Monday, 28 September 2020

Virga Choker - Free Lace Choker Knitting Pattern

As an in-between project I finished another lace choker, the Virga Choker, and my free pattern is available below.

Knitted Lace Choker
Virga - Knitted Lace Choker

I was inspired to knit a choker in this lace pattern when looking at in-progress project photos of my Virga shawl (pictured below, more information here), an upcoming pattern for a semi-circular lace shawl, which will be published on the blog soon.

Virga Lace Shawl (in progress, before blocking) 

When I took the photos of the shawl, the dressmaker's dummy still had my Cascade choker wrapped around the neck and I got the idea to make a choker in the same lace pattern as the Virga shawl. 

The result of this endeavour is my Virga choker.

Saturday, 27 June 2020

Free Knitting Pattern: Cascade Lace Choker

I’m finally catching up with the pattern posting of my latest knitted lace choker, the Cascade Choker. Just like my earlier lace choker knitting patterns (the Nameless and the Brocade Choker), this is a quick and uncomplicated lace project, ideal for using up tiny amounts of yarn. The choker can be completed in a day or two, including the time it requires to block the finished piece. (And if you decide to knit this choker, blocking is not optional, but absolutely essential to open up the lace.) The simple lace motif is knitted over 6 rows, consisting of knit and purl stitches and a variety of standard in-and decreases. 


Cascade Lace Knit Choker Free Pattern
Cascade Lace Choker


For this project I used just 5g of Scheepjes Maxi Sugar Rush mercerised cotton yarn and 2mm double-pointed needles (dpns). Though it is possible to knit the choker on wood or bamboo needles, I recommend the use of pointy, metallic dpns, especially if you are opting for the use of mercerised cotton yarn with this pattern. This will make the knitting experience much more enjoyable. 

The length of the choker can be adjusted easily for different neck circumferences and I recommend you check the fit whilst knitting. Altogether, you should ensure that the body of the choker covers around 80% of the neck before the piece is blocked. The choker is secured with the help of two dainty i-cords, which each measure approximately 20cm in length. These will be tied to a bow. Beads can be attached to the ends of the i-cords for a more sophisticated finish. 

Cascade Lace Knit Choker Free Pattern
Cascade Lace Knit Choker

The completed piece should be wet-blocked (to open the lace detail) and left to dry over night. 

If you decide to substitute the mercerised cotton with another type of yarn, the number of lace repeats will obviously differ. As you can check the fit whilst knitting, this should not be a major issue, making this project ideally suited to using up all types of yarn leftovers.

!!Update!!

The pattern for the one-piece i-cord version of the Cascade Choker (picture below) is now available here.


Saturday, 25 April 2020

Free Knitting Pattern: Brocade Lace Choker

As promised, here is my latest free pattern for a knitted lace choker - a project ideally suited for beginner lace knitters looking for a sense of accomplishment in a quick and easy lace project, which can be completed in a day or two. 


Free Lace Choker Knitting Pattern
Brocade Choker - Free Knitting Pattern
The lace motif, which is knitted over eight rows, is simple, consisting mainly of a combination of standard in- and decreases across fifteen stitches. All wrong side rows are a combination of knit and purl stitches. 

Brocade Lace Choker Knitting Pattern - Lace Detail

For this project I used just 5g of Scheepjes Maxi Sugar Rush mercerised cotton yarn and 2mm double-pointed needles (dpns). Though it is possible to knit this project on wood or bamboo needles, I recommend the use of pointy, metallic dpns, especially if you are opting for the use of mercerised cotton yarn with this pattern. This will make the knitting experience much more enjoyable. 

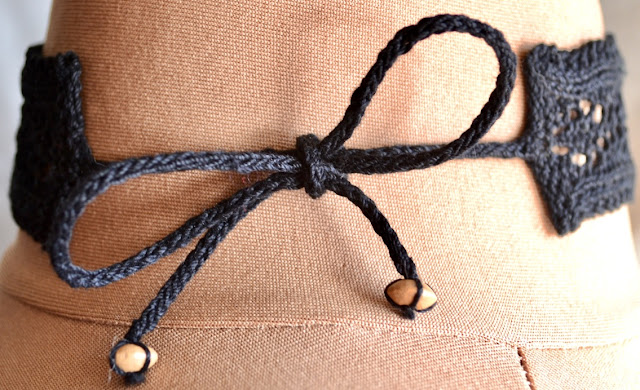
The size of the choker can be adjusted easily for different neck circumferences and I recommend you check the fit whilst knitting. Altogether, you should ensure that the body of the choker covers around 80% of the neck before the piece is blocked. The choker is secured with the help of two dainty i-cords, which each measure approximately 20 cm in length. These will be tied to a bow. Beads can be attached to the ends of the i-cords for a more sophisticated finish. 

Free Lace Choker Knitting Pattern
Brocade Lace Choker - I-Cord Detail

The completed piece should be wet-blocked (to open the lace detail) and left to dry over night.

If you decide to substitute the mercerised cotton with another type of yarn, the number of lace repeats will obviously differ. As you can check the fit whilst knitting, this should not be a major issue, making this project ideally suited to using up all types of yarn leftovers, especially sock yarn.


Free Choker Knitting Pattern
Brocade Choker 

Brocade Lace Choker

Free Knitting Pattern


Measurements


Before starting this project, measure your neck circumference. The lace body of your choker should cover around 80% of your neck and it will be secured with two i-cords, which should be long enough to tie a bow comfortably 


The knitting instructions for the Brocade choker below will produce a piece which measures 26.5 cm (body of the choker after blocking) and the i-cords each measure 20 cm in length. For a choker measuring 26.5 cm, you will work 16 repeats of the lace sequence for the body of the choker. One repeat measures approximately 2 cm. Adjust the number of lace repeats for a shorter or longer choker.


Free Choker Knitting Pattern
Brocade Choker Knitting Pattern

Materials and Tools


  • 5g of Scheepjes Maxi Sugar Rush mercerised cotton yarn 
  • 2 mm double-pointed needles
  • 1.5 mm crochet hook / fine darning needle (for sewing-in yarn ends and attaching bead)
  • contrast yarn (for provisional cast-on)
  • 2 beads for securing the ends of the i-cords (optional)
  • Blocking utensils


Free Choker Knitting Pattern
Brocade Choker Knitting Pattern 


Instructions

  • Cast-on 15 stitches, using the provisional cast-on for the three centre stitches (7,8,9) as shown in the photo below. The three live stitches are located, where the i-cord will be worked later.
Provisional Cast-On Choker
Provisional cast-on for i-cord
  • Knit 4 rows (garter stitch)
Start of lace pattern:
  • Row 1 (right side): k2, p2, k2tog, [k1, yo] twice, k1, sl1, k1 psso, p2, k2
  • Row 2 (wrong side): k4, p7, k4
  • Row 3: k2, p2, k2tog, yo, k3, yo, sl1, k1, psso, p2, k2
  • Row 4: k4, p7, k4
  • Row 5: k2, p2, k1, yo, sl1, k1, psso, k1, k2tog, yo, k1, p2, k2
  • Row 6: k4, p7, k4
  • Row 7: k2, p2, k2, yo, sl1, k2tog, psso, yo, k2, p2, k2
  • Row 8: k4, p7, k4
  • For a choker body measuring 26.5 cm repeat the above lace sequence 16 times. Adjust the number of repeats according to your own requirements.
  • Knit 3 rows in garter stitch, ensuring that the cast-off is started on the wrong side.
  • Bind off all stitches up to the three centre stitches, knit the centre three stitches (7, 8, 9) and cast-off the remaining stitches. 

I-cords: 
  • Start knitting a 20 cm i-cord with the three remaining live stitches, bind-off i-cord  and attach bead (optional). 
  • Pick-up the three centre stitches from the provisional cast-on edge, attach yarn and proceed to knit the  second i-cord. Ensure the i-cords are long enough to comfortably tie a bow.

Icord  Detail  - Knitted Lace Choker - Free Knitting Pattern
Brocade Choker - I-Cord Detail


Finishing:
  • Weave-in all yarn ends and block piece to ensure the lace is opened up.  


Should you require pattern support, please feel free to contact me via Ravelry, Twitter, Facebook, by e-mail or leave a comment below.

This pattern is for personal use only and may not be reproduced for commercial purposes without permission. Neither may you sell any items made from the directions in this pattern.

Should you wish to knit another choker (and, let's face it, one can never have enough chokers), the pattern for my Nameless Choker (pictured below) is available here and the pattern for the Cascade Choker (last image in this post) is available here.

Nameless Choker
Lace Choker Knitting
Cascade Lace Choker


© 2020 Clarice Asquith. All rights reserved. http://makedoandmendnovice.blogspot.com