Sunday 6 September 2015

Unravelling Old Projects: Musings on Reckless Beginner Knitting and Body Image

In the interest of frugality, I will be unravelling a project from the very early stages of my 'knitting career'. This was a time when knitting a gauge swatch was such a bore, adequate measuring (of myself and the swatch) appeared mysterious and incredibly complicated, blocking didn't exist and, due to a lack of familiarity with materials, I habitually chose the most unsuitable yarns for my projects. 

Hopelessly Oversized Asymmetrical Cardigan (completed circa 2010 / 2011)

I'm sure many other beginner knitters will be familiar with this cavalier attitude: You feel excited by the very fact that you mastered the basics of knitting and you just want to get on with it. Every project therefore turns into a test, attempting new techniques and more challenging pieces, rather than paying attention to the necessary groundwork, i.e. jumping through the hoops of all the preparatory steps before casting-on in earnest.  


I adopted this rather nonchalant attitude in two of my earliest projects: a jumper and an asymmetrical cardigan. And even though every seasoned knitter drew my attention to the importance of gauge, selecting suitable materials or the necessity of blocking, I chose to ignore all of this well-intentioned advice, knowing in the back of my mind that I was en route to Disappointment Central.


Friday 4 September 2015

Exploring Basic Shapes: The Knitted Star

An end to a thoroughly unproductive day, in which I merely managed to complete the pattern notes for a basic knitted star in preparation for another upcoming project, which - going by the speed it's taken to complete these notes - will take a little while yet. 

Without further ado, here are the instructions for a basic star, which is worked in the round on double-pointed needles. The star's outer edges are shaped with short rows. The size of the star can be modified by increasing or reducing the total number of stitches before working the spikes on the outer perimeter.

Knitted Star
Materials Required
  • 4 double-pointed needles (dpns)
  • Approximately 10 - 30 grams of yarn (matching the needle size of the dpns) 
  • Scissors 
  • Darning Needle

Set - Up
  • Cast-on 7 stitches in whichever method you are most comfortable with (using a dpn)
  • As if knitting an I - Cord, bring the yarn to the first cast-on stitch
  • K1, KFB, K3, KFB, K1 [ 9 stitches in total]
  • Divide these 9 stitches evenly on three dpns and join in the round
Knitted Star after completion of first increase row 

Body of Star

Row 1: K9 
Row 2: KFB into all stitches [18 stitches]
Row 3: K 18
Row 4: *KFB, K2; repeat from * to end [24 stitches]
Row 5: K24
Row 6 *KFB, K3; repeat from * to end [30 stitches]
Row 7: K30
Row 8*KFB, K4; repeat from * to end [36 stitches]
Row 9: K36
Row 10*KFB, K5; repeat from * to end [42 stitches]
Row 11: K42

Please note: For a larger or smaller star, you can continue to increase the stitch count (adding 6 stitches on every even row) or decide to start the shaping of the spikes before you reach 42 stitches. Instead of utilising KFB increases, it is also possible to increase the stitch count with 'yarn overs'. This will result in a lace star.


Knitted Star - Detail

Before you start shaping the points, you should ensure that each dpn holds an even number of stitches. Half of the stitches on every needle will be shaped into one of the six outer points.


Shaping of the Outer Points


Shaping the Outer Points

Row 1: K7, turn (do not wrap the stitch when turning!)
Row 2: P7
Row 3: Sl1, K1, PSSO, K3, K2Tog, turn
Row 4: P5
Row 6: Sl1, K1, PSSO, K1, K2Tog, turn
Row 7: P3
Row 8: Sl1, K1, K1
Row 9: P2tog
Row 10: Bind-off remaining, break yarn

Proceed to shape the remaining five outer points in the same fashion.

A star is born.


Knitted Star


For pattern support, please feel free to contact me via Ravelry (ClariceAsquith), Twitter (@Slipstitched), Instagram (@clarice.asquith) leave a comment below or by e-mail: clarice.asquith@googlemail.com.


For a link collection to all original designs on the blog, please visit this link.

This pattern is for personal use only and may not be reproduced for commercial purposes without permission.

© 2015 Clarice Asquith. All rights reserved. http://makedoandmendnovice.blogspot.com


Wednesday 2 September 2015

OMG it's huge: The Picot Pi is finally blocking

A long overdue update on the Picot Pi


It's finally blocking. And, as expected, it's huge.

Bed vs Picot Pi: 


Picot Pi Blocking


Detailed pattern notes will be up on the blog shortly. More information on the project is available here.


Picot Pi Lace Detail

Tuesday 1 September 2015

The Weekly Swatch: The Honeycomb Stitch


Honeycomb Knit Stitch


The Honeycomb Knit Stitch as featured above is an uncomplicated stitch motif (no purling, just knitting!), resulting in a dense, yet flexible, texture, which is ideal for a wide variety of wintery garments and accessories. These tend to be designed to retain heat, whilst remaining breathable; and the Honeycomb Stitch fulfils these design requirements perfectly. 


Honeycomb Knit Stitch Sample


Sunday 30 August 2015

Winter Stole Update: Test Knit Completed ✔

Back in January I released my pattern notes for the Winter Stole, a lace stole knitted with a chunky alpaca / wool blend on 6mm needles. More background on the rationale behind the design and my choice of yarn is available here; and the pattern is available here.


The Winter Stole pattern was developed to encourage knitters (and myself) to diversify the choice of materials when knitting lace. Depending, of course, on the complexity of the lace stitch sequence and the overall design, I was aiming to showcase that it is possible to produce knitted lace with chunkier yarns. 

Winter Stole (yarn: Wendy Zena, pattern available here.


Winter Stole (yarn: Wendy Zena, pattern available here.

Thanks to Tara (tara53aus on Ravelry) I am now pleased to announce that the pattern has undergone its first 'independent' test knit and Tara's completed stole is pictured below:


Tara's Completed Winter Stole 

Regular readers of this blog will know that I am always thankful for the feedback I receive from the knitters of my designs, especially from those, who put their trust in a pattern that has so far only been completed by the pattern's very own designer. This was the case with the Winter Stole pattern. 


This time round and following the feedback I received from Tara, I am particularly pleased to announce that my original Winter Stole pattern is free of mistakes, slips and no modifications are necessary.


Tara's Stole Blocking

I was also delighted to see that Tara not only used a natural, undyed alpaca yarn to complete her stole, she also chose a very special handspun yarn from an independent producer in Western Australia. 


Sadly, I was not able to retrieve more information on the producer over the web, but the ball band details can be seen in the picture below. So, if you are located in Western Australia, I suggest you get your hands on a delightful skein (or two) of Greg's and Wendy's handspun.


A remark on the pattern from my side: I have decided to update the pattern notes of the Winter Stole slightly with optional variations, to take those knitters into consideration, who are opting to use handspun yarn (Alpaca or otherwise) and may thus only have a finite amount of yarn to complete the project. The stole was designed to be rather wide and fewer cast-on stitches (resulting in fewer lace motif repeats in the body of the piece) will ensure that the piece will turn out long enough to be classed a 'stole'. These notes on modifications of the original pattern will be published shortly. In the meantime, the original Winter Stole pattern is available here.

Finally and once again, a very big 'THANK YOU!' to Tara for her feedback, for being the first to test the pattern and for choosing a delicious, independently produced, handspun yarn to complete her project. 

For any interested knitters, wishing to complete a Winter Stole and requiring pattern support, please feel free to contact me via Ravelry (ClariceAsquith), Twitter (@Slipstitched), leave a comment below or by e-mail: clarice.asquith@googlemail.com.


For a link collection to all original designs on the blog, please visit this link.

Thursday 27 August 2015

Knitting with Non-Traditional Materials: The Nameless Choker meets the Nameless Cuff

Roughly one year ago I released project notes for a simple knitted lace choker, the Nameless Choker. The pattern notes for the 'Nameless Choker' are available here. 

Specifically designed to use up the last remnants of sock yarn after the completion of a larger project, Nameless is an ideal project for a very small quantity of yarn (approximately 10 - 20 grams).


Nameless Choker, Knitting Pattern available here


One year on, I decided to explore the choice of material for this project in more detail. Whilst certain types of sock and cotton yarn (especially the sturdier varieties) work very well with the design, the pattern provides an ideal starting point for venturing into new territory, i.e. the cross-over point where knitting and jewellery-making techniques meet and blend into one another. 

For my revision of the pattern, I am planning to adapt the original design with the help of a number of non-traditional materials such as waxed cotton thong cord (1mm), leather cord (1mm) and, potentially, jewellery wires.

Having completed an initial experiment with waxed cotton cord (shown below), it is clear that certain design elements  of the original pattern (stitch count, lace repeats, needle size and quantities etc.) will obviously have to be revised and modified to take the properties of cotton thread into consideration, but I am quite happy with the initial outcome.

The first insight derived from yesterday's cotton cord knitting session is that 10 metres of waxed cotton thong are not sufficient to produce a fully fledged knitted choker on the basis of the original Nameless pattern, but they will be enough to make a knitted wrist cuff.   

Nameless Cuff (knitted with 1mm waxed cotton cord)


Nameless Cuff (knitted with 1mm waxed cotton cord)


Nameless Cuff (knitted with 1mm waxed cotton cord)

Nameless Cuff Prototype

Nameless Cuff - Prototype

Further updates and finalised project notes on the Nameless Cuff and the modified Nameless Choker will be up on the blog shortly. 

In the meantime, stay tuned... 


Sunday 23 August 2015

Cartridge Rib Stitch in the Round + Cat = Cat Leg Warmer


Cartridge Rib Stitch in the Round + Cat = Cat Leg Warmer

The blog seems to have received a number of search queries for instructions to the cartridge rib stitch motif knitted in the round. This is potentially the result of an earlier entry, in which I posted the stitch sequence for the basic cartridge rib stitch. This is available here.


Catridge Rib Stitch Sample in the Round

Saturday 22 August 2015

Cast-on loosely and don't knit tight - knitting lace with fingering weight mohair yarn

Wisp: Pattern by Cheryl Niamath (published in Knitty, Summer 2007), Yarn: Patons UK Misty


The Wisp Shawl pattern by Cheryl Niamath has somewhat turned into a classic lace knitting pattern and due to its simplicity it tends to attract many beginner lace knitters, who may never have used cobweb or fingering weight yarn in any of their projects before.

Though not my first lace project, I, too, opted for the pattern as I wanted to gain experience knitting lace with fingering weight yarn, whilst completing a relatively simple pattern. Niamath's Wisp fulfils these requirements and due to its straightforward stitch sequence, it allows you to concentrate on your manual ability and, above all, to get a feel for working with extremely fine yarn. 


Thursday 20 August 2015

The Weekly Swatch: The Simple Cable Stitch / Rope Stitch

Simple Cable / Rope Stitch (Sample knitted with Rowan Cocoon)

It occurred to me that I have so far seriously neglected knitted cables on this blog, and as I am currently swatching for new designs (another snood / cowl due for release later this autumn), this week's swatch will feature a simple cable stitch, which is also often referred to as 'Rope Stitch'. 


Simple Cable / Rope Stitch (Sample knitted with Stylecraft Signature Chunky)

Monday 27 July 2015

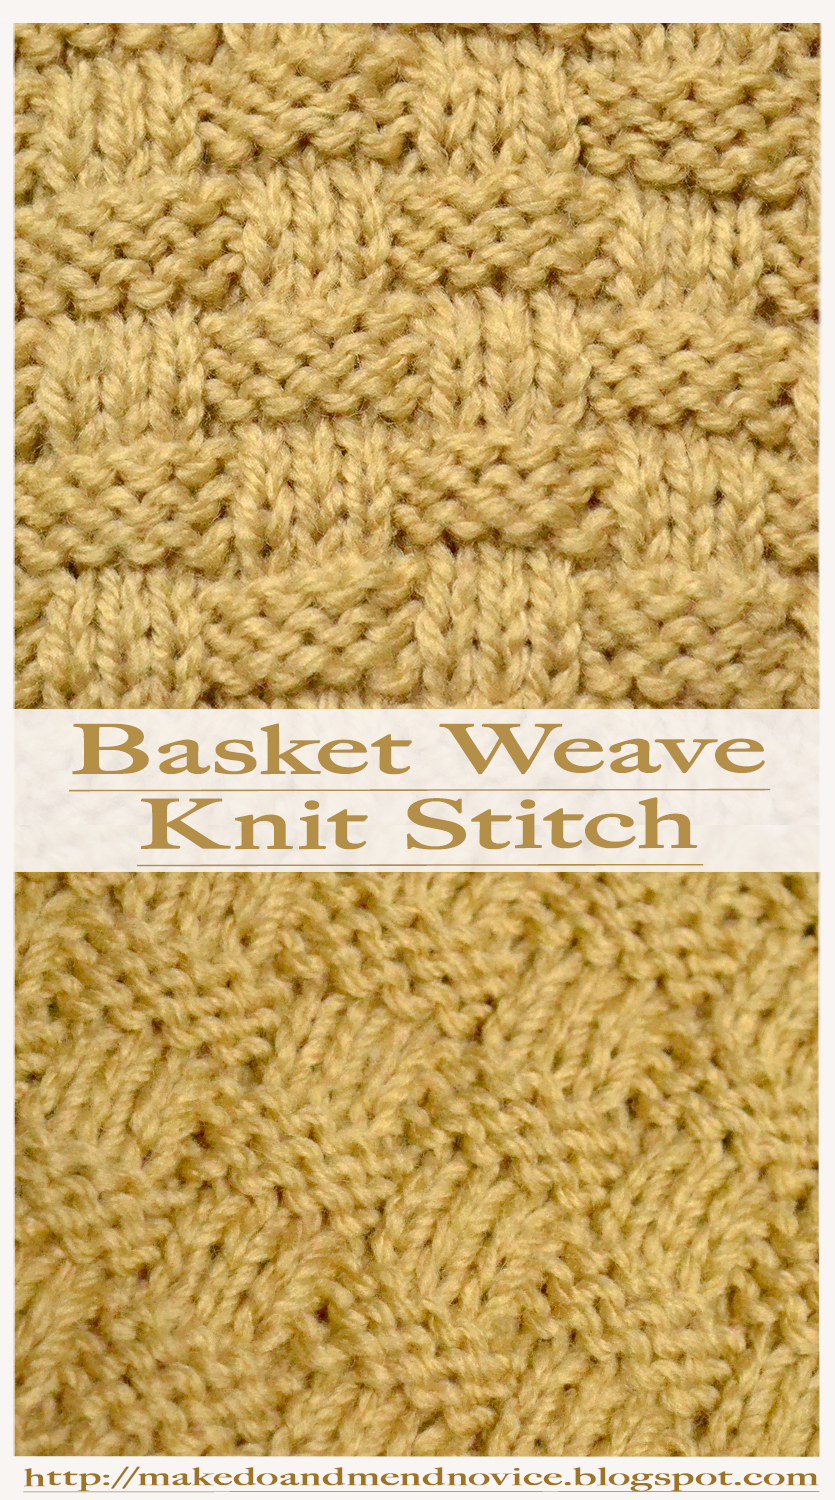
The Weekly Swatch: The Basket Weave Knit Stitch

Basket Weave Knit Stitch Pattern


The Basket Weave Stitch sequence is an uncomplicated stitch motif, imitating the texture of woven baskets as the name implies. Many stitch combinations, which will produce a similar texture, exist. To achieve the below sample a multiple of 10 plus 3 stitches are required. These are either knitted or purled. The Basket Weave Stitch is extremely beginner-friendly and an organic stitch motif for knitted bags, cases or pillow and cushion covers.


Sunday 26 July 2015

Going Full Circle: The Picot Pi Shawl is OFF THE NEEDLES


According to Elizabeth Zimmermann, we should be knitting circular shawls during the summer months, and that's exactly what I have done. Below is a first glimpse of my Pi Shawl variation, based on Zimmermann's timeless Pi Shawl pattern.


I haven't counted the picot bobbles of my Pi and keeping track of the exact stitch count in the final stages of my pattern is not essential, but I estimate that the Picot Pi's final bind-off row consisted of over three thousand stitches, when including the additional cast-on stitches. More on the Picot bind-off technique is available here

The completion of the knit was further delayed by having to find a more or less suitable yarn substitute for Regia (4 ply silk), as I was running out shortly after starting the last row. And although my knitting cupboard is home to many treasures, it may at times take a while to retrieve these. It appears somewhat crammed in there at the moment.


Pickle invading the cupboard and getting comfy...as usual

Friday 17 July 2015

Just for a change...A Few Shots of Cycling Paraphernalia


Charity bike ride training weekend, Friends of the Princess of Wales's Royal Regiment

It happened to be a sunny day in Kent and I had the pleasure of meeting the Tigers during their training weekend in Canterbury. They appear to be rather fond of their kit. 

To find out more, follow them on Twitter: #Tigersr2r /  and here.

Here are my impressions of the day: 

Saturday 4 July 2015

The Weekly Swatch: The Star Stitch


Star Lace Knit Stitch

The Star Stitch is a simple lace stitch. All of the in- and decreases are worked on the wrong side, i.e. the purl-side. The right side rows are knitted throughout. 

This stitch motif produces a meshy texture, making it an ideal stitch for summer garments and accessories. 

Star Stitch Swatch Sample with Araucania Botany Lace Sock Yarn

Saturday 27 June 2015

The Picot Bind-Off: It's a love-hate relationship

I'm in the process of finishing the Picot Pi and (as the name suggests) I'm binding off picot-style. At over one thousand stitches, this is a lengthy and repetitive process. But, the end result will be worth the wait.

Picot literally means 'small loop' and describes the bobbles at the cast-off edge, which are produced by adding more stitches immediately before binding off. Incorporating the picot bind-off will result in a very flexible, wider garment at the outer edge of the piece. In other words, it adds drape.

Picot Bind-Off Detail for Ammonite 

Sunday 14 June 2015

Design Digest: Revisiting the Ammonite Prototype

Following a few enquiries from the knittersphere regarding the prototype Ammonite in grey, which eventually evolved into the Ammonite pattern, I finally found the time to write up my recollections, which might help with the queries I recently received. 

Apologies for such a late response to all those who got in touch!

Ammonite Mark 2 Pattern instructions available here

Ammonite Mark 3, Project Notes are available here

Unfortunately, I didn't take any notes when knitting my freestyle Ammonite prototype. Below you will find some pointers, which might be useful, should you wish to achieve a different appearance from the final Ammonite pattern: 


Freestyle Ammonite