Showing posts with label Knitting Techniques. Show all posts

Saturday 22 August 2015

Cast-on loosely and don't knit tight - knitting lace with fingering weight mohair yarn

Wisp: Pattern by Cheryl Niamath (published in Knitty, Summer 2007), Yarn: Patons UK Misty


The Wisp Shawl pattern by Cheryl Niamath has somewhat turned into a classic lace knitting pattern and due to its simplicity it tends to attract many beginner lace knitters, who may never have used cobweb or fingering weight yarn in any of their projects before.

Though not my first lace project, I, too, opted for the pattern as I wanted to gain experience knitting lace with fingering weight yarn, whilst completing a relatively simple pattern. Niamath's Wisp fulfils these requirements and due to its straightforward stitch sequence, it allows you to concentrate on your manual ability and, above all, to get a feel for working with extremely fine yarn. 


Thursday 20 August 2015

The Weekly Swatch: The Simple Cable Stitch / Rope Stitch

Simple Cable / Rope Stitch (Sample knitted with Rowan Cocoon)

It occurred to me that I have so far seriously neglected knitted cables on this blog, and as I am currently swatching for new designs (another snood / cowl due for release later this autumn), this week's swatch will feature a simple cable stitch, which is also often referred to as 'Rope Stitch'. 


Simple Cable / Rope Stitch (Sample knitted with Stylecraft Signature Chunky)

Monday 27 July 2015

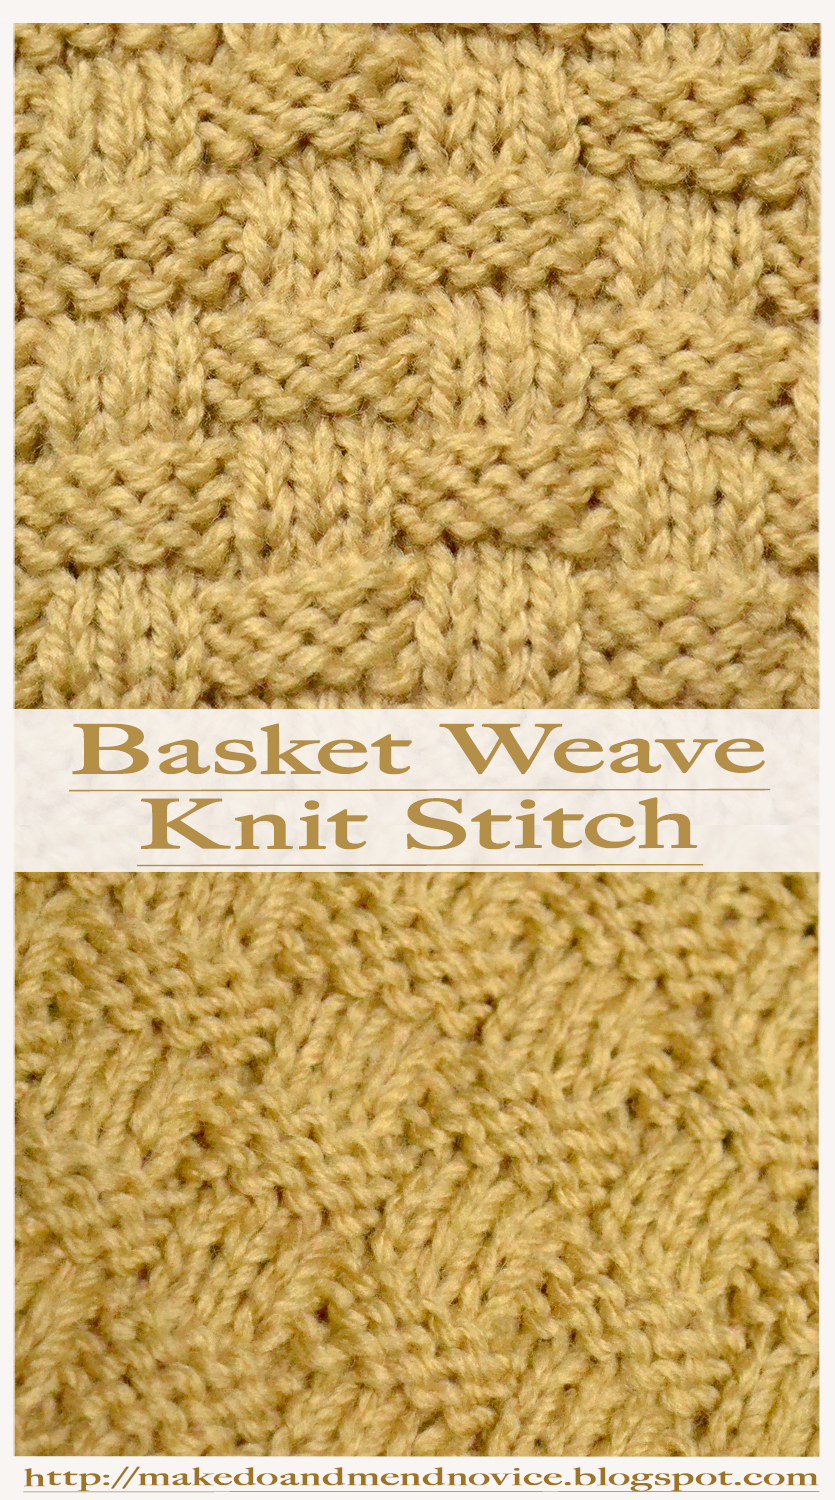
The Weekly Swatch: The Basket Weave Knit Stitch

Basket Weave Knit Stitch Pattern


The Basket Weave Stitch sequence is an uncomplicated stitch motif, imitating the texture of woven baskets as the name implies. Many stitch combinations, which will produce a similar texture, exist. To achieve the below sample a multiple of 10 plus 3 stitches are required. These are either knitted or purled. The Basket Weave Stitch is extremely beginner-friendly and an organic stitch motif for knitted bags, cases or pillow and cushion covers.


Sunday 26 July 2015

Going Full Circle: The Picot Pi Shawl is OFF THE NEEDLES


According to Elizabeth Zimmermann, we should be knitting circular shawls during the summer months, and that's exactly what I have done. Below is a first glimpse of my Pi Shawl variation, based on Zimmermann's timeless Pi Shawl pattern.


I haven't counted the picot bobbles of my Pi and keeping track of the exact stitch count in the final stages of my pattern is not essential, but I estimate that the Picot Pi's final bind-off row consisted of over three thousand stitches, when including the additional cast-on stitches. More on the Picot bind-off technique is available here

The completion of the knit was further delayed by having to find a more or less suitable yarn substitute for Regia (4 ply silk), as I was running out shortly after starting the last row. And although my knitting cupboard is home to many treasures, it may at times take a while to retrieve these. It appears somewhat crammed in there at the moment.


Pickle invading the cupboard and getting comfy...as usual

Saturday 4 July 2015

The Weekly Swatch: The Star Stitch


Star Lace Knit Stitch

The Star Stitch is a simple lace stitch. All of the in- and decreases are worked on the wrong side, i.e. the purl-side. The right side rows are knitted throughout. 

This stitch motif produces a meshy texture, making it an ideal stitch for summer garments and accessories. 

Star Stitch Swatch Sample with Araucania Botany Lace Sock Yarn

Saturday 27 June 2015

The Picot Bind-Off: It's a love-hate relationship

I'm in the process of finishing the Picot Pi and (as the name suggests) I'm binding off picot-style. At over one thousand stitches, this is a lengthy and repetitive process. But, the end result will be worth the wait.

Picot literally means 'small loop' and describes the bobbles at the cast-off edge, which are produced by adding more stitches immediately before binding off. Incorporating the picot bind-off will result in a very flexible, wider garment at the outer edge of the piece. In other words, it adds drape.

Picot Bind-Off Detail for Ammonite 

Sunday 14 June 2015

Design Digest: Revisiting the Ammonite Prototype

Following a few enquiries from the knittersphere regarding the prototype Ammonite in grey, which eventually evolved into the Ammonite pattern, I finally found the time to write up my recollections, which might help with the queries I recently received. 

Apologies for such a late response to all those who got in touch!

Ammonite Mark 2 Pattern instructions available here

Ammonite Mark 3, Project Notes are available here

Unfortunately, I didn't take any notes when knitting my freestyle Ammonite prototype. Below you will find some pointers, which might be useful, should you wish to achieve a different appearance from the final Ammonite pattern: 


Freestyle Ammonite


Sunday 7 June 2015

The Weekly Swatch: Fisherman's Rib Stitch


Fisherman's Rib is one my all-time favourite stitches. Primarily used for thick and stretchy garments, the motif can either be achieved by picking up yarn and wrapping it round the needle followed by decreasing; or by knitting into the stitch directly below the knit stitch and purling the following stitch. For the sample below, I used the latter method.


Fisherman's Rib Knit Stitch


Sunday 31 May 2015

The Weekly Swatch: Fern Stitch Variation

Many lace stitch motifs are referred to as 'Fern Stitches' and the below swatch sample showcases one  of the many variations of the Fern Stitch. 

Knitted with a cotton / acrylic yarn (Stylecraft Kontiki), the texture and look of the sample reminded me somewhat of Entrelac knitting. The stitch motif requires a  multiple of 8 plus 4 stitches.


Fern Stitch Swatch, Yarn: Stylecraft Kontiki

Tuesday 26 May 2015

The First Sock is the Hardest: Turning Those Heels...

Gently inserted into everyday conversation, the mere mention of sock knitting tends to provoke remarks about its apparent difficulty and a comment on the intricacy of heel turning will undoubtedly be thrown in here and there as well. Even non-knitters or those only loosely connected to the fibre sphere will appear to sound like experts on the topic of sock knitting and inevitably convey a sense of a awe when they utter that ominous phrase: 'turning a heel'. 


And all of a sudden it seems that everyone has heard about how immensely difficult it is to turn a heel. "Turning the heel', i.e. the part of the knitting when you shape the heel of the sock and work your piece on several needles whilst decreasing, seems to simultaneously instil feelings of awe, fear and amazement whenever it is mentioned, especially if non-knitters join the conversation. 
It sounds somewhat magical, surgical and therefore terribly advanced. 


Sock Knitting Heel Detail

Sunday 12 April 2015

From one opinionated knitter to another: Revisiting Elizabeth Zimmermann's Knitter's Almanac

Almost three years ago, I had Elizabeth Zimmermann's Knitter's Almanac on loan from my local library. Had I written my review of the book at the time, it would probably have sounded very different from my assessment today. Frau Zimmermann - at least as far her Almanac is concerned - is certainly not aiming her designs at beginner knitters; and I would have described myself as one at the time. Consequently, when I first laid hands on Zimmermann's Almanac, I didn't find it too appealing. The patterns appeared somewhat tired and outdated; and her occasional digressions into anecdotes, though intriguing, distracted from the instructions. When it was time to return my borrowed copy to the library, I did so without attempting to retain any of the instructions for future projects. It seemed as if the Almanac had nothing on offer for me. 


Elizabeth Zimmermann


Sunday 15 March 2015

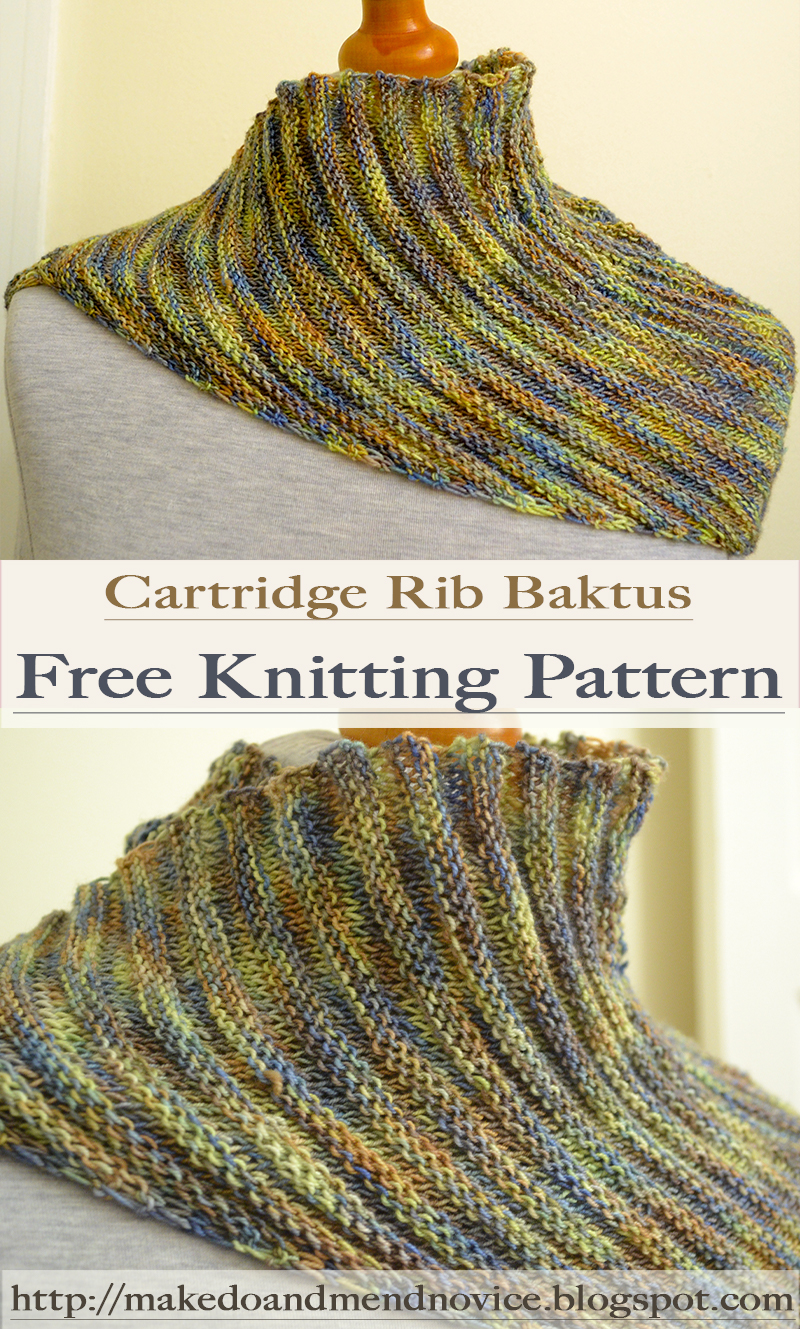
Cartridge Rib Stitch Baktus - Project Instructions

Free Baktus Knitting Pattern


As promised in my last post, here are the project instructions for the Cartridge Rib Stitch Baktus. 


Garter Stitch Baktus in Araucania Botany Lace 


This project was a modification of the ever popular Baktus pattern by Strikkelise, which is available here. Just like the original, the Catridge Rib Baktus is designed to use exactly one skein of sock yarn. The needle size is up to you and gauge is not important. Happy days!


Garter Stitch Baktus in Araucania Botany Lace 

Sunday 8 March 2015

Another Brain Cleanser - Baktus in Cartridge Rib


Almost one year ago, I was busy knitting my first baktus (a triangular scarf in garter stitch throughout). The pattern for the original baktus can be found here. I highly recommend it as a brain cleanser project. For those occasions when you wish to knit, but lack the desire for a serious challenge. For those occasions, it's an ideal base project. 

Due to its simplicity, the pattern inspires to play around. If you feel like trying new techniques (knitting with multiple colours, cabling, basic lace and so on), then the baktus should be on your list of 'go-to-patterns'.


Garter Stitch Baktus

Saturday 17 January 2015

Sunday 11 January 2015

Knitting Lace with Chunky Alpaca Yarn


Admittedly, to a sock yarn lover the above might not sound particularly intriguing. As a sock yarn connoisseur myself, I have to admit that the idea of knitting simple lace with a chunky alpaca / wool blend did not seem appealing. Nevertheless, in the interest of reducing the size of my yarn stash, I decided to embark on this adventure some time in late 2014. 


Winter Stole in Progress (Yarn: Wendy Zena)

Sunday 16 November 2014

New Free Pattern: The Commuter Cowl

Evening Rush Hour London Victoria

Another experiment in simple lace knitting. This project was conceived of and completed during the daily commute and that's how it came to its name, the Commuter Cowl. 

The cowl's lace pattern gives the impression of vertical ribbing, which is achieved by a simple lace sequence, ideal for beginner lace knitters.

The project is extremely portable and the pattern's lace rows are followed by simple knit rows, making this an ideal beginner project. The cowl is knitted entirely in the round.


Thursday 25 September 2014

Waldorf Knitting Patterns

An advertising leaflet for the local Steiner Kindergarten / School in Canterbury came through my letterbox a few weeks ago. Due to the lack of offspring of my own, the advertising was completely lost on this household, but it prompted me to think of the Steiner Curriculum, in which knitting still forms an integral part. It also reminded me of the traditional Waldorf dolls, which I vaguely remember from my childhood.

The examples below, even though some of the projects displayed are Waldorf-inspired rather than original Waldorf patterns, provide an idea of the kind of style I have in mind. Further details on these are available here. 

Waldorf and Waldorf - Inspired knitting projects on Pinterest. Available here.

Saturday 5 July 2014

Sunday 11 May 2014

The Freestyle Raglan Cardigan - Project Instructions

Surprisingly pleased with my first freestyle raglan cardigan, I decided to knit another, this time keeping a record of my project instructions.


Knitted seamlessly from the top down, this is a made to measure project without a written pattern as such. 

The number of cast - on stitches depends on your gauge swatch, your own measurements, the chosen needle size and the type of wool you are using. The pattern allows for modifications at every step of the way and what follows are my instructions for a cardigan in size S, knitted in stockinette stitch, with garter stitch edging at the bottom.

Should you wish to use another stitch motif, you simply have to knit the gauge swatch in the desired stitch and derive your measurements from your test swatch.


I used the following materials:

  • Yarn: Madelinetosh, Tosh Merino Light (Sock Yarn) - 1 hank

  • Needle: 5mm (US size 8) circular needle, 4 double - pointed needles (5mm / US size 8)

  • Scrap yarn, 4 stitch markers, scissors, darning needle 


Madelinetosh Tosh Merino Light Sock Yarn, Colourway: Victorian Gothic


Madelinetosh Tosh Merino Light Sock Yarn, Colourway: Victorian Gothic


Prepare your gauge swatch and block it in whichever way you see fit. Count the stitches and calculate the number of stitches against the measurement of the gauge swatch: In my gauge swatch, 26 stitches in stockinette stitch measured 10cm exactly. 


Gauge swatch in stockinette stitch.


Next, you will have to determine how many stitches are required for the neckline of your cardigan. You can either measure yourself or, as this is not always as straightforward, opt to measure the neckline of an existing garment. My neckline measurement was 51cm.

Once you have determined the neckline measurement, you calculate the number of stitches to be cast on proportionally:

The general calculation looks as follows:

(measurement of desired neckline x number of stitches in swatch sample) / measurement of swatch = number of required stitches 

For my cardigan, the calculation looks like this: 

(51cm x 26sts) / 10cm = 132.6sts


I rounded the stitch total to 135, in order to easily divide the stitches between the various sections.


Once you have determined the number of stitches required, you are ready to start knitting:


Cast on 135 stitches:

  • 1st row: knit all stitches
  • 2nd row: purl all stitches

(After completion of this row, I decided to incorporate a button hole at the beginning of the next row, but this is entirely optional.)

Next, divide stitches between markers for the front, back and the two sleeve sections: 

  • 45 for the back section, 46 in total for the front sections and 22 stitches for each sleeve section
  • 3rd row: knit 23, place marker, knit 22, place marker, knit 45, place marker, knit 22, place marker, knit 23
  • 4th row: purl, slipping markers as you complete the row

From the next row onwards, you start the Raglan increases. Until you are able to fit your arms comfortably through the sleeve sections, the number of stitches will have to be increased as set out below.

  • 5th row: knit to two stitches before 1st marker, kfb, knit, slip marker, kfb, knit to two stitches before next marker. Continue increasing the stitch count as set-out above until the row row is complete, increasing one stitch before and after each marker.
  • 6th row: purl all stitches slipping markers as you complete the row


Continue in stockinette stitch, increasing stitches before and after each marker on every knit row as shown above.

Continue knitting in stockinette stitch until your arms fit through the sleeves. (I increased the sleeve sections from 22 stitches to a total of 45 stitches between markers.) 

When the sleeves are wide enough and the fit is comfortable, proceed as follows:

  • Knit to 1st marker, remove marker, place all stitches between markers on scrap yarn. Remove second marker. Join first front section with back section, continue knitting to second sleeve section, remove first marker, place stitches between markers on scrap yarn, remove second marker, join back section with second front section. Proceed to knit until end of row. 


Proceed to knit in stockinette stitch, removing all markers until your cardigan has reached the desired length. (You will have to keep checking the fit of the cardigan whilst knitting.)

Once your cardigan has reached the desired length, knit 4 rows in plain garter stitch (to avoid rolled edges) and bind off.


Having completed the Torso, it's time to move on to the sleeves: 

As pictured above, the live sleeve stitches are held on scrap yarn. Divide these stitches evenly between 3 double - pointed needles and remove the scrap yarn. To give the sleeves a neater look and to avoid the appearance of "underarm holes", pick up a few stitches underneath the arms, where the front and back sections were originally joined. This will stabilise the sleeve and create an overall tidy appearance.

It is now up to you to decide, how long the sleeves should be. As I wanted to use one skein of sock yarn exactly, I settled for short sleeves, which only required me to knit three rows in the round until bind-off. 

Once you have completed the sleeves, your cardigan is ready to be blocked.

As this garment is knitted in one piece, blocking can be quite a challenge and I decided to pin it against my dressmaker's dummy, whilst steam - blocking the fabric.  


Should you require pattern support, please feel free to contact me via Ravelry or leave a comment below.

This pattern is for personal use only and may not be reproduced for commercial purposes without permission.


© 2012 Clarice Asquith. All rights reserved. http://makedoandmendnovice.blogspot.com