Showing posts with label Free Patterns; Original Designs. Show all posts

Thursday 12 December 2019

Knitted Leggings for Monster High Dolls - Preview of New Pattern


Monster High Knitted Leggings


New Free Monster High Knitting Pattern Preview

I have been busy knitting leggings for the Monster Highs dolls. The leggings are knitted seamlessly from the top down and the size can be adapted whilst knitting, ensuring a snug fit. I'm hoping to release the free pattern on the blog in the next few days. 

Until then, here is a little preview.

Saturday 27 July 2019

Free Pattern - Picot Dress for Monster High Doll


As promised a little while ago, I have been busy designing another Monster High doll dress pattern. Originally, I just wanted to have a go at designing a jumper. I ended up knitting a few pieces before arriving at the final pattern and whilst working on the design, I got the idea to extend the jumper and made it into a dress, featuring a Picot border instead. Adding the Picot bind-off is optional and my pattern also gives you the option to knit a 2x2 ribbed yoke or work the yoke in plain stockinette stitch. 
For this project, I was playing around with different yarn options. The photographs show the dress knitted with both fingering weight mohair (Yeoman's Elsa, modelled by both Frankie and Madeline), 2ply dk weight (also Yeoman's) as well as 4ply sock yarn (Knitglobal). All of these yarn types are suitable without making any alterations to the pattern as such, but will give the finished dress a very different look and feel. 

Ever After High Doll Dress Free Pattern
Ever After High Cocktail Dress with Picot Border and Stockinette Yoke (Yarn Yeoman's 2 ply DK Weight)

The dress is designed for Monster High dolls approximately 25cm tall, but the design is also suitable for Ever After High Dolls, as is evidenced by Madeline. Please note the photos of the grey dress below show the dress unblocked. As soon as it's finished blocking, I will post an update with photos of the blocked dress and more in-depth information on my finishing techniques, including options for fastening the dress at the back.

Free Monster High Doll Dress Knitting Pattern
Monster High Cocktail Dress with Picot Border and Stockinette Yoke (Yarn Yeoman's 2 ply DK Weight)

Free Monster High Doll Dress Pattern
Monster High Cocktail Dress with Picot Border (Yarn Yeoman's 2 ply DK Weight)


Pattern Notes

Materials and Tools

  • app 5 - 10g of: 4 ply Sock Yarn or 3 ply Mohair Fingering Weight or 2 ply DK Weight Yarn 
  • 2 - 3mm Double-Pointed Needles 
  • Scissors
  • Safety Pin x2 
  • Darning Needle or Sewing Needle (for sewing in ends) 
  • For fastening the back of the dress: Button(s) / Hook and Eye Clap or Contrast Yarn

Saturday 20 July 2019

Another Monster High Doll Clothes Pattern

Work has commenced on another Monster High doll clothes pattern. This time, it's a simple jumper, which can be easily modified into a mini or maxi dress. 

Whilst my Monster High I-cord dress pattern is worked from the bottom up, this pattern is initially worked flat, before it's finished seamlessly in the round from the waist down. 


Monster High Doll Clothes Pattern
Monster High - Knitted Jumper Dress

When refining the design, I was playing around with yarns and needle sizes and ended up favouring the fine mohair blends (Patons UK Misty, Yeoman's Elsa) to give the piece a fluffier look.

Sunday 30 June 2019

Free Monster High I-Cord Dress Knitting Pattern

After a long period of absence, I'm finally back attending to my many craft projects and I thought it would be a good idea to make a start with the release of my long overdue Monster High doll dress pattern. 


Free Monster High Doll Dress Pattern (Yarn: Araucania Botany Lace, 4 ply sock yarn)

The mini pencil dress, which will fit a Monster High doll measuring approximately 25cm, required less than 5 grams of yarn. For the pink Monster High dress I used Araucania Botany Lace, which is a 4 ply fingering weight sock yarn. For the other dress, I utilised leftover scraps of 4 ply Knitglobal sock yarn (shade: plum). Any sock yarn with similar attributes will be suitable for this pattern. 


Free Monster High Doll Dress Pattern (Yarn: Knitglobal 4 ply Sock Yarn)
Free Monster High Doll Dress Pattern (Yarn: Knitglobal 4 ply Sock Yarn) 

Monday 2 April 2018

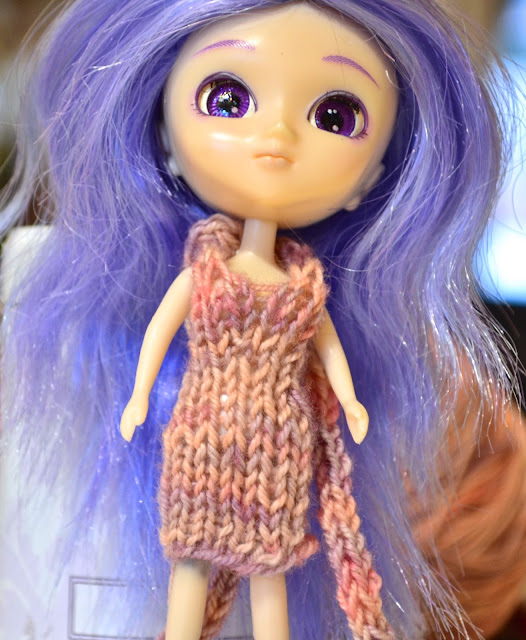
Knitted Pencil Mini - Dress for Petite Blythe or Little Pullip - Free Knitting Pattern


As promised months ago, here is my pattern for a miniature knitted pencil dress, designed for both Petite Blythe dolls, Dollcena Dolls and Little Pullips. 


Little Pullip Doll in custom Hand-Knit Pencil Dress 

The pink mini pencil dress, worn by the Little Pullip doll above required less than 2 grams of yarn. I used Araucania Botany lace, which is a 4 ply fingering weight sock yarn, but any sock yarn with similar attributes will be suitable for this pattern. The construction of the dress allows you to easily adjust the design when fitting the dress on your doll whilst knitting. 

Knitted seamlessly in the round from the bottom up, the pencil dress is secured at the back of the doll's neck with the help of two i-cords. The simple design can be customised by adjusting both the length of the dress itself and the length of the i-cords. In two prototypes of the design (worn by a Takara Tomy Dollcena below) I turned the mini into a maxi dress, but overall I prefer the shorter version.

Takara Tomy Dollcena Doll in Knitted Pencil Maxi Dress 

Sunday 25 March 2018

Simple DIY Monster High Outfit - made from scraps

The Great Scarrier Reef edition of Clawdeen (Monster High)

The Great Scarrier Reef edition of Clawdeen moved in three months ago and I completely ignored her pleas for an outfit change. I'm pleased to report that I finally rectified this dire state of affairs and - after a brief outing into the world of hand sewing - here we have her in a prototype of a new stripy outfit, which was made from the sleeve of a an old top and the salvaged components of a retired bra. 


Clawdeen Wolf (Monster High) in custom stripy outfit

As a result of the fins on her hips and arms, and her mermaid-style stand, the scarrier reef version of Clawdeen poses certain challenges when it comes to creating clothes for her. 

The  design of this two-part (three-part, if you care to include her small scarf) outfit tries to work around these obstacles (arm fins, hip-fins and and tail-stand) rather than altering the doll.

Custom DIY Outfit for Monster High Great Scarrier Reef Clawdeen 

As I didn't have a suitable piece of velcro to hand, I resorted to cannibalising an old bra to salvage the metal fasteners and the elastic bands. The fabric scrap used for her sirrong-style skirt and drapey top is rather stretchy and wraps tightly around the elastics when sewing up the fasteners. The elastic top seams help adding drape to skirt and top, and ensure a good fit around hips (below the fin fasteners) and torso. 

Clawdeen should be much happier now, whilst I'm off improving the design. 

Clawdeen Wolf Monster High in Custom Outfit

Friday 15 December 2017

Knitting for Dollcena Takara Tomy Dolls


After knitting a pencil dress with sock yarn for this Takara Dollcena doll, I decided to make another in black (also with sock yarn). Project instructions will follow. Soon. I hope.

Here's the prototype.

Pencil Dress for Takara Tomy Dollcena Doll, hand-knit with Araucania Botany Lace 


And here's a preview of the little black pencil dress: 

Dollcena Takara Tomy doll in hand-knit pencil dress

Dollcena Takara Tomy doll in hand-knit pencil dress

Dollcena Takara Tomy Doll in Handknit Pencil Dress (Sock Yarn) - Beaded I-cord Halter 

Dollcena Takara Tomy Doll in Handknit Pencil Dress (Sock Yarn) - Beaded I-cord Halter


Thursday 5 October 2017

Knitting for Dollcena Dolls

... can be tedious. It's not so much the knitting, rather the finishing, which can be extremely time-consuming. 

But this Dollcena urgently needed a comfy outfit. 


Takara Tomy Doruchena / Dollcena Doll (Lilo) - handknit dressing gown


Takara Tomy, Doruchena / Dollcena Doll (Lilo) - handknitted gown

I am currently working on pattern notes for a hand-knit tiny pencil dress for this Dollcena. Progress pictures are below, more is available here.

Handknit Pencil Dress (sock yarn) for Takara Tomy Dollcena - I-cord halter detail


Friday 4 September 2015

Exploring Basic Shapes: The Knitted Star

An end to a thoroughly unproductive day, in which I merely managed to complete the pattern notes for a basic knitted star in preparation for another upcoming project, which - going by the speed it's taken to complete these notes - will take a little while yet. 

Without further ado, here are the instructions for a basic star, which is worked in the round on double-pointed needles. The star's outer edges are shaped with short rows. The size of the star can be modified by increasing or reducing the total number of stitches before working the spikes on the outer perimeter.

Knitted Star
Materials Required
  • 4 double-pointed needles (dpns)
  • Approximately 10 - 30 grams of yarn (matching the needle size of the dpns) 
  • Scissors 
  • Darning Needle

Set - Up
  • Cast-on 7 stitches in whichever method you are most comfortable with (using a dpn)
  • As if knitting an I - Cord, bring the yarn to the first cast-on stitch
  • K1, KFB, K3, KFB, K1 [ 9 stitches in total]
  • Divide these 9 stitches evenly on three dpns and join in the round
Knitted Star after completion of first increase row 

Body of Star

Row 1: K9 
Row 2: KFB into all stitches [18 stitches]
Row 3: K 18
Row 4: *KFB, K2; repeat from * to end [24 stitches]
Row 5: K24
Row 6 *KFB, K3; repeat from * to end [30 stitches]
Row 7: K30
Row 8*KFB, K4; repeat from * to end [36 stitches]
Row 9: K36
Row 10*KFB, K5; repeat from * to end [42 stitches]
Row 11: K42

Please note: For a larger or smaller star, you can continue to increase the stitch count (adding 6 stitches on every even row) or decide to start the shaping of the spikes before you reach 42 stitches. Instead of utilising KFB increases, it is also possible to increase the stitch count with 'yarn overs'. This will result in a lace star.


Knitted Star - Detail

Before you start shaping the points, you should ensure that each dpn holds an even number of stitches. Half of the stitches on every needle will be shaped into one of the six outer points.


Shaping of the Outer Points


Shaping the Outer Points

Row 1: K7, turn (do not wrap the stitch when turning!)
Row 2: P7
Row 3: Sl1, K1, PSSO, K3, K2Tog, turn
Row 4: P5
Row 6: Sl1, K1, PSSO, K1, K2Tog, turn
Row 7: P3
Row 8: Sl1, K1, K1
Row 9: P2tog
Row 10: Bind-off remaining, break yarn

Proceed to shape the remaining five outer points in the same fashion.

A star is born.


Knitted Star


For pattern support, please feel free to contact me via Ravelry (ClariceAsquith), Twitter (@Slipstitched), Instagram (@clarice.asquith) leave a comment below or by e-mail: clarice.asquith@googlemail.com.


For a link collection to all original designs on the blog, please visit this link.

This pattern is for personal use only and may not be reproduced for commercial purposes without permission.

© 2015 Clarice Asquith. All rights reserved. http://makedoandmendnovice.blogspot.com


Wednesday 2 September 2015

OMG it's huge: The Picot Pi is finally blocking

A long overdue update on the Picot Pi


It's finally blocking. And, as expected, it's huge.

Bed vs Picot Pi: 


Picot Pi Blocking


Detailed pattern notes will be up on the blog shortly. More information on the project is available here.


Picot Pi Lace Detail

Sunday 30 August 2015

Winter Stole Update: Test Knit Completed ✔

Back in January I released my pattern notes for the Winter Stole, a lace stole knitted with a chunky alpaca / wool blend on 6mm needles. More background on the rationale behind the design and my choice of yarn is available here; and the pattern is available here.


The Winter Stole pattern was developed to encourage knitters (and myself) to diversify the choice of materials when knitting lace. Depending, of course, on the complexity of the lace stitch sequence and the overall design, I was aiming to showcase that it is possible to produce knitted lace with chunkier yarns. 

Winter Stole (yarn: Wendy Zena, pattern available here.


Winter Stole (yarn: Wendy Zena, pattern available here.

Thanks to Tara (tara53aus on Ravelry) I am now pleased to announce that the pattern has undergone its first 'independent' test knit and Tara's completed stole is pictured below:


Tara's Completed Winter Stole 

Regular readers of this blog will know that I am always thankful for the feedback I receive from the knitters of my designs, especially from those, who put their trust in a pattern that has so far only been completed by the pattern's very own designer. This was the case with the Winter Stole pattern. 


This time round and following the feedback I received from Tara, I am particularly pleased to announce that my original Winter Stole pattern is free of mistakes, slips and no modifications are necessary.


Tara's Stole Blocking

I was also delighted to see that Tara not only used a natural, undyed alpaca yarn to complete her stole, she also chose a very special handspun yarn from an independent producer in Western Australia. 


Sadly, I was not able to retrieve more information on the producer over the web, but the ball band details can be seen in the picture below. So, if you are located in Western Australia, I suggest you get your hands on a delightful skein (or two) of Greg's and Wendy's handspun.


A remark on the pattern from my side: I have decided to update the pattern notes of the Winter Stole slightly with optional variations, to take those knitters into consideration, who are opting to use handspun yarn (Alpaca or otherwise) and may thus only have a finite amount of yarn to complete the project. The stole was designed to be rather wide and fewer cast-on stitches (resulting in fewer lace motif repeats in the body of the piece) will ensure that the piece will turn out long enough to be classed a 'stole'. These notes on modifications of the original pattern will be published shortly. In the meantime, the original Winter Stole pattern is available here.

Finally and once again, a very big 'THANK YOU!' to Tara for her feedback, for being the first to test the pattern and for choosing a delicious, independently produced, handspun yarn to complete her project. 

For any interested knitters, wishing to complete a Winter Stole and requiring pattern support, please feel free to contact me via Ravelry (ClariceAsquith), Twitter (@Slipstitched), leave a comment below or by e-mail: clarice.asquith@googlemail.com.


For a link collection to all original designs on the blog, please visit this link.

Thursday 27 August 2015

Knitting with Non-Traditional Materials: The Nameless Choker meets the Nameless Cuff

Roughly one year ago I released project notes for a simple knitted lace choker, the Nameless Choker. The pattern notes for the 'Nameless Choker' are available here. 

Specifically designed to use up the last remnants of sock yarn after the completion of a larger project, Nameless is an ideal project for a very small quantity of yarn (approximately 10 - 20 grams).


Nameless Choker, Knitting Pattern available here


One year on, I decided to explore the choice of material for this project in more detail. Whilst certain types of sock and cotton yarn (especially the sturdier varieties) work very well with the design, the pattern provides an ideal starting point for venturing into new territory, i.e. the cross-over point where knitting and jewellery-making techniques meet and blend into one another. 

For my revision of the pattern, I am planning to adapt the original design with the help of a number of non-traditional materials such as waxed cotton thong cord (1mm), leather cord (1mm) and, potentially, jewellery wires.

Having completed an initial experiment with waxed cotton cord (shown below), it is clear that certain design elements  of the original pattern (stitch count, lace repeats, needle size and quantities etc.) will obviously have to be revised and modified to take the properties of cotton thread into consideration, but I am quite happy with the initial outcome.

The first insight derived from yesterday's cotton cord knitting session is that 10 metres of waxed cotton thong are not sufficient to produce a fully fledged knitted choker on the basis of the original Nameless pattern, but they will be enough to make a knitted wrist cuff.   

Nameless Cuff (knitted with 1mm waxed cotton cord)


Nameless Cuff (knitted with 1mm waxed cotton cord)


Nameless Cuff (knitted with 1mm waxed cotton cord)

Nameless Cuff Prototype

Nameless Cuff - Prototype

Further updates and finalised project notes on the Nameless Cuff and the modified Nameless Choker will be up on the blog shortly. 

In the meantime, stay tuned... 


Sunday 26 July 2015

Going Full Circle: The Picot Pi Shawl is OFF THE NEEDLES


According to Elizabeth Zimmermann, we should be knitting circular shawls during the summer months, and that's exactly what I have done. Below is a first glimpse of my Pi Shawl variation, based on Zimmermann's timeless Pi Shawl pattern.


I haven't counted the picot bobbles of my Pi and keeping track of the exact stitch count in the final stages of my pattern is not essential, but I estimate that the Picot Pi's final bind-off row consisted of over three thousand stitches, when including the additional cast-on stitches. More on the Picot bind-off technique is available here

The completion of the knit was further delayed by having to find a more or less suitable yarn substitute for Regia (4 ply silk), as I was running out shortly after starting the last row. And although my knitting cupboard is home to many treasures, it may at times take a while to retrieve these. It appears somewhat crammed in there at the moment.


Pickle invading the cupboard and getting comfy...as usual

Sunday 8 March 2015

Another Brain Cleanser - Baktus in Cartridge Rib


Almost one year ago, I was busy knitting my first baktus (a triangular scarf in garter stitch throughout). The pattern for the original baktus can be found here. I highly recommend it as a brain cleanser project. For those occasions when you wish to knit, but lack the desire for a serious challenge. For those occasions, it's an ideal base project. 

Due to its simplicity, the pattern inspires to play around. If you feel like trying new techniques (knitting with multiple colours, cabling, basic lace and so on), then the baktus should be on your list of 'go-to-patterns'.


Garter Stitch Baktus

Saturday 17 January 2015

Sunday 11 January 2015

Knitting Lace with Chunky Alpaca Yarn


Admittedly, to a sock yarn lover the above might not sound particularly intriguing. As a sock yarn connoisseur myself, I have to admit that the idea of knitting simple lace with a chunky alpaca / wool blend did not seem appealing. Nevertheless, in the interest of reducing the size of my yarn stash, I decided to embark on this adventure some time in late 2014. 


Winter Stole in Progress (Yarn: Wendy Zena)

Sunday 16 November 2014

New Free Pattern: The Commuter Cowl

Evening Rush Hour London Victoria

Another experiment in simple lace knitting. This project was conceived of and completed during the daily commute and that's how it came to its name, the Commuter Cowl. 

The cowl's lace pattern gives the impression of vertical ribbing, which is achieved by a simple lace sequence, ideal for beginner lace knitters.

The project is extremely portable and the pattern's lace rows are followed by simple knit rows, making this an ideal beginner project. The cowl is knitted entirely in the round.


Saturday 15 November 2014

Update on that "Bag of Weed"

My so-called "sabbatical" ended unexpectedly at the onset of October. This accounts for the silence on the blog, which I'm about to interrupt with a post on blocking.

Blocking again! I don't seem to be able to get away from the topic of blocking.

Commuter Cowl blocking, draped around dressmaker's dummy