Sunday 3 November 2019

The Weekly Swatch: Pucker Cable Knit Stitch

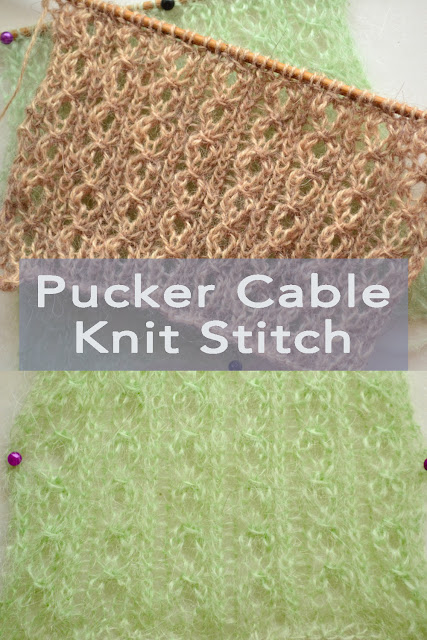
This week I have prepared swatches showcasing the Pucker Cable Stitch. Despite its name, to knit the pattern you will not require a cable needle. The delicate texture is achieved through simple in- and decreases, the remainder of the stitches are either knitted or purled. 

This uncomplicated stitch works well with all types of yarns, even fuzzier, fingering-weight Mohair blends, as can be seen in the pictures below. 


Pucker Cable Stitch
Pucker Cable Stitch

Sunday 20 October 2019

The Weekly Swatch: Diamond Trellis and Garter Triangle Stitch

The Diamond Trellis and Garter Triangle Stitch

For this week's stitch, I have been knitting up two swatches, one for the Diamond Trellis stitch and for one of its (many!) variations, featuring a garter stitch effect in the upper part of the diamond motif.  

Both require a multiple of ten plus three stitches and repeats are worked over sixteen rows.  

As can be seen from the images below, this lace stitch is best suited to yarns with a good stitch definition. For my samples I have chosen Rowan Bamboo Soft and Stylecraft Kon-Tiki, both on 4mm needles. 


The Diamond Trellis and Garter Triangle Stitch

The Weekly Swatch: Waterfall Lace Knit Stitch Pattern

The Waterfall Lace Knit Stitch

For this week's stitch, I have been knitting up two swatches in the so-called Waterfall lace pattern.

This stitch motif requires a multiple of six plus three stitches and repeats are worked over six rows. 

An uncomplicated stitch, which you will be able to remember after a few pattern repeats, this pattern creates vertical columns and the positioning of the yo-increases results in the effect of cascading water. This stitch is ideal for throws, blankets and scarfs. 

As can be seen from the images below, this lace stitch is suitable for yarns of all types of  weight. For my samples I have chosen Rowan Kid Classic and Wendy Zena, an Alpaca  / Acrylic blend.

Waterfall Lace Knit Stitch Pattern

Monday 7 October 2019

The Weekly Swatch: Gate and Ladder Knit Stitch Pattern

The Gate and Ladder Knit Stitch

For this week's lace knit stitch, I have chosen the Gate and Ladder Stitch. 

This stitch motif is achieved over two rows (excluding the set-up row) and results in a fabric, which combines solid knit columns and openwork ladders, where the yarn over increases are worked. 

As can be seen from the images below, this lace stitch is ideal for yarns of a heavier weight. 

For my samples I have chosen Rowan Bamboo Soft and Stylecraft Merino, both on 4cm knitting needles.

Gate and Ladder Knit Stitch

Saturday 5 October 2019

OOAK Custom Doll Wigs - Tips on how to make acrylic yarn wigs for Monster High and other dolls

Doll wigs made from brushed acrylic yarn


Yes, it is possible, very straightforward and fun to make doll wigs from brushed acrylic yarn. 

Not only is this an effective stashbuster project, if you wish to use up left-overs and odd bits of acrylic yarn, but - as I explained in a previous post on doll customisation - I believe, this is an excellent project for those wishing to get started with doll customisation.


OOAK Custom Monster High Doll Wig in Progress (made with brushed acrylic yarn)
OOAK Custom Monster High Doll Wig in Progress (made with brushed acrylic yarn) 

Since last posting on custom doll wigs, I have completed another Monster High doll wig and what follows below are a few hints and tips for those wishing to make their own doll wigs with brushed acrylic yarn. 

Without further ado, let's start talking OOAK (one of a kind) custom doll yarn wigs.

OOAK Custom Monster High Doll Wig in Progress (made with brushed acrylic yarn)
OOAK Custom Monster High Doll Wig in Progress (made with brushed acrylic yarn) 


Monster High OOAK Custom Acrylic Yarn Wig
Monster High OOAK Custom Acrylic Yarn Wig 


Acrylic Yarn Wig - How to

  • Removing the doll's factory hair

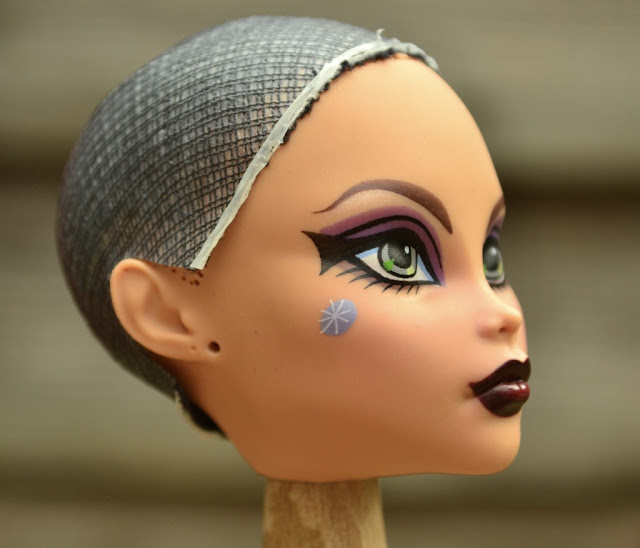
Removing the hair from and cleaning the doll's head is by far one of the most time-consuming steps in the process. I managed to 'be-head' and 'de-hair' my Monster High with the help of warm water and a pair of tweezers, which I used to remove the glue from the inside of her scalp. 

This process involves a lot of scraping against the inside of the doll's scalp and should be done with a great deal of patience. Other doll models may behave differently, and I would advise not to apply too much force, giving this process time. Once I had all the hair successfully pulled from the scalp of my Monster High, I proceeded to make a simple wig cap.
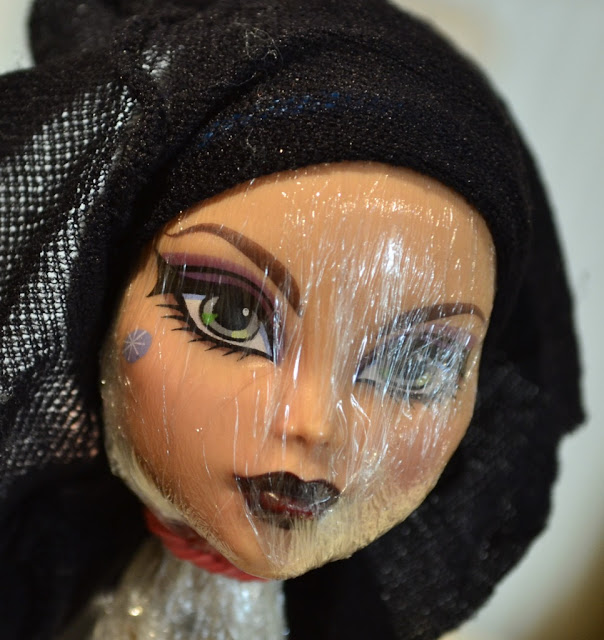

Monster High Doll Wig Cap

  • Making a wig cap

I have seen a number of ways, in which customisers make wig caps, utilising both silicon or hot glue guns. Yet, I decided to opt for the simplest route, requiring an old pair of tights, a rubber band and several (at least three) applications of PVA glue.

Before making the cap, ensure the doll's head is wrapped in a thin layer of cling film. Proceed to cover the head with the tights, pull them neatly over the doll's head and secure the fabric with a rubber band underneath the ears. The rubber band will serve as a guide when applying the glue to the head.

Monster High OOAK Custom Doll Wig Cap
Monster High OOAK Custom Doll Wig Cap 

I chose the most easily available, run of the mill PVA glue, which is stocked in my local Tesco's. Though there are superior brands available online, it did the job just about fine, even though its consistency is clearly more on the lumpy side. 

Next time, I will opt for another brand with a smoother liquid. Especially when it comes to preparing the yarn wefts, you will want to make use of a glue that is as smooth as possible when brushed onto the wefts. This one was just a bit too lumpy for my liking.


PVA Glue by County Stationery


I applied four coats of PVA glue to make the cap, letting the glue dry completely between applications. This resulted in a sturdy, yet flexible cap, fitting the doll's head like a glove. Waiting for four glue applications to dry may sound somewhat lengthy, but it's vital to ensure that the glue is dried completely before proceeding to cut the wig to size. When the wig is ready, you will need to cut away the excess fabric, using the rubber band as a guide. The rubber band itself will usually peel off or can be carefully removed by hand. You will also need to cut out the area where the doll's ears are located. I used the outline of the ears in the dried glue as a guide, but you may wish to trace the outline with a marker pen when the cap is still on the doll's head.

Monster High OOAK Custom Doll Wig Cap


Monster High OOAK Custom Doll Wig Cap

  • Making acrylic yarn wefts and reducing waste
A good-looking wig starts with well-made yarn wefts. To ensure the wefts are uniform in size, the yarn should be cut into equal strands, each between 19cm and 25cm long. Bulky acrylic works best. 

Before brushing out the yarn, I separated the individuals strands of the yarn. This makes the process of brushing a lot easier and, I feel, reduces waste. I secured an equal number of strands on a knitting needle and proceeded to brush these with a carder.
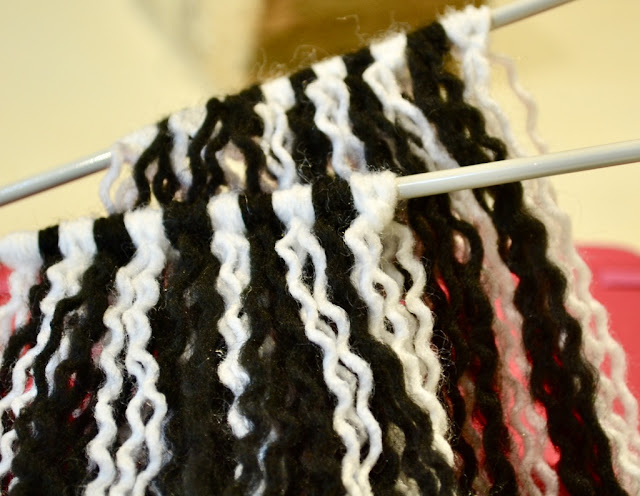


Acrylic Yarn cut for Yarn Wefts

When I made my first yarn wig I was overwhelmed by the amount of waste when brushing out the yarn. And at first I was reluctant to really apply the force necessary to brush out the yarn properly: Firstly, I was afraid that I would destroy all of the yarn and, secondly, I was horrified at the waste I was producing in the process. (The below photo shows the waste acrylic from just one weft.) 


Waste Acrylic Yarn when brushing out acrylic yarn

Unfortunately, the wastage cannot be helped. There will be a lot of waste. (More on that and how to utilise the waste acrylic for the wig below.) Yet, once you start brushing the yarn, you will not destroy the individual strands of yarn completely. At some point in the process, you will end up with a yarn weft that resembles the picture below.


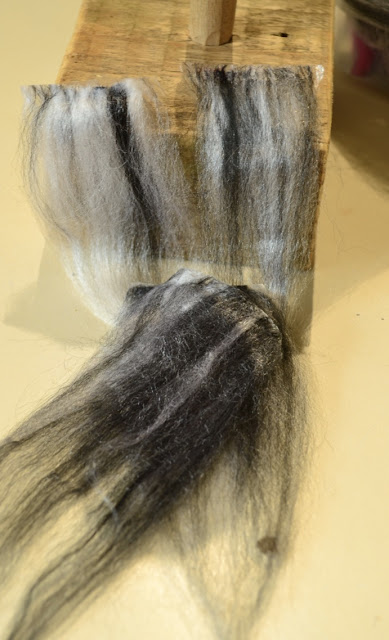
Acrylic yarn weft, brushed before straightening
Acrylic yarn weft, brushed before straightening 


  • Minimising waste when making acrylic yarn wefts
In order to minimise waste, I tried to make a weft out of the waste acrylic by simply brushing the yarn with the carder for a second time. I'm pleased to report that this method works and it is possible to make small wefts out of the waste acrylic. The 'waste wefts' are shown in the following two images both before and after heat treatment. 

These smaller, 'waste wefts' will look inferior when compared to the others, but can still be utilised in the  less visible bottom layers of the wig, providing added bulk.


Yarn wefts made from waste acrylic yarn (before straightening)
Yarn wefts made from waste acrylic yarn (before straightening) 


Yarn wefts made from waste acrylic fluff after straightening
Yarn wefts made from waste acrylic fluff after straightening (used for lower layers of wig)  

For an overall smooth appearance, the wefts should be heat treated with a hair straightener. Individual results will vary, depending on how much heat is applied and for how long, but I would recommend starting off with the lowest setting and regulating up.


Yarn Weft after straightening

  • Glueing the yarn wefts
When applying PVA glue to the wefts, I ensure that a small amount of glue equal to the length of the weft is applied to a plastic sheet (multi-punched pocket or other plastic surface). I place the weft into this area, pressing it firmly into the glue. I then proceed to deposit a very small amount of glue over the top ends of the wefts and carefully work the glue into the acrylic with a brush. 

In this step it's important to use just the right amount of glue. Too little and the weft will not be held together. Too much glue will result in the top of the weft being too stiff and too bulky, making it harder to fit it onto the wig cap. I let the glue dry overnight, ensuring that the wefts can be easily removed from the plastic.


  • Assembling the wig
The scariest part in the whole process is assembling the wig itself. The challenge here is to place the wefts in such a way that the glued ends are not visible. How you assemble the wefts on the cap largely depends on the look you want to achieve, but I would recommend starting off with the front of the head working your way round the entire wig once, placing smaller wefts (cut to size) around the ear area and then proceeding to work your way up from the back. 


Arranging the yarn wefts on the wig cap

When the wig is completed and all wefts have been glued, I keep styling to a minimum and ensure that the wig is left untouched for at least 12 hours, giving the glue a chance to dry. As PVA glue is water soluble, all contact with water should be avoided.


OOAK Monster High Custom Wig

Monster High OOAK Custom Doll Wig
Monster High OOAK Custom Doll Wig 


Monster High Doll Custom Acrylic Yarn Wig
Monster High Doll Custom Acrylic Yarn Wig 

Monster High Doll Custom Acrylic Yarn Wig
Monster High Doll Custom Acrylic Yarn Wig 

Sunday 29 September 2019

The Weekly Swatch: The Net Knit Stitch or Filet Net Knit Stitch

For this week's knit swatch I have prepared the Net Knit or Filet Net Knit Stitch. This is an uncomplicated openwork lace knit stitch, which is worked over two rows, creating a mesh fabric. 

When playing around with the swatch, I got the idea that this stitch might be suitable for a project incorporating beads and the below photo of the swatch with black yarn showcases the stitch worked with wooden beads, which were incorporated on the 2nd row. 


Net Knit Stitch or Filet Net Knit Stitch (Yarn: Stylecraft Kon-Tiki)
Net Knit Stitch or Filet Net Knit Stitch (Yarn: Stylecraft Kon-Tiki) 


Saturday 28 September 2019

Doll Customising: Easy Beginner Projects - Acrylic Yarn Wigs

Getting Into Doll Customising 

Regular readers of my blog will have noticed that I have been busy creating a number of custom outfits for Monster High and other dolls over the past months. I have to confess, by now my interest in doll customisation has become a bit of an obsession, judging by the time I spend marvelling at the many fantastic custom creations available on the web. 

Though I have been aware of the existence of custom or ooak (one of a kind) dolls for a number of years, especially since many Blythe doll collectors roaming the craft scene are very accomplished knitters and crocheters. Yet, I didn't feel confident enough to launch into my own custom projects for a long time. 

What's more, doll customising sounds like a bit of an obscure past time, especially for grown-ups. For this reason, I felt reluctant to admit to myself that I actually felt intrigued by it. So intrigued in fact, that I would want to give it a go myself.

Despite its growth over the past decade thanks to social media platforms such as Tumblr, Pinterest and Youtube, the community of doll customisers is still comparatively small and the number of  tutorials and readily available information on techniques, tools and materials is consequently rather limited, especially when compared to mainstream crafts such as sewing, knitting, or crocheting. Due to their familiarity with materials and tools in use by doll customisers, all those familiar with model-making are likely to have an advantage when branching into the custom doll sphere. For a knitter like me, doll customisation is entirely new territory.

Monster High Acrylic Yarn Doll Wig

Saturday 17 August 2019

The Weekly Swatch: Trellis Lace Knit Stitch


Trellis Lace Knit Stitch

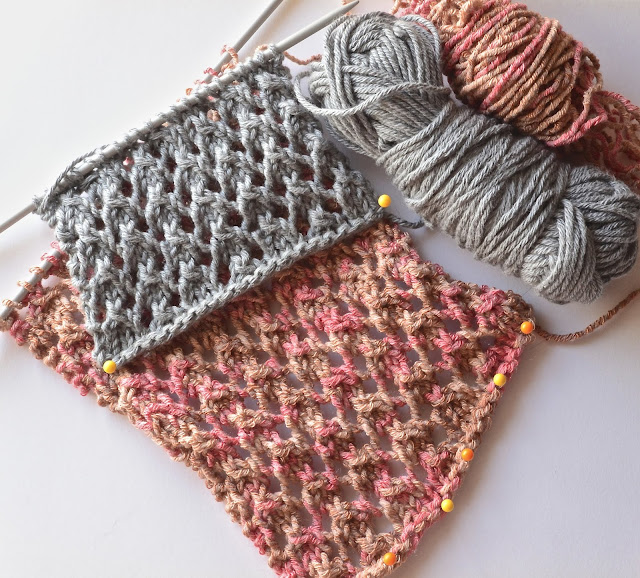
For this week's swatch I have chosen the Trellis Lace Knit Stitch, a simple stitch motif that results in an open mesh fabric, ideal for summer garments, scarfs and throws. There is nothing complicated about this stitch. The pattern is knitted over four rows, all even rows are purled throughout and the lace pattern can be memorised easily. 

The stitch motif is suitable for yarns of all weights and I chose to showcase my swatch sample utilising Stylecraft Kontiki (grey) and Patons UK Vintage (pink). 

Trellis Lace Knit Stitch (Yarns: Stylecraft Kontiki - grey and Patons UK Vintage - pink)

Saturday 10 August 2019

The Weekly Swatch: Another Zig Zag Lace Knit Stitch

Lace Knit Stitch


As mentioned in my last weekly swatch post, in which I was showcasing a 'zig zag lace stitch pattern', there are many variations of the so-called 'zig zag stitch' motif in lace knitting. That's why I have decided to knit up another zig zag swatch for this week's not-so-weekly, weekly swatch. 


Zig Zag Lace Knit Stitch Variation, Yarn: 4 ply Madelinetosh Tosh Merino Light


Here, we have another zig zag stitch motif. It requires a multiple of 9 stitches and is knitted over 16 rows. Stitches on all even rows are purled throughout, all in- and decreases are a combination of yos, k2togs and pssos.


Saturday 27 July 2019

Free Pattern - Picot Dress for Monster High Doll


As promised a little while ago, I have been busy designing another Monster High doll dress pattern. Originally, I just wanted to have a go at designing a jumper. I ended up knitting a few pieces before arriving at the final pattern and whilst working on the design, I got the idea to extend the jumper and made it into a dress, featuring a Picot border instead. Adding the Picot bind-off is optional and my pattern also gives you the option to knit a 2x2 ribbed yoke or work the yoke in plain stockinette stitch. 
For this project, I was playing around with different yarn options. The photographs show the dress knitted with both fingering weight mohair (Yeoman's Elsa, modelled by both Frankie and Madeline), 2ply dk weight (also Yeoman's) as well as 4ply sock yarn (Knitglobal). All of these yarn types are suitable without making any alterations to the pattern as such, but will give the finished dress a very different look and feel. 

Ever After High Doll Dress Free Pattern
Ever After High Cocktail Dress with Picot Border and Stockinette Yoke (Yarn Yeoman's 2 ply DK Weight)

The dress is designed for Monster High dolls approximately 25cm tall, but the design is also suitable for Ever After High Dolls, as is evidenced by Madeline. Please note the photos of the grey dress below show the dress unblocked. As soon as it's finished blocking, I will post an update with photos of the blocked dress and more in-depth information on my finishing techniques, including options for fastening the dress at the back.

Free Monster High Doll Dress Knitting Pattern
Monster High Cocktail Dress with Picot Border and Stockinette Yoke (Yarn Yeoman's 2 ply DK Weight)

Free Monster High Doll Dress Pattern
Monster High Cocktail Dress with Picot Border (Yarn Yeoman's 2 ply DK Weight)


Pattern Notes

Materials and Tools

  • app 5 - 10g of: 4 ply Sock Yarn or 3 ply Mohair Fingering Weight or 2 ply DK Weight Yarn 
  • 2 - 3mm Double-Pointed Needles 
  • Scissors
  • Safety Pin x2 
  • Darning Needle or Sewing Needle (for sewing in ends) 
  • For fastening the back of the dress: Button(s) / Hook and Eye Clap or Contrast Yarn

The Weekly Swatch: Lace Zig Zag Stitch Pattern

My blog post directory tells me that I published my last 'weekly' knitted swatch (the lace rib knit stitch) in September 2018. This is unacceptable and shows how busy life has been over the past year. 

After Pickle's passing at the onset of 2019, I finally seem to have regained my mojo for knitting, crafting and blogging somewhat. So, without further ado, here is my latest swatch project, showcasing a lace 'zig zag' pattern. 

There are many variations of 'zig zag' lace stitches out there. This one is extremely simple, utilising k2togs and pssos for the decreases and yos for the increases. 

After a few rows practising, you won't have any trouble memorising the pattern. The stitch is knitted with a stitch count of 6 plus 1 stitches over a multiple over 12 rows. All even rows are purled throughout. 


Free Zig Zag Lace Stitch Knitting Pattern
Zig Zag Lace Stitch Knitting Pattern


Tuesday 23 July 2019

Monster High Doll Picot Maxi Dress

My new Monster High Picot Maxi Dress (designed for a 25cm Monster High Doll), has finished blocking. 

Time for a little outing and a few initial shots. 


Monster High Knitted Doll Picot Maxi Dress (Yarn: Yeoman's Elsa)
Monster High Doll Picot Maxi Dress (Yarn: Yeoman's Elsa)

Saturday 20 July 2019

Another Monster High Doll Clothes Pattern

Work has commenced on another Monster High doll clothes pattern. This time, it's a simple jumper, which can be easily modified into a mini or maxi dress. 

Whilst my Monster High I-cord dress pattern is worked from the bottom up, this pattern is initially worked flat, before it's finished seamlessly in the round from the waist down. 


Monster High Doll Clothes Pattern
Monster High - Knitted Jumper Dress

When refining the design, I was playing around with yarns and needle sizes and ended up favouring the fine mohair blends (Patons UK Misty, Yeoman's Elsa) to give the piece a fluffier look.

Sunday 30 June 2019

Free Monster High I-Cord Dress Knitting Pattern

After a long period of absence, I'm finally back attending to my many craft projects and I thought it would be a good idea to make a start with the release of my long overdue Monster High doll dress pattern. 


Free Monster High Doll Dress Pattern (Yarn: Araucania Botany Lace, 4 ply sock yarn)

The mini pencil dress, which will fit a Monster High doll measuring approximately 25cm, required less than 5 grams of yarn. For the pink Monster High dress I used Araucania Botany Lace, which is a 4 ply fingering weight sock yarn. For the other dress, I utilised leftover scraps of 4 ply Knitglobal sock yarn (shade: plum). Any sock yarn with similar attributes will be suitable for this pattern. 


Free Monster High Doll Dress Pattern (Yarn: Knitglobal 4 ply Sock Yarn)
Free Monster High Doll Dress Pattern (Yarn: Knitglobal 4 ply Sock Yarn) 

Sunday 6 January 2019

Recquiescat in Pace


A Sad Farewell to Our Beloved Pickle


Some three weeks ago I was composing a blog post for an update on Pickle's health in my head. It would have been a cheerful post. At the onset of 2018 she was diagnosed with feline colorectal adenocarcinoma, a very aggressive, malignant cancer with the ability to rapidly progress. The average life expectancy following diagnosis lies between 8 weeks to 18 months. This January our beautiful Pickle was just about to turn a massive corner, completing her first year more or less without symptoms since the diagnosis. Things were looking good. 


Apart from minor skin issues, which didn't appear to bother her too greatly, she was doing fine with a good appetite and no litter tray disasters. Her coat had improved (not that it was too bad to begin with), her claws were in good condition and, especially during the final three months of her life, she appeared to be more active and playful. She was in a stable state and, as we were unable to determine the stage of the cancer at the time of diagnosis last year, she was not on any medication. 

She had her first follow-up examination in April 2018 and appeared to have recovered well from her dental surgery at the end of 2017, during which the cancerous polyp was removed from her anus. The polyp showed no sign of returning and her vet was not able to detect any obstructions when taking her temperature. Pickle would have been seeing her vet for her next check-up in early 2019 and we were keeping fingers and paws crossed for her. 


feline colorectal adenocarcinoma
RIP Pickle 2009 - 2019

Sadly, I never got round to writing my 12-month update on how well she was doing, as she started to rapidly decline around eight days ago. At this time  we noticed the first significant change in her behaviour. 

Instead of tucking into her dinner (a mix of home-cooked and raw food, which we introduced following her diagnosis) last Saturday, she walked away from her bowl after a few bites. Even though alarm bells started ringing loudly inside my head, I was only able to monitor and offer her a different variety of food, whilst hoping for the best throughout Sunday.